# Installation and Project Setup

## Installation

Find the package manager and type `install-package Perigee`. It's available on [NuGet](https://www.nuget.org/packages/perigee).

![](/files/cLpOkek8IVLx3XyhDiMI)

## License Installation

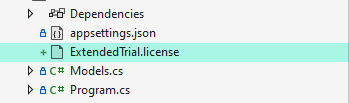
To install your <mark style="color:purple;">**.license**</mark> file, simply add it to the projects root folder and set it to "Copy Always".

Installation on a deployed application is exactly the same! Make sure the <mark style="color:purple;">**.license**</mark> is in the executable directory.

<figure><img src="/files/w82Hy3O0bs3ZhyNeon7Y" alt=""><figcaption></figcaption></figure>

{% hint style="success" %}

#### <mark style="color:red;">It's very important to set the "Copy to Output Directory" to "Copy Always" under the property inspector - otherwise the build can't see the file!</mark>

![](/files/HZejI0xHMZ5DxaJoyNOA)
{% endhint %}

## Basic Configuration

To actually use the logging, we need a basic <mark style="color:green;">**appsettings.json**</mark> file in the project.&#x20;

**A) Either drop the included sample configuration into the project**

{% file src="/files/WNyTDfLt8lN1s3xa6oyp" %}

&#x20;**B) OR - Create the file (**<mark style="color:green;">**appsettings.json**</mark>**) in the root of the project with the code below:** &#x20;

```json
{
  "ConnectionStrings": {
  
  },
  "AppSettings": {
  
  },
  "Perigee": { "HideConsole": false },
  "Serilog": {
    "MinimumLevel": "Debug",
    "WriteTo": [
      { "Name": "Console" }
    ]
  }
}
```

{% hint style="success" %}

#### <mark style="color:red;">It's very important to set the "Copy to Output Directory" to "Copy Always" under the property inspector - otherwise the build can't see the file!</mark>

![](/files/HZejI0xHMZ5DxaJoyNOA)
{% endhint %}

We will cover additional logging and configuration in [/HelloLogs](/getting-started/hello-logs) later!

## A quick word on "Using" Statements

Since we use Serilog, you may be inclined to use those namespaces at the top of your code. Typically speaking, we import the `Microsoft.Extensions.Logging` package instead. Since Serilog extends that generic functionality, we can do everything we need to with its inclusion. To get access to the logging functions, put this include at the top of the project:

```csharp
using Microsoft.Extensions.Logging;
using Perigee;
```

You can always click the :bulb:icon or press `ctrl+.` to find missing namespaces:

![](/files/6MLRIrrqpT8bqt6M84fr)

That's it! Perigee is installed and ready to go. Head to the next section, let's write our first "Hello Perigee!" application


# Hello Perigee!

## Resources

{% embed url="<https://www.youtube.com/watch?v=vCAROWxkKgM>" %}
Want to watch the intro to Perigee instead?
{% endembed %}

{% file src="/files/rKVj7W9clmAfXW1nHEim" %}
Completed Project Files
{% endfile %}

## Our first application

Go ahead and create a new .NET 5/6+ console application. Open up `Program.cs`, and head to the first step to get started!

{% hint style="warning" %}
If you haven't gone through the installation step, please do so first!
{% endhint %}

{% content-ref url="/pages/hdedFoHMHIxcQq94FsmK" %}
[Installation and Project Setup](/)
{% endcontent-ref %}

### Step 1) The application starting point

Let's start with the basics. First let's create a new application in `Program.cs`. Depending on the version of .NET you started with, you'll see two different things when you open `Program.cs`

### Net 6++

The <mark style="color:orange;">**.NET 6**</mark> ++ version looks like this:&#x20;

```csharp
// See https://aka.ms/new-console-template for more information
Console.WriteLine("Hello, World!");

//YOUR CODE HERE
```

If this is the case, delete <mark style="color:blue;">**Line 2**</mark> - `Console.WriteLine("Hello, World!");` and start there.

### Net  5 and lower

The <mark style="color:orange;">**.NET 5**</mark> and below versions looks like this:

```csharp
class Program
{

    static void Main(string[] args)
    {
        //YOUR CODE HERE
    }
}
```

If this is the case, start coding on <mark style="color:blue;">**Line 6**</mark>.&#x20;

### The application code

Now that we know where to start, here's a simple <mark style="color:blue;">**Perigee**</mark> application.

{% code lineNumbers="true" %}

```csharp
//A fully managed perigee application! 
PerigeeApplication.ApplicationNoInit("FirstApp", 
(taskConfig) => { 

});
```

{% endcode %}

Let's look what what we have here in the constructor:

* <mark style="color:blue;">**Line 2**</mark> - `"FirstApp"` -  The name of the application, this can be whatever you like!
* <mark style="color:blue;">**Line 3**</mark> - `taskConfig block` - This block is where we add any and all thread managed tasks.&#x20;

{% hint style="info" %}
Make sure you have everything included in your `using` statements by clicking the :bulb: icon or press `ctrl+.` to find missing namespaces

```csharp
using Microsoft.Extensions.Logging;
using Perigee;
```

{% endhint %}

### Step 2) Adding thread managed code

This wouldn't be a hello tutorial without writing "Hello, World!", so let's add a [CRON](/perigee-and-beyond/all-about-cron#what-about-a-cron) method to [log](/getting-started/hello-logs#logging-introduction) <mark style="color:red;">`Hello Perigee`</mark> every 15 seconds!

The `.AddCron` method adds a new thread to the system. Each thread is managed by Perigee and is independent of every other thread. This is an important aspect of [Perigee Application Design](/getting-started/perigee-application-design#anatomy-of-a-perigee-application) as it allows for individual thread management. Threads do not affect each other, and Perigee's internal thread management system has mechanisms in place to automatically restart downed threads.

```csharp
//A fully managed perigee application! 
using Microsoft.Extensions.Logging;
using Perigee;

PerigeeApplication.ApplicationNoInit("FirstApp", (taskConfig) => {

    taskConfig.AddCRON("HelloWorld", "*/15 * * * * *", (ct, log) => {
        log.LogInformation("Hello Perigee from {appName}", taskConfig.AppName);
    });

});
```

* <mark style="color:blue;">**Line 4**</mark> - We use fluent syntax to `.AddCRON()` - This method takes a `name`, `CRON string`, and a `callback(cancelToken, ILogger)`.&#x20;
* <mark style="color:blue;">**Line 5**</mark> - We use the built in logger passed to us to log information in a templated format, passing in the name of the application to the logger.

Running the application produces a log new line every 15 seconds!

<figure><img src="/files/6QpIAw4E143Sa3Ft1jBQ" alt=""><figcaption></figcaption></figure>

To close this application using graceful shutdown, press <mark style="color:orange;">**CTRL-C**</mark>, it will start the safe shutdown procedure allowing the application to properly stop all running tasks before just exiting out.

<figure><img src="/files/YDxxU4AmeINX3iQVoRGr" alt=""><figcaption></figcaption></figure>

## Hello Perigee - Extended

My oh my, we logged something! :thumbsup:Exciting right? Let's take our first demo application a step further and watch for [CSV](/core-modules/file-formats/csv#read) files, read them in, and report the row and data counts.

Simply replace `.AddCron()` with the [directory watcher](/core-modules/event-sources/watchers/directory-watch#demo-application) instead, full code below:

```csharp
PerigeeApplication.ApplicationNoInit("FirstApp", (taskConfig) => {

    taskConfig.AddDirectoryWatch("CSV", "C:\\Watch", "*.csv", SearchOption.TopDirectoryOnly, (ct, l, path) => {

        //Read the CSV
        var CSVData = CSVReader.ToDataTable(path, out var rRes);

        //Reprt on it
        l.LogInformation("Read CSV {file}[{encoding}]. Columns/Rows: {col}/{row}; Delimiter: {delChar}; Jagged? {jagged}",
            Path.GetFileName(path), rRes.FileEncoding.EncodingName, rRes.ColumnCount,
            CSVData.Rows.Count, rRes.FinalDelimiter, rRes.RowShifts.Count > 0 ? "YES" : "NO");

        //Remove it - OR let the failed folder policy kick in
        //File.Delete(path);

    }, policy: ThreadRegistry.DirectoryWatchFailurePolicy.MoveToFailedFolder);

});
```

Here's a `sample.csv`:

```csv
Name, Age, Email, Phone
John Doe, 30, john.doe@example.com, 123-456-7890
Jane Smith, 25, jane.smith@example.com, 987-654-3210
Bob Johnson, 40, bob.johnson@example.com, 555-555-5555
Mary Lee, 28, mary.lee@example.com, 111-222-3333
Hash Brown, 35, hash.brown@example.com, 444-444-4444
```

{% hint style="success" %}
Make sure you have everything included in your **`using`** statements by clicking the :bulb: icon or press `ctrl+.` to find missing namespaces

```csharp
using Microsoft.Extensions.Logging;
using Perigee;
using Perigee.FileFormats.CSV;
using System.Data;
```

{% endhint %}

Voila! You're now watching for CSV files, reading them in, and reporting on the number of rows and columns.&#x20;

For an intro to Perigee we accomplished quite a lot.&#x20;

* We learned about [threads](/getting-started/perigee-application-design#managed-threads) - how they're added and independent of each other.
* We learned about [logging](/getting-started/hello-logs) information to the available sinks.
* [CRON](/perigee-and-beyond/all-about-cron#what-about-a-cron) strings and how to use a CRON thread.
* How to configure Perigee.
* What "Graceful Shutdown" looks like.
* We even got to see the [CSV](/core-modules/file-formats/csv#read) reader in action.

Let's hop over to the next section and continue!


# Perigee Application Design

## Anatomy of a Perigee Application

Perigee Applications are created around two main concepts: <mark style="color:purple;">**Threads**</mark> and <mark style="color:purple;">**Events**</mark>.

<mark style="color:purple;">**Events**</mark> are the source for starting a process:

* An API call
* An email received
* A scheduled task at a specific date/time
* A file dropped on disk
* A new message from a queue
* A task recurring every minute

<mark style="color:purple;">**Events**</mark> live and execute their code within Managed Threads.

We use the [Perigee Application Callbacks](#perigee-application-callbacks) to tell our application what events we want to subscribe to, and Perigee automatically manages the relevant threads for you.

## Managed Threads

<mark style="color:purple;">**Threads**</mark> are managed independent code blocks, completely separate from other threads. This is a key part of the application design process, as one thread can be shut down without affecting another thread. One thread can crash without taking down the application or other running threads.

<mark style="color:purple;">**Threads**</mark> are managed by Perigee internally. This allows for the application to track its running state, restart them if they're down, and allows programmatic access to manage them.

<mark style="color:purple;">**Threads**</mark> provide a clear separation of running code that does not allow one running block to cancel or crash another. By designing applications that use this separation of logic, we can create highly customizable, scalable, and fault-tolerant applications where a fault in one process doesn't take down other processes.

<mark style="color:purple;">**Threads**</mark> are configured during the [Perigee Application Callbacks](#perigee-application-callbacks) phase. We have some options during this startup, and we aren't forced to start threads immediately. They may be configured to start later or from a different event.

### "Real World" example - PDF Document Processor

Imagine for a moment you have a directory watcher to read all the account PDFs from a folder and securely upload them to a third party for processing. Let's take a look at the power of managed threads and how they can help you and your business.

Inherently, you've got several points of failure and things to consider in this scenario:

* The drive the documents live on may fail
* The third party may be offline, or down
* We may need to perform maintenance on the server
* There may be an emergency call to stop processing documents

All of the above scenarios are easily handled within Perigee. Let's create a watcher to notify us of a new PDF on our drive.

```csharp
taskConfig.AddDirectoryWatch("DocumentProcessor", "C:\\PDFs", "*.pdf", SearchOption.TopDirectoryOnly, 
(ct, log, path) => {
    log.LogInformation("New file ready for process {file}", Path.GetFileName(path));
});
```

Much of the difficult code is handled within the `Directory Watcher`. As we progress through the "Hello" series, we will be covering all of the fault-tolerant design patterns to follow. Let's take a look at a few of the mentioned issues above:

#### Have an emergency call to stop processing?&#x20;

Maybe you need to take that processor down and perform maintenance. You can just shut down that thread, and leave the remainder of the application running and untouched!

```csharp
//Is it running?
taskConfig.IsRunning("DocumentProcessor");

//Ask it to stop
taskConfig.QueueStop("DocumentProcessor");
```

The way you implement this logic is up to you. Maybe you decide to expose an internal, authorized endpoint to shut down or restart that process:

```csharp
[HttpGet]
[Authorize]
public IActionResult Admin_StopDocumentProcessing()
{
    if (Perigee.IsRunning("DocumentProcessor")) Perigee.QueueStop("DocumentProcessor");
    return Ok();
}
```

{% hint style="info" %}
You can find this setup with .NET hosting in the Blueprints section, [here](/blueprints/perigee-with-.net-hosting).&#x20;

The specific demo for the admin controller [here](/examples-and-demos/api-+-perigee).
{% endhint %}

#### Have a critical, unhandled exception that crashes the entire thread?

Maybe the drive had a fault and is now offline, which caused the thread itself to go offline. Perigee implements several powerful ways to assist in the restart of this process. Another powerful feature of threads is that we're able to set up and configure how threads should react when they crash. Below is an example of adding the optional callback for restarting a down thread.

<pre class="language-csharp" data-line-numbers><code class="lang-csharp">taskConfig.AddDirectoryWatch("DocumentProcessor", 
(ct, log, path) => { },

//Restart function and paramaters //
<strong>() => { 
</strong>    //Check the hard drive?
    
    //Check the connectivity to the third party processor?
    
    //All look good? return true
    return true; 
}, 
<strong>restartTimerDelayMS: 5000, 
</strong><strong>shutDownWaitMS: 300000,
</strong>// ----------------------------- //

<strong>started: true);
</strong></code></pre>

* <mark style="color:blue;">**Line 5**</mark> The first callback `() => {}`  allows you to perform logic before telling Perigee to restart that thread. <mark style="color:red;">**If you return true, the thread will be started again**</mark>.&#x20;
* <mark style="color:blue;">**Line 13**</mark> `restartTimerDelay` is to tell Perigee how long to wait until checking the callback again, if it returns false.
* <mark style="color:blue;">**Line 14**</mark> `shutdownWaitMS` is how long Perigee will wait until dropping the thread when attempting to cancel it.
* <mark style="color:blue;">**Line 17**</mark> `started` is an optional way to tell Perigee only to configure and store the thread, but do not start it yet. You have control over how to start this later.

#### Need to shut down the whole application?&#x20;

Simply press <mark style="color:orange;">**ctrl-c**</mark> if you're within a console application and wait while Perigee gracefully cancels all running tasks. No data will be lost, and everything will be persisted to disk. You'll see the logs indicate what is currently running, and what is awaiting shutdown.&#x20;

You may want to write custom logic to shut the app down gracefully as well. Check out the [Thread Registry](/core-modules/thread-registry) section to see how to cancel the parent token.&#x20;

## Events

Whether you are writing an integration, data pipeline, worker bot, synchronization agent, data process, or even an order transaction coordinator, they all have an event source. There are only two types of event sources. Let's look at each of them:

### Triggered

Triggered event sources are used in most types of applications. They can be new accounts created in Salesforce, an email arriving in an inbox, or a new message in a queue. They act as a starting point for additional logic and are events created outside of our control. Here are a few more examples:

* A directory watcher receiving a new file.
* An email client getting an email.
* A Kafka topic receiving a new message.
* Salesforce pushtopic getting data.
* An API with JSON data posted to it.

### Scheduled

Scheduled event sources are everything not triggered by external/internal sources. Typically these are CRON jobs, although Perigee has a few additional scheduling types to use. A few examples of using these:

* We want a data process to kick off at 4 AM.
* We need to check every hour for new data on the network drive.
* We pull an external API every 5 minutes for the status update of our request

## Events callback

Now that we have a basic understanding of how event sources work, let's look at what that might look like inside Perigee.

```csharp
PerigeeApplication.Application("Sync Agent", "IPCSingleRunToken", (init) => {}, 
            (taskConfig) => 
            { 
                taskConfig.AddDirectoryWatch("C:\WatchMeMaybe") //Watch a directory
                .AddCRON("0 */2 * * *")  //Run every other hour
                .AddIMAPWatcher() //Watch an IMAP inbox
                .AddSalesForceClientPush() //Watch a salesforce pushtopic
                .Add() //Add your own thread managed method
            });
```

These are just a few of the ways you can integrate different kinds of events inside Perigee. We'll cover all of them in examples and blueprints in more detail.&#x20;

Every single one of the `.Add ... ()` methods contain a callback action of when to process an event.&#x20;

* For the CRON, this callback is when we're within the time and timezone to execute.
* For the IMAP Watch, it's when we receive a new email in the inbox.
* For the Directory Watch, it's when a new file is present and is no longer being written to

All of the callbacks within perigee contain a <mark style="color:blue;">**Cancellation Token**</mark> and an <mark style="color:blue;">**ILogger**</mark>.  See the below example:

```csharp
taskConfig.Add("ManagedThreadA",
(cancelToken, logger) => { 

});
```

The <mark style="color:blue;">**Cancellation Token**</mark> will get flagged cancelled when a shutdown event has occurred, and the process is expected to exit soon. Pay attention to this if you want to be able to gracefully shutdown, or cancel tasks in process. You can store your data or finish your process. If you're able to safely stop processing, you can respect it's request to shut down and end execution to return back to Perigee.

The <mark style="color:blue;">**ILogger**</mark> is a Serilog enabled logging source, enabling you to write your logs to the console, files, external data sources, and many other sinks. [Serilog is awesome](https://serilog.net/), go check them out!

## Perigee Application Callbacks

<pre class="language-csharp" data-line-numbers><code class="lang-csharp">PerigeeApplication.Application("FirstApp", "IPCSingleRunToken", 
<strong>(init) => { 
</strong>   
}, 
<strong>(taskConfig) => { 
</strong>       
});#
</code></pre>

<mark style="color:blue;">**Line 2**</mark> - The initialization callback is how we inject and define our properties. Maybe our application requires a connection string, a custom property loader, or API credentials. This initialization block is how we inject additional configuration before the primary configuration block is called.

The `init` parameter is simply an `IConfiguration`. This allows full access to your `appsettings.json` file for reading any configuration values you need to set up additional components.

<mark style="color:blue;">**Line 5**</mark> - Perigee has a primary configuration callback defined every time you create an application. This block is where we define how and what the application does. More specifically, we define what event sources we use and any managed threads we want to create.

For configuring a Perigee application, we've created an easy-to-use SDK, this is why you get the `taskConfig` parameter, which is the [ThreadRegistry](/core-modules/thread-registry#properties).


# Hello Configuration

## Resources

{% embed url="<https://youtu.be/ufNbuYTfxWk>" %}
Want to watch the config and linking instead?
{% endembed %}

{% file src="/files/FDN4wRr53oTVfc3XZh01" %}
Completed part 2 code
{% endfile %}

## Intro

Lets take a closer look at how the configuration works within <mark style="color:blue;">**Perigee**</mark>.

To understand the configuration process we need to understand how the <mark style="color:purple;">**sections**</mark> work and why we separate them. To keep it concise, sections create a logical separation of values for the different processes in our application.&#x20;

{% hint style="warning" %}
As an example we have a section called <mark style="color:red;">**Serilog**</mark>. This section is entirely dedicated to setting up our logging, where we send logs to and in what format. It wouldn't make any sense to put a message queue URL or an API key inside of this section.&#x20;

We create a logical separation between our logging needs and a specific threads' requirements by keeping those configuration values separate.
{% endhint %}

Configuration <mark style="color:purple;">**sections**</mark> can be registered in our application in a number of ways including but not limited to:

* Environment variables
* main(<mark style="color:green;">**string\[] args**</mark>)
* <mark style="color:green;">**appsettings.json**</mark> file
* Custom providers

{% hint style="info" %}
There is a custom provider shipped with Perigee called the `SQLConfigurationSource`. It allows you to quickly wire up a MSSQL database table as a configuration section to use in your application. [You can see this example here](/perigee-and-beyond/extending-loaders#using-the-built-in-sql-provider)
{% endhint %}

Back in the [Installation and Project Setup](/#basic-configuration) we used a configuration file. A <mark style="color:purple;">**section**</mark> is a key off of the root json node and as you can see there are 4 different sections in our startup file.

```json
{
  "ConnectionStrings": {
  
  },
  "AppSettings": {
  
  },
  "Perigee": { "HideConsole": false },
  "Serilog": {
    "MinimumLevel": "Debug",
    "WriteTo": [
      { "Name": "Console" }
    ]
  }
}
```

{% hint style="info" %} <mark style="color:blue;">**Line 2**</mark> - `ConnectionStrings` is exactly as it sounds, it's the place to put connections to other services like a database.

<mark style="color:blue;">**Line 5**</mark> - `AppSettings`is the default included location to put configuration values. Various ways of retrieving configuration values will default to this section

<mark style="color:blue;">**Line 8**</mark> - `Perigee`is the section automatically read by Perigee itself. As an example, if you're running in a windows console you can hide it by setting the `HideConsole` flag to `true.`

<mark style="color:blue;">**Line 9**</mark> - `Serilog`is the configuration section for Serilog logging. There's a lot of info on this section, and we'll cover a lot more of them in [Hello Logs](/getting-started/hello-logs)
{% endhint %}

## Demo Application

![This is the final screenshot after all sections below have been completed. If your log doesn't look like this yet, keep going :) ](/files/EsutWvx5XTvTAeETZzgz)

Our goal is to write an application that logs out our custom configuration sections. We will do so by reading the configuration directly at runtime as well as binding the configuration section to a custom class.&#x20;

You will also see some helpful ways you can plug the configuration system into [managed threads](/getting-started/perigee-application-design#threads)

### Configuration Direct Read

To start, we need to add another section to our <mark style="color:green;">**appsettings.json**</mark> file called <mark style="color:red;">**HelloConfig**</mark> and give it some values to read.

```json
{
  "ConnectionStrings": {
  
  },
  "AppSettings": {
  
  },
  "HelloConfig": {
    "Enabled": true,
    "Name": "HAL 9000",
    "Year": 2001,
    "Tags": [ "Heuristic", "Algorithmic" ]
  },
  "Perigee": { "HideConsole": false },
  "Serilog": {
    "MinimumLevel": "Debug",
    "WriteTo": [
      { "Name": "Console" }
    ]
  }
}
```

{% hint style="info" %}
Notice the comma after the section? Make sure when you add new sections you keep the file valid JSON :vulcan:
{% endhint %}

This creates a section for us to read in our code. We will read it directly by calling `taskConfig.GetValue<>()`.

This handy method is a quick way to reference ALL of the incoming configuration providers and it works by supplying two things:&#x20;

1. The C# <mark style="color:blue;">**Type**</mark> - This could be a string, or int, or whatever other value type you're reading.
2. A special format: <mark style="color:orange;">**Section:**</mark><mark style="color:purple;">**Key**</mark>.

To read the Name from our configuration section the <mark style="color:blue;">**Type**</mark> would be `string` and our <mark style="color:orange;">**Section:**</mark><mark style="color:purple;">**Key**</mark> would be: `HelloConfig:Name`

Here's a fully working <mark style="color:blue;">**Perigee**</mark> application

```csharp
PerigeeApplication.ApplicationNoInit("HelloConfig", (taskConfig) => {

    taskConfig.AddRecurring("TestMethod", (ct, log) => {

        log.LogInformation("What is my name? It is {name}", taskConfig.GetValue<string>("HelloConfig:Name"));

    });
});
```

* <mark style="color:blue;">**Line 1**</mark> - This is a simplified Perigee start method that skips IPC tokens and initialization actions.&#x20;
* <mark style="color:blue;">**Line 3**</mark> - `AddRecurring` simply adds a managed thread that is automatically called every n milliseconds (supplied by an optional parameter, default 5000 (5 seconds))
* <mark style="color:blue;">**Line 5**</mark> - We log out the configuration value reading it live at runtime.

{% hint style="info" %}
The regular `.Add()` method doesn't recur. If the block exits then Perigee will consider that thread to be ended and it will enter its restart phase and conditions.&#x20;

This is why we use `.AddRecurring()` here, because the efficient loop is automatically built into it.&#x20;

If a cancellation request comes through, it will not call the block again and end. You can always use the same built in loop in your own code and it's what we recommend if you're adding your own managed threads.

```csharp
while (PerigeeApplication.delayOrCancel(delay, cancelToken)) { 
  // This is only called after delay, and if it's not cancelled
  // Otherwise, the loop block ends
}
```

{% endhint %}

You'll see below the results of running this application. We get a log every 5 seconds with the value captured from our configuration file.

![](/files/K7IOV0EqPWiLhtsVXzD9)

### Configuration Binding

Next let's look at binding the section we added to a custom class. Here's the file if you prefer to import it.

{% file src="/files/p8RwppnMw2Q3Ex1Tc1nm" %}

{% hint style="info" %}
If you import the class file above, don't forget to change the namespace if you want it to auto-link to whatever your applications default namespace is.
{% endhint %}

The class simply has 3 properties <mark style="color:orange;">**that are an exact case sensitive name match**</mark> to the configuration section we created.

```csharp
public class HelloConfig
{
    public string Name { get; set; } // HelloConfig:Name
    public int Year { get; set; } // HelloConfig:Year
    public List<string> Tags { get; set; } // HelloConfig:Tags
}
```

To bind a class, simply use the `taskConfig` and call `GetConfigurationAs<>()`:

```csharp
taskConfig.GetConfigurationAs<HelloConfig>("HelloConfig");
```

* The `Generic T Parmater`, <mark style="color:orange;">**HelloConfig**</mark>, is the class we're creating and assigning. It's a type reference.
* The `string`, <mark style="color:red;">**"HelloConfig"**</mark>, is what section to get from our configuration so that we can assign it's properties to the referenced type.

This is all that is needed to bind our configuration <mark style="color:purple;">**section**</mark> to a class. Here's the full application up to this point!

```csharp
PerigeeApplication.ApplicationNoInit("HelloConfig", (taskConfig) => {
   
    taskConfig.AddRecurring("TestMethod", (ct, log) => {

        //Directly by reading
        log.LogInformation("What is my name? It is {name}", taskConfig.GetValue<string>("HelloConfig:Name"));

        //Binding a class
        HelloConfig config = taskConfig.GetConfigurationAs<HelloConfig>("HelloConfig");
        log.LogInformation("{name} first appeared in {year:N0} and was {@tagged}", config.Name, config.Year, config.Tags);

    });
});
```

<mark style="color:blue;">**Line 10**</mark> - We got the configuration as a custom class by binding to it.&#x20;

<mark style="color:blue;">**Line 11**</mark> - We use the custom classes properties to write to our log.

![](/files/ECzT9mswAN4Qw5oylptY)

{% hint style="info" %}
Curious what those special characters are in the template string?&#x20;

The first one, <mark style="color:purple;">**:N0**</mark> tells the template string to treat it's input as a number with 0 precision, adding the grouping character (thousands separator). This is why the logged out version has a thousands separator.

The second one has an <mark style="color:purple;">**@ symbol**</mark> which tells the template string to deconstruct the input. This is why you see the array of tags written out.
{% endhint %}

### Link to Config

<mark style="color:blue;">**Perigee**</mark> will, by default, hot-reload the <mark style="color:red;">**`appsettings.json`**</mark> files. This is a fantastic way to give control to a configuration file to enable or disable a thread without shutting down the entire application.&#x20;

<mark style="color:blue;">**Perigee**</mark> has a great helper method built into it which enables the thread-to-configuration linking for enabling or disabling managed threads through a configuration boolean.&#x20;

Our example config section we added (`HelloConfig`) which has a key called **`Enabled`**, and we're going to use that Boolean to tell <mark style="color:blue;">**Perigee**</mark> whether or not to start or stop our thread.

{% code lineNumbers="true" %}

```csharp
PerigeeApplication.ApplicationNoInit("HelloConfig", (taskConfig) => {
   
    taskConfig.AddRecurring("TestMethod", (ct, log) => {

        //Directly by reading
        log.LogInformation("What is my name? It is {name}", taskConfig.GetValue<string>("HelloConfig:Name"));

        //Binding a class
        HelloConfig config = taskConfig.GetConfigurationAs<HelloConfig>("HelloConfig");
        log.LogInformation("{name} first appeared in {year:N0} and was {@tagged}", config.Name, config.Year, config.Tags);

    }, started: false).LinkToConfig("HelloConfig:Enabled");
});
```

{% endcode %}

<mark style="color:blue;">**Line 12**</mark> - We added `started: false` to the methods optional parameter so that with the addition of the linking command, it will be in charge of starting or stopping this thread.\
&#x20;  `LinkToConfig` was added and we supplied our <mark style="color:orange;">**Section:**</mark><mark style="color:purple;">**Key**</mark> to it.&#x20;

{% hint style="warning" %}
Because configurations are loaded, hot-reloaded, and maintained internally by the configuration system, please also use the **`started: false`** flag on the thread itself. This will prevent the thread from starting while the configuration value is `"false".`
{% endhint %}

Now if you run the application and navigate over to the debug folder to open up the <mark style="color:green;">**appsettings.json**</mark> file, you can change that <mark style="color:orange;">**HelloConfig:**</mark><mark style="color:purple;">**Enabled**</mark> value from `true` to `false` or `false` to `true` and watch <mark style="color:blue;">**Perigee**</mark> start and gracefully stop that thread :mage: :magic\_wand:

<figure><img src="/files/7LJSXZRtYPjbBz8VNkX1" alt=""><figcaption></figcaption></figure>

{% hint style="warning" %}
The "debugging" version of the app config should be at: `{projectRoot}\bin\Debug\net{version}\appsettings.json`

If you change the appsettings.json file in your project you aren't actually modifying the version of the file the debugged application is reading.&#x20;
{% endhint %}

#### Change Notification

If you'd prefer more control over how to start or stop your threads, or even make different decisions based on the configuration changes, you can always subscribe the change notification directly. `.LinkToConfig()` is essentially the same code as below but managed by <mark style="color:blue;">**Perigee**</mark> internally and automatically, saving you from a few lines of code.

```csharp
taskConfig.Event_ConfigurationUpdated += (sender, Configuration) =>
{
    bool enabled = Configuration.GetValue<bool>("HelloConfig:Enabled", false);
    if (enabled) taskConfig.StartIfNotRunning("TestMethod");
    else taskConfig.QueueStop("TestMethod", true);
};
```

{% hint style="info" %}
To see other thread operations, see [ThreadRegistry](/core-modules/thread-registry#thread-methods).&#x20;
{% endhint %}

### Configuring the logging

Perigee will automatically add an additional config property block to each of it's loggers that it passes to the managed threads. This property block is called <mark style="color:green;">**ThreadName**</mark>. As a fun aside, let's update our logging template to include this property block.&#x20;

{% hint style="info" %}
If you want to read up on all of the configurations for the console, simply go to that sinks [dedicated support page](https://github.com/serilog/serilog-sinks-console).
{% endhint %}

Open the <mark style="color:green;">**appsettings.json**</mark> file and under the `Serilog` section, update the console sink to include the updated `outputTemplate`.

```json
{
  "Name": "Console",
  "Args": {
    "outputTemplate": "[{Timestamp:HH:mm:ss} {Level:u3}]({ThreadName}) {Message:lj}{NewLine}{Exception}"
  }
}
```

Now our application's logs have the name of the managed thread they are coming from right in the log!

![](/files/AToYBZZUiYmRdSRJsWgD)

You can add your own properties to the loggers, we'll show you how on the [Hello Logs ](/getting-started/hello-logs)page.

## Secure Values

Perigee has several ways built in that allow you to encrypt your configuration values which may provide an extra layer of security/obscurity. It uses <mark style="color:orange;">**AES256**</mark> bit encryption on the values for secure encrypting and decrypting values and has built in methods for reading them.

To secure a value you must provide the encryption key, encryption IV, and the source of where to find these values.

There are 3 sources for the Encryption keys

* Environment Variable source
* Arguments Source
* Variable Source

Here's an example of setting this up all within code using the variable source. The methods are exactly the same though if you decide to pass in the encryption key from an argument, or read it from an environment variable.

```csharp
PerigeeApplication.ApplicationNoInit("DemoApp", (c) => {

//Set the value source as variables, to which we assign next
c.SecureValueSource = ThreadRegistry.SecureKeyStorage.Variable;

//Create two new randoms, one AES 256 and the IV as AES 128
c.SecureValueKey = AesCrypto.GetNewRandom();
c.SecureValueIV = AesCrypto.GetNewRandom(16);

//Write out the two new generated values, so we can use them to decrypt values with later
c.GetLogger<Program>().LogInformation($"Copy these values out!!{Environment.NewLine}Key: {{key}}{Environment.NewLine}iv: {{iv}}", c.SecureValueKey, c.SecureValueIV);

});
```

With that done you should see something like this printed to the console:

<figure><img src="/files/9EuI8S2jtrr7U18gpJA9" alt=""><figcaption></figcaption></figure>

These are your two encryption keys, and we will use them to decrypt values in the next step. \
&#x20;  Remember you can easily put these in the environment variables, command line arguments, or even set the variables in code. For the ease of this demonstration, we'll assign them directly:

```csharp
PerigeeApplication.ApplicationNoInit("DemoApp", (c) => {

//Assign our keys
c.SecureValueSource = ThreadRegistry.SecureKeyStorage.Variable;
c.SecureValueKey = "e7zP37543Rbvn5a6NnN3FGlhPVAsdTmljcXZoTLOlkw=";
c.SecureValueIV = "UFn5LH+RLLCVkxt+qfjWKQ==";

//Encrypt and decrypt the same string
string encrypted = c.EncryptSecureValue("Hello World");
string decrypted = c.DecryptSecureValue(encrypted);
c.GetLogger<Program>().LogInformation($"Encrypted: {{Encrypted}}{Environment.NewLine}Decrypted: {{Decrypted}}", encrypted, decrypted);

});
```

<figure><img src="/files/vkZFbvt6BVyWzc1X6S6I" alt=""><figcaption></figcaption></figure>

If you're reading encrypted configuration values, there's a handy little helper than does the read and decrypt in one pass:

```csharp
PerigeeApplication.ApplicationNoInit("DemoApp", (c) => {

    c.GetSecureConfigurationValue("HelloConfig:EncryptedValue")
    
});
```

{% hint style="warning" %}
There's always an option of rolling your own or using custom methods of reading/decrypting values. If you want to see how to[ implement a custom property loader](/perigee-and-beyond/extending-loaders) then check out the link!
{% endhint %}

## Summary

Hopefully you understand a bit better about how configuration, sections, and providers work as well as how to use them in code.

{% hint style="success" %}
**PRO TIP:** If you plan to support <mark style="color:orange;">**hot-reloading**</mark>, never cache the configuration values in such a way that a hot-reload would be ignored. If you're binding a configuration section to a class do so at the time you need it and dispose of the class when you're finished so that in the event the configuration section is changed between iterations of your code you get the updated values by rebinding.&#x20;
{% endhint %}


# Hello Logs

## Logging Introduction

When building an application it is very important to have information communicated clearly about what is going on inside your application. Whether this is a success message or a critical failure that needs someones attention.

We use [Serilog](https://github.com/serilog/serilog/wiki/Configuration-Basics) behind the scenes. So any configuration you can perform with [Serilog](https://github.com/serilog/serilog/wiki/Configuration-Basics), also applies here.&#x20;

### Log Sinks

Serilog can output it's data to all kinds of sources. The console, Azure, Amazon, Elastic, Log4Net, Loggly, NLog, SQL Server, file... just to name a few. These sources are called **Log Sinks**.

Any time a sink is added to the configuration, all logging within <mark style="color:blue;">**Perigee**</mark> automatically sends it's log data to the configured sources. This simple configuration strategy makes it incredibly easy to send log data wherever you need it.&#x20;

### Configure logs

We recommend doing most of this configuration within the appsettings.json file, so let's take a look at configuring a simple logger.

In the [Hello Configuration Section](/getting-started/hello-configuration) we configured the console sink to have a different logging template. using the following section of code:

```json
{
    "Serilog": {
        "MinimumLevel": "Debug",
        "WriteTo": [
            {
                "Name": "Console",
                "Args": {
                    "outputTemplate": "[{Timestamp:HH:mm:ss} {Level:u3}]({ThreadName}) {Message:lj}{NewLine}{Exception}"
                }
            }
        ]
    }
}
```

The first tag, <mark style="color:red;">**`MinimumLevel`**</mark> - This describes what events get emitted to the sinks. At <mark style="color:orange;">**`Debug`**</mark>, anything logged at the <mark style="color:orange;">**`Verbose`**</mark> level is ignored. It's great for controlling what types of messages are visible.&#x20;

The seconds tag, <mark style="color:red;">**`WriteTo`**</mark> is the array of configured logging sinks. You can control these sinks with the various settings they accept and can be found on the Serilog Sink Configuration page for the given sink.&#x20;

{% hint style="warning" %}
If you configure another sink like the Microsft SQL Server sink, don't forget to also add the relevent nuget package to your project or it will be ignored!

1\) Add the appropriate object to the **`AppSettings.Serilog.WriteTo`**&#x61;rray:

<pre class="language-json"><code class="lang-json"><strong>{ "Name": "MSSqlServer", ...}
</strong></code></pre>

2\) Install the package with Nuget:

`Install-Package` **`Serilog.Sinks.MSSqlServer`**

3\) You're now ready to log away as usual!
{% endhint %}

### Configuration - With Hosting

The hosting configuration also includes a few additional keys, let's take a look here:

```json
{
  "Serilog": {
    "MinimumLevel": {
      "Default": "Information",
      "Override": {
        "Microsoft": "Warning",
        "System": "Warning",
        "Microsoft.AspNetCore": "Warning"
      }
    },
    "WriteTo": [
      { "Name": "Console" }
    ]
  }
}
```

This time, the <mark style="color:red;">**`MinimumLevel`**</mark> is an object, not a string. This allows us to set the default logging level, as well as override the logging levels for several other namespaces.&#x20;

The overrides supplied here will squash the incredible amount of information being logged from ASPNetCore hosting by default.

### Perigee Logging

Logging is built throughout <mark style="color:blue;">**Perigee**</mark>. Any thread that is managed and created is automatically sent a logger with the appropriate configurations.&#x20;

```csharp
PerigeeApplication.ApplicationNoInit("DemoApp", (c) =>
{
    c.AddRecurring("Recurring Task" (ct, l) => {
    
        l.LogInformation("See how this Thread is automatically sent a logger?");
    
    });
});
```

{% hint style="info" %}
Want to see more information about [perigee application design](/getting-started/perigee-application-design#anatomy-of-a-perigee-application)?&#x20;
{% endhint %}

### Getting a logger directly

We can easily get a logger directly from the <mark style="color:blue;">**`ThreadRegistry`**</mark> any time we want outside of a ManagedThread. This logger is tied into the Serilog system and will automatically inherit the configuration defined.

```csharp
PerigeeApplication.ApplicationNoInit("DemoApp", (c) =>
{
    //Get a logger from the ThreadRegistry
    c.GetLogger<Program>();
    
});
```

### Log Scopes&#x20;

As shown above, you can override the logging template with additional parameters. Here we've added the `ThreadName` to the logging template. The reason this works out of the box is because Perigee's internal thread management system injects this log scope before sending an <mark style="color:blue;">`ILogger`</mark> back.

You can add as many custom log scopes as you need. They will appear differently for different log sinks. This is very helpful when adding a `BatchID`, `CorrelationID`, `SystemID`, `NetworkID` or other identifying information to the log request.&#x20;

* If logging to a database with an additional column added to the logging table - any matching log scope will fill that column value&#x20;
* If logging to something like Splunk, you'll see those log scopes present in the additional log data
* If an overriden template in the console logger includes the custom scope, it will be written when present

#### Scope demo

Make sure to setup your <mark style="color:red;">**`appsettings.json`**</mark> with the modified logging template:

```json
{
    "Serilog": {
        "MinimumLevel": "Debug",
        "WriteTo": [
            {
                "Name": "Console",
                "Args": {
                    "outputTemplate": "[{Timestamp:HH:mm:ss} {Level:u3}]({ThreadName}) {Message:lj}{NewLine}{Exception}"
                }
            }
        ]
    }
}
```

Then add a simple recurring method and override the ThreadName supplied by Perigee:

```csharp
PerigeeApplication.ApplicationNoInit("Scopes", (c) =>
{
    c.AddRecurring("RecurringLogger", (ct, l) => {

        //Begin a new log scope on this logger, overriding the ThreadName
        using var scopes = l.BeginScope(new Dictionary<string, object> { { "ThreadName", "CUSTOMIZED" } });

        //Anything now logged from here will have it's "ThreadName" set to "CUSTOMIZED"
        l.LogInformation("See the overriden thread name?");

    });
});
```

The output will look like this:

```
[15:09:16 INF](CUSTOMIZED) See the overriden thread name?
```

### &#x20;


# Hello Integration

This is the last of the hello series. We're going to cover the final few topics you'll need to really get started. Let's jump in!

## Watermarking

Watermarking is simply storing a key/value pair from last execution and recalling it again next time it is needed. We use this when interfacing with another system we need to synchronize data to or from. A few examples of this are:

* A Mail sync client needs to know what the UIDNEXT, or MODSEQ integers are.
* If you're synchronizing data changes to SharePoint, you'll want to store the delta link as a string.
* &#x20;If you're pulling data by a last modified date, you'll want to make sure you store a DateTime(Offset).

These are just a few examples of how you would use watermarking in a real world production application.&#x20;

### The SDK

We make working with watermarks quite easy and they are very powerful.&#x20;

* Our watermarks are persisted locally to disk automatically and recalled on application startup.
* They are debounced (We cover this in the [updating section](#updating)).
* They are thread safe.
* You can register as many subscribers as you need to the data feed.
* You may push that data externally on update, and recall it on initialization for further backup.

```csharp
//Register a watermark
Watermarking.Register("IntegrationOffset", () => Watermark.FromDateTimeOffset(DateTimeOffset.UtcNow), (nVal) => {
    taskConfig.GetLogger<Watermark>().LogInformation("New value for {name} ({value})", nVal.Name, nVal.GetDateTimeOffset());
});

//Register additional handlers anywhere else, they receive updates to that watermark
Watermarking.RegisterAdditionalEventHandler("IntegrationOffset", (s, nVal) => {
    taskConfig.GetLogger<Watermark>().LogInformation("AddlHandler: New value for {name} ({value})", nVal.Name, nVal.GetDateTimeOffset());
});

//Push updates to this watermark anywhere else
Watermarking.UpdateWatermark("IntegrationOffset", Watermark.FromDateTimeOffset(DateTimeOffset.UtcNow));

//And when you need the value, refer to it again later
Watermarking.GetWatermark("IntegrationOffset").GetDateTimeOffset()
```

{% hint style="warning" %}
The register call should be performed at application initialization if possible to avoid a [race condition](https://en.wikipedia.org/wiki/Race_condition) of pulling for it's value before it is registered. <mark style="color:red;">**Requesting a watermark before it is registered will throw an exception**</mark> .

```csharp
PerigeeApplication.ApplicationNoInit("HelloConfig",
(taskConfig) =>
{
    //Register me first!
    
    
    //Then .Add other methods
});
```

{% endhint %}

### Registering

Registering a watermark is an easy one liner. Let's look at the parameters:

{% code lineNumbers="true" %}

```csharp
Watermarking.Register(

//Name 
"IntegrationOffset", 

//Initialization Callback
() => Watermark.FromDateTimeOffset(DateTimeOffset.UtcNow), 

//OnUpdate (optional)
(nVal) => {
    taskConfig.GetLogger<Watermark>().LogInformation("New value for {name} ({value})", nVal.Name, nVal.GetDateTimeOffset());
});
```

{% endcode %}

* <mark style="color:blue;">**Line 4 - Name**</mark> - The name of the watermark
* <mark style="color:blue;">**Line 7 - Func\<Watermark> Initialization callback**</mark> - If the value does not exist, the initialization callback is called and an initial value is set.
* <mark style="color:blue;">**Line 10 - Action\<Watermark> onUpdate?**</mark> - An optional callback for when the value is updated.

{% hint style="success" %}
To create the other base data types, simply provide that type in the <mark style="color:blue;">**initialization callback**</mark>.&#x20;

```csharp
Watermark.FromString("");
Watermark.FromInt(1);
//etc
```

{% endhint %}

That's it. The underlying system does the heavy lifting of persisting this locally under the **`/watermarks`** folder beside it's running application.

### Registering Handlers

You're able to register as many "subscribers" to the data changes you desire in other parts of the code. These will be called on a background thread with the updated value.

The <mark style="color:green;">**`RegisterAdditionalEventHandler`**</mark> simply takes two parameters:

{% code lineNumbers="true" %}

```csharp
Watermarking.RegisterAdditionalEventHandler(

//Name of the watermark to register
"IntegrationOffset", 

//Callback function
(s, nVal) => {
    taskConfig.GetLogger<Watermark>().LogInformation("AddlHandler: New value for {name} ({value})", nVal.Name, nVal.GetDateTimeOffset());
});
```

{% endcode %}

* <mark style="color:blue;">**Line 4 - Name**</mark> - The name of the watermark you want to update.
* <mark style="color:blue;">**Line 7 - EventHandler\<Watermark>**</mark> - This sends you the <mark style="color:blue;">**`(sender, watermark)`**</mark> back in the callback and you're able to read the value from there

### Updating

The <mark style="color:green;">**`UpdateWatermark`**</mark> call takes two parameters:

{% code lineNumbers="true" %}

```csharp
Watermarking.UpdateWatermark(

//Name
"IntegrationOffset", 

//New value
Watermark.FromDateTimeOffset(DateTimeOffset.UtcNow));
```

{% endcode %}

* <mark style="color:blue;">**Line 4 - Name**</mark> - The name of the watermark you want to update.
* <mark style="color:blue;">**Line 7 - Watermark**</mark> - The new watermark and value.

A lot happens behind the scenes you should be aware of:

* Updates are <mark style="color:purple;">**debounced**</mark> which means that rapid updates don't all push their values at once to any subscribers of the data updates.&#x20;
  1. Let's say you processed 10 records in a matter of 50 milliseconds and every record you updated the watermark so it went from the initial value of <mark style="color:red;">**`0`**</mark> to <mark style="color:red;">**`10`**</mark>.&#x20;
  2. After about a second, all of the subscribers would get **a single updated watermark event** with the value of <mark style="color:red;">**`10`**</mark>.
  3. Debouncing reduces the number of calls both to the filesystem and to your subscribers
* Updates are thread safe as they perform internal item locks before writing to disk and notifying subscribers.&#x20;

### Get

Getting the watermark only requires the <mark style="color:blue;">**Name**</mark> of the watermark to retrieve.&#x20;

```csharp
Watermarking.GetWatermark("IntegrationOffset").GetDateTimeOffset()
```

If there are inflight updates to the watermark, this call may block the thread for a second or two while those debounces get processed. If there are no inflight updates, it returns immediately.&#x20;

## Credential Store

Another primary concept of writing integrations is using credentials to get access tokens and authorization for other systems. The most common example of this would be using OAuth 2.0 to retrieve an access or bearer token that expires in the future.

Credentials are all registered on startup and are usually given an expiration date. This allows for any process later in the application to ask the manager to retrieve a credential. The below example shows how to register **SuperCredential**, and two possible return values:

{% code overflow="wrap" lineNumbers="true" %}

```csharp
CredentialStore.RegisterRefresh("SuperCredential", (o) => {

        //Call third party API
        //Reach out to database
        //Request keys from AWS
        //Do anything you need to get authorization details

        //Then return either a good credential:
        return new CredentialStoreItem() { 
            Expiration = DateTimeOffset.Now.AddMinutes(60),
            Authorization = "ABCDEFG",
            Scope = "offline.access",
            StoreA = "Custom ValueStore"
        };

        //Or a faulted one:
        return new FaultedCredentialStoreItem("External ERROR", new Exception("Exception thrown while trying to get credential!!!"), retry: true);
    });
```

{% endcode %}

When the application loads up or a new credential is created, the local drive is checked and all previously non expired credentials are restored immediately. This allows for applications to be safely shut down and restarted without interrupting or over-retrieving from an external API.

During the retrieval process, the <mark style="color:blue;">**CredentialStore**</mark> checks for existence of the credential, it's expiration and then checks if the expiration is within N number of minutes(user defined) before returning to the caller.&#x20;

{% code overflow="wrap" %}

```csharp
//Use default settings
CredentialStore.GetCredential("SuperCredential"); 

//Set all settings on retrieval 
CredentialStore.GetCredential("SuperCredential", maxRetries: 3, retryMS: 1000, expireTimeBufferSeconds: 600);
```

{% endcode %}

In Summary: the <mark style="color:blue;">**CredentialStore**</mark> does several important things:

* It automatically caches the authorization details to disk and retrieves them again on application reload.
* When supplying expiration dates to a credential, it's able to renew itself when it's required before sending back the old authorization parameters.
* The retrieval call is automatically retried to prevent a blip in connectivity from stopping a process.
* It will automatically renew the token a defined number of minutes before expiration, allowing long running processes not to fail while in the middle of execution.
* &#x20; It integrates seamlessly with RestSharp, allowing all HTTP(S) traffic to automatically and internally pull credentials

### Using Credentials - The SDK

#### RestSharp for HTTP(S)

To register a specific <mark style="color:blue;">**RestSharp**</mark> credential, just create that type and assign the appropriate Authenticator.

```csharp
CredentialStore.RegisterRefresh("ClientAPI", (o) => {

        return new RestSharpCredentialStoreItem(
                new RestSharp.Authenticators.JwtAuthenticator("MyToken"), 
                DateTimeOffset.UtcNow.AddMinutes(58));
        
});
```

Any time you create a client, simply assign this credential authenticator:

```csharp
var rco = new RestClientOptions("https://localhost.com")
{
    //Assign the CredentialAuthenticator with the name tied to the refresh
    Authenticator = new CredentialAuthenticator("ClientAPI")
};

//Create a new client
using var client = new RestClient(rco);

//Anytime you execute any requests, it's automatically maintained. 
```

There's a whole page on this content, read more here:

{% content-ref url="/pages/zdpVSksUzLyb3WMdZTLH" %}
[HTTP(S) - RestSharp](/core-modules/integration-utilities/http-s-restsharp)
{% endcontent-ref %}

## Limiting

Another integration pattern is limiting the number of calls that can be made during a given period of time. This is important when rate limiting or billing may be an issue and is a perfect stop gap for a critical failure causing an erroneous number of API calls or running up an unwanted bill!

The Limiter auto resets it's count every calendar day and will not allow additional executions past the defined limit.

```csharp
using Perigee;
using Perigee.Extensions;

PerigeeApplication.ApplicationNoInit("Limiter", (c) =>
{

    c.AddRecurring("Limiter", (ct, l) => {
        using var APILimit = new Limiter("APILimiter.json", 2, ct);

        if (APILimit.CanExecute())
        {
            //Perform action
            l.LogInformation("Calling API {n}/{x} executions", APILimit.GetCount(), APILimit.GetLimit());
        }
        else
        {
            l.LogInformation("Out of executions...");
        }
    });
});

/*
 [16:35:07 INF] Calling API 1/2 executions
 [16:35:13 INF] Calling API 2/2 executions
 [16:35:18 INF] Out of executions...
 */
```

{% hint style="info" %}
This is built off of the [`FileSyncWrite`](/core-modules/file-system-storage/filesync-+-cache) module listed below, and code for it is linked if you'd like to customize it to match your needs.&#x20;

{% file src="/files/LF5OaiPDSGtYGz7XM6Pq" %}
{% endhint %}

## Fault Tolerance

A common integration issue is that systems outside of the immediate domain will have faults, issues, disconnects, exceptions, availability or downtime. All of these issues are usually easily resolved with a fault tolerance approach to building your application.&#x20;

<mark style="color:blue;">**Perigee**</mark> has several classes built into it to make this a common practice within your application.&#x20;

### The Cancellation Token

The Cancellation Token passed alongside every <mark style="color:blue;">**ManagedThread**</mark> is an important fault tolerant key to be aware of. They allow us to gracefully shut down or stop processing data, and give us an opportunity to save state before the application closes.&#x20;

If you can successfully pay attention to them, they give you the opportunity you need to end your process and save state.&#x20;

```csharp
PerigeeApplication.ApplicationNoInit("CancelTokens", (c) => {

    c.AddRecurring("Recurring", (ct, l) => {

        //Since we haven't started yet, can we stop and resume later?
        if (ct.IsCancellationRequested) {
            //Save state or info first?
            return;
        }

        //Process stuff
        // ...

        //Are we at a safe place to stop and resume later? Check the cancellation
        if (ct.IsCancellationRequested) return;
    
    });

});
```

### Exit Event

Use the Exit Event alongside the cancellation tokens to store and finalize state on shut down, this allows for an easy application reload, update, or server restart. Remember Exit is called immediately before the application closes, and in some cases only allows for a few seconds to pass before ending execution. This is a last step process where data should be persisted.&#x20;

```csharp
PerigeeApplication.OnExit(() => {
    Console.WriteLine("App is closing in a few seconds");
});
```

### Retry and Rety Async

One of the utility class methods is a Retry and RetryAsync. They provide an easy ability to retry on exception thrown with a delay.&#x20;

The response from these classes is a Tuple where&#x20;

* <mark style="color:blue;">**`Item1`**</mark> is a boolean indicating if it was a success(true), or failed the maximum number of times (false).
* <mark style="color:blue;">**`Item2`**</mark> is the exception thrown if it was not a succeed

```csharp
PerigeeApplication.ApplicationNoInit("CancelTokens", (c) => {

    c.AddRecurring("Recurring", (ct, l) => {

        //This will be tried 5 times, with 10 seconds between retries. 
        Tuple<bool, Exception> Retry = PerigeeUtil.Retry(5, (i) => {

            bool Success = false;
            if (Success == false)
            {
                throw new Exception("Do or do not, there is a retry");
            }

        }, 10000);

        if (!Retry.Item1)
        {
            l.LogError(Retry.Item2, "Retries exceeded");
        }

    
    });
});
```

### REST Retry

A lot of cases network connectivity issues can easily be dealt with by simply retrying a moment later. These handy extensions are built right alongside RestSharp to use in place. If they don't suit your needs, you can always wrap the call chain in the utility retry methods instead!

In the example below: **`ExecuteRetry(request, count)`** will execute the request at least once.&#x20;

* If a success response code is sent back, it will return and not execute the retry.
* If a failure code is returned it will retry as many times as supplied with a 5 second delay between requests.
  * If using the **`CredentialAuthenticator`** and a 401 (unauthorized) status is returned, it will detect and invalidate the credential. This will refresh the authorization token/mechanism and retry again with the new token.&#x20;

```csharp
PerigeeApplication.ApplicationNoInit("CancelTokens", (c) => {

    CredentialStore.RegisterRefresh("TokenAuth", (o) => { 
        // Usually this would include making a request or generating a new token,
        //  for this simple demo, it's creating a basic authentication header
        return new RestSharpCredentialStoreItem(new HttpBasicAuthenticator("user", "pass"), DateTimeOffset.Now.AddMinutes(45)); 
    });

    c.AddRecurring("Recurring", (ct, l) => {

        var rco = new RestClientOptions("https://postman-echo.com") { 
            Authenticator = new CredentialAuthenticator("TokenAuth") 
        };
        using RestClient rc = new RestClient(rco);
        RestRequest rq = new RestRequest("/status/401", Method.Get);
        
        //Execute retry will retry 2(n) times, and if the response code is a 401 (unauthorized)
        //  it will automatically invalidate the credential and refresh the token
        rc.ExecuteRetry(rq, 2);

    });
});
```

### FileSyncWrite

<mark style="color:red;">**FSW**</mark> for short is the primary class suited for synchronizing data to the local drive. [It's explained in detail here](/core-modules/file-system-storage/filesync-+-cache). In short, you supply the `CancellationToken` from the thread and it safely handles the file locking and writing of newly updated data on a regularly scheduled basis and before the application closes.&#x20;

This provides a fantastic way to keep state or progress on any tasks ongoing.

If you run the below demo multiple times, you'll see the count being restored, incremented and shut down. There's a new file with the data located at `bin\debug\sync\local.json`.

```csharp
//Declare a cancellation token source to control the FSW. 
//If using FSW within a ManagedThread, use the passed cancellation token
CancellationTokenSource CTS = new CancellationTokenSource();

//Local persist data
LocalPersistData localData = new LocalPersistData();

//Declare a new FileSyncWrite, it's generic T type can be any class that supports new()
FileSyncWrite<LocalPersistData> _FSW = new FileSyncWrite<LocalPersistData>($"sync{Path.DirectorySeparatorChar}local.json", 
    CTS.Token,              //The token mentioned above

    rollingDelay: 1000,     //Rolling delay is bumped every time an Update() is pushed in. 
    maximumDelay: 10000,    // Maximum delay is if rolling delay is never expired
                            //  When either event is satisfied, the data is written to disk

    (s,data) => { }         //This is an updated event callback. Any time the data is written, this is called

    );


//If initialized, then a value was loaded back in from the disk.
//If this is FALSE, no value was loaded in
if (_FSW.InitializedValue)
{
    localData = _FSW.Get();
    Console.WriteLine($"FSW Initialized: {localData.Count}, {localData.Offset}");
}

//Register an additional callback
_FSW.UpdatedEvent += (object s, LocalPersistData e) =>
{
    if (e != null)
        Console.WriteLine($"FSW Updated: {e.Count}, {e.Offset}");
};

//Push debounced updates to it:
localData.Count++;
_FSW.Update(localData);

//Tell the FSW to end all pending update queues and sync data back now
CTS.Cancel();

Task.Delay(8000).Wait();
return;
```

The class used above is simply two properties with getter/setters:

```csharp
public class LocalPersistData
{
    public int Offset { get; set; }
    public int Count { get; set; }
}
```

### Thread Conditions

Thread Conditions provide a way to cancel processes if a condition is not met. It's a great way to turn off a service is the network is down or the hard drive is too full. They're fully customizable and allow you to set your own logic for how they should be run.

{% content-ref url="/pages/LylnL1wlg67GCRZ5TEKz" %}
[Thread Conditions](/core-modules/utility-classes/thread-conditions)
{% endcontent-ref %}

### Transaction Coordination&#x20;

Transaction Coordinator is the big boss of all of the above methods. It implements cancellation tokens, exit events, retries, the FSW modal, and local+remote two way synchronization.&#x20;

Think of the coordinator as a way of defining the steps of a process in logical tiny blocks, and always verifying you move through those blocks in the correct order while never missing a step, or data in the process.&#x20;

It's so fault tolerant you can terminate the running application, and restart it at any point and it will pick up where it left off. Impressive eh?

To see this better in action, [check out it's page](/core-modules/integration-utilities/transaction-coordinator#what-is-the-coordinator)!


# Troubleshooting

If you're having issues getting a Perigee application to start or load properly, check the below items:

## License check

The license check run's immediately on application startup, and if a valid license is not detected, it will immediately shut down the application.&#x20;

1. Make sure you have a valid license, and your trial period is not expired
2. Make sure you're copying that license file to the output directory, or it is installed on the server.

## Serilog configuration

If a Serilog sink is configured to startup on a remote source (like a database), Please verify that it has an open connection and there are no firewalls preventing Serilog from initializing.


# Case Studies

Over the final few years in development we have worked closely with other companies to test, refine, and apply Perigee to their business needs. Here are a few **testimonials of successfully implementing Perigee in their current production applications**.

## Parallel Transformation Task&#x20;

> With the assistance of Perigee we utilized the powerful set of parallel processing libraries to speed up our customer data transformation process by a little over %500,000 - from hours to microseconds. Perigee made this possible for us.

## Multi-Agent Daily Refresh Tasks & Scheduling

> Perigee allowed us to schedule our complicated daily refresh processes with ease. The “Sync Agents” allowed us to build up a tiered and structured refresh system that follows our requirements. We get reports sent to our team with the status of every job after they complete so we can easily monitor the process. It’s been running for almost a year now and through the logging has helped us identify multiple outages on our third party system.

## Daily Integration Process With Notifications

> Perigee serves as the foundation for our daily integration and data mapping between source systems. It enables us to schedule synchronizations daily, with the flexibility to initiate ad-hoc syncs as needed. The powerful logging allows us to query our database for each step of the refresh process on a per-transaction basis. In case of any issues, we receive instant notifications on our devices, making us aware of system outages within minutes.

## Azure/Graph - Custom Sharepoint Workflow

> We used Perigee to work directly with Microsoft Graph and Azure Service Bus to enable a custom Sharepoint solution for our analysts. Perigee handles the daily Authentication requirements, and provides us with an easy way to temporarily turn off the service bus when applying patches to our code base. We saved several hundred development hours by using Perigee.

## Email Data Processor

> Our email bot has processed thousands of files over the past 8 months, all thanks to Perigee's IMAP connector. It features a robust SDK that allows us to receive files, respond with dynamic HTML, and process the results as we get new requests. Perigee enabled our team to finish this task with minimal effort and saved weeks of development time.

## Empowered Our Client Website's Query Functionality

> Perigee has empowered our company to efficiently process and prepare large hierarchical documents, owing to its parallel processing and NestedSet helpers. We can effortlessly query the document hierarchy and pose complex questions from the UI, which would be impossible without the data preparation carried out by Perigee.

## Transformation Engine

> We build a powerful transformation engine powered by the incredible CSV reader provided by Perigee. We're able to load, process, and transform customer data at lightning speed - far better than anything we tried previously.


# Licensing

## Purchase a license

To purchase a license, please visit <https://perigee.software>.

## Have questions, need more than 10 licenses or want to discuss volume discounts?

Contact us at [Sales@perigee.software](mailto:sales@perigee.software). We are happy to hear from you!


# Notice of Third Party Agreements

## Perigee Licensing Agreement

SOFTWARE IS PROVIDED "AS IS", WITHOUT WARRANTY OF ANY KIND, EXPRESS OR IMPLIED, INCLUDING BUT NOT LIMITED TO THE WARRANTIES OF MERCHANTABILITY, FITNESS FOR A PARTICULAR PURPOSE AND NONINFRINGEMENT. IN NO EVENT SHALL THE AUTHORS OR COPYRIGHT HOLDERS BE LIABLE FOR ANY CLAIM, DAMAGES OR OTHER LIABILITY, WHETHER IN AN ACTION OF CONTRACT, TORT OR OTHERWISE, ARISING FROM, OUT OF OR IN CONNECTION WITH THE SOFTWARE OR THE USE OR OTHER DEALINGS IN THE SOFTWARE.

### Licensing production and development use

To obtain a valid license after the trial period, visit [https://Perigee.software](https://perigee.software) to purchase and view license terms and conditions.

## Third Party licensing agreements

### Dapper, Serilog, Serilog.AspNetCore, Google.Apis.Auth, Google.Apis.Gmail.v1, RestSharp&#x20;

The packages listed are licenced under Apache 2.0: <http://www.apache.org/licenses/LICENSE-2.0>

Licensed under the Apache License, Version 2.0 (the "License"); you may not use this file except in compliance with the License. You may obtain a copy of the License at

<http://www.apache.org/licenses/LICENSE-2.0>

Unless required by applicable law or agreed to in writing, software distributed under the License is distributed on an "AS IS" BASIS, WITHOUT WARRANTIES OR CONDITIONS OF ANY KIND, either express or implied. See the License for the specific language governing permissions and limitations under the License.

### Ude.NET

The contents of this file are subject to the Mozilla Public License Version 1.1 (the "License"); you may not use this file except in compliance with the License. You may obtain a copy of the License at <http://www.mozilla.org/MPL/>

Software distributed under the License is distributed on an "AS IS" basis, WITHOUT WARRANTY OF ANY KIND, either express or implied. See the License for the specific language governing rights and limitations under the License.

### CometD.NetCore2, Bogus, BrotliSharpLib, Newtonsoft.json, Newtonsoft.json.schema, Portable.BouncyCastle, ExcelDataReader, HtmlAgilityPack, MailKit, NetCoreForce.Client, Pluralize.NET, SharpZipLib

The MIT License (MIT)

Permission is hereby granted, free of charge, to any person obtaining a copy of this software and associated documentation files (the "Software"), to deal in the Software without restriction, including without limitation the rights to use, copy, modify, merge, publish, distribute, sublicense, and/or sell copies of the Software, and to permit persons to whom the Software is furnished to do so, subject to the following conditions:

The above copyright notice and this permission notice shall be included in all copies or substantial portions of the Software.

THE SOFTWARE IS PROVIDED "AS IS", WITHOUT WARRANTY OF ANY KIND, EXPRESS OR IMPLIED, INCLUDING BUT NOT LIMITED TO THE WARRANTIES OF MERCHANTABILITY, FITNESS FOR A PARTICULAR PURPOSE AND NONINFRINGEMENT. IN NO EVENT SHALL THE AUTHORS OR COPYRIGHT HOLDERS BE LIABLE FOR ANY CLAIM, DAMAGES OR OTHER LIABILITY, WHETHER IN AN ACTION OF CONTRACT, TORT OR OTHERWISE, ARISING FROM, OUT OF OR IN CONNECTION WITH THE SOFTWARE OR THE USE OR OTHER DEALINGS IN THE SOFTWARE.


# Extending - Threads

Let's take a look at how you might extend Perigee to fit your companies very specific needs. Although we ship with many different connectors, watchers, agents, and synchronization features you may want to add something to the Perigee core system. It is very easy to implement custom threads. This is one the reasons Perigee is so powerful as we don't lock you out of adding and customizing the application.&#x20;

There are two types of custom threads you can add where both have different execution rules as they allow you create any additional functionality needed for your specific requirements.&#x20;

### Managed Thread

The first type is a managed thread. The <mark style="color:blue;">**ManagedThread**</mark> calls the callback method when it is started, <mark style="color:red;">**and doesn't expect that method to return, throw an exception, or exit until the**</mark><mark style="color:red;">**&#x20;**</mark><mark style="color:red;"><mark style="color:orange;">**cancellation token**<mark style="color:orange;"></mark><mark style="color:red;">**&#x20;**</mark><mark style="color:red;">**is canceled**</mark>.&#x20;

When the callback does exit before token cancelation, it will restart the thread a second later expecting the process to start again. \
&#x20;  If an exception is thrown and is uncaught within the callback, it will be caught in the <mark style="color:blue;">**ManagedThread**</mark>, and the <mark style="color:orange;">**ExceptionRestartTime**</mark> property of the manager will be awaited before restarting.&#x20;

Below is a fully working extension that adds a new method to call from `TaskConfig`.

```csharp
public static ThreadRegistry AddCustomXYZFunction(this ThreadRegistry tr)
{   
    //Create a regular managed thread (not an expression, CRON)
    var TM = new ManagedThread("CustomXYZFunction", (ct, l) => { 
        
        //The callback method is here...

        do
        {
            //An example of repeating something every second, and exiting the thread when the token is cancelled.


            //Doing a long process that can be stopped safely? Pay attention to the cancellation token, and kindly exit when a graceful shutdown is requested.
            if (ct.IsCancellationRequested)
            {
                //Save or finish or persist information.
                return; 
            }

        }
        while (PerigeeApplication.delayOrCancel(1000, ct));

    }, tr.CTS, tr.GetLogger<Program>(), started: true);

    //Set additional options
    TM.ExceptionRestartTime = TimeSpan.FromSeconds(30);

    //Add the thread to the management system
    tr.AddManagedThread(TM);
    
    return tr;
}
```

Then to use this custom method on startup.

```csharp
PerigeeApplication.ApplicationNoInit("DemoApp", (c) => {

    c.AddCustomXYZFunction();
    
});
```

### Expression Thread

This is nearly identical to the managed thread, however it's execution is built on a CRON expression. This changes the way the callback functions slightly.&#x20;

The Callback Method is ONLY called the expression is at execution time. This means the process is expected to kick off, and end by returning out of the method.&#x20;

If an exception is thrown, it will be caught in <mark style="color:blue;">**ManagedThread**</mark>, but no additional delay is added as the next execution period of the CRON expression will simply call the callback again.&#x20;

{% hint style="warning" %}
The takeaway about the two types:

**Expression Threads**: Get called, expect to exit.

**Managed Threads**: Get called, don't expect to exit, and will trigger the restart functionality on uncaught exceptions.&#x20;

{% endhint %}


# Extending - Loaders

It's very easy to add custom providers.

It's very easy to add custom providers. Remember that .NET creates a <mark style="color:blue;">**ConfigurationSource**</mark> that implements and returns a <mark style="color:blue;">**ConfigurationProvider**</mark>.&#x20;

You can see this pattern here: [Implement a custom configuration provider](https://docs.microsoft.com/en-us/dotnet/core/extensions/custom-configuration-provider).

### Custom Implementation

To implement a custom source and provider only requires a single line of code.

1. Call the ConfigureConfiguration method.&#x20;
2. This callback sends you two parameters:
   1. <mark style="color:blue;">**IConfigurationBuilder**</mark> This builder allows you to add a custom source.
   2. <mark style="color:blue;">**EnivronmentString**</mark> the string variable that is the current environment.&#x20;
3. Simply add a new instance of the source. (See **line 5**)

{% code lineNumbers="true" %}

```csharp
PerigeeApplication.ApplicationNoInit("DemoApp", (c) => {
    
    //Add ConfigurationSource to the builder
    c.ConfigureConfiguration((builder, EnvStr) => {
        builder.Add(new SQLConfigurationSource("connectionString", "select [name], [value] from dbo.configs", "sql"));
    });

    //Reload all providers
    c.ReloadProviders();

    //Reload the specific provider
    c.ReloadProvidersOfType(typeof(SQLConfigurationProvider));
    
    string MyValueFromSQL = c.GetValue<string>("sql:MyValue");
    
});
```

{% endcode %}

You can see how easy it is in the future to reload the providers. You can reload all of them or specific types by supplying that type information.

### Using the built in SQL Provider

If you're trying to load values from a SQL database, then Perigee ships with a loader ready to go in only a single line of code. Simply call the configuration method and supply the connection, query, and prefix.&#x20;

{% hint style="success" %}
Because this works with `IDBConnection`, it works with MSSQL, PostGres, MySql... etc. Just supply the appropriate connection and it will work!
{% endhint %}

{% code overflow="wrap" %}

```csharp
PerigeeApplication.ApplicationNoInit("DemoApp", (c) => {

    //Configure the SQL Property loader using SqlConnection
    c.ConfigureSqlPropertyLoader(
        () => new SqlConnection(c.GetConnectionString("main")),
        "SELECT [Key],[Value] FROM [dbo].[PropertyStore]");

    string MyValueFromSQL = c.GetValue<string>("sql:MyValue");
    
});
```

{% endcode %}


# All about CRON

Not corn, but close...

## What about a CRON?

CRON strings are a concise way of telling the application when to schedule or run something. Perigee uses CRON string data throughout for advanced process scheduling and events.&#x20;

### CRON Data Explanation

Most CRON strings contain five bits. Perigee's CRON can contain 6 if you use the optional seconds bit.

```
Second   Minute      Hour      Day      Month      Day-Of-Week
   *        *         *         *         *            *
```

* The **ASTERISK** character means "All Available Values"
  * For hour, this is 0-23
  * For Minute, this is 0-59
  * For Day this is 1-31
  * For Month this is 1-12
  * For Day-Of-Week this is 0-6 (Sunday being 0)
* The **COMMA** character is a list of values
  * If the Month bit is **`0,1,2`** - Then the CRON is only run in Jan, Feb and March.
* The **DASH** character means a range from a-z.
  * If the day bit is **`0-6`** - Then the CRON is only run the first 7 days of the month
* The **SLASH** character is a divider of all available values.
  * If the second bit is **`*/5`** - Then the CRON is executed on every fifth second.
* There are several special characters that can only be used in certain situations.&#x20;
  * The **F** character is for FIRST OF:
    * This can be used in the Day or Day-Of-Week bits
    * In the day bit, **`F`** - The CRON would run the first day of the month
  * The **L** character is for LAST OF:
    * This can be used in the Day or Day-Of-Week bits
    * In the day bit, **`L-2`** - The CRON would run the second from last day of the month
  * The **#** is for day-of-week selector
    * This is only used in the Day-Of-Week bit:
    * **`0#2`** would be the second Sunday (0 Sunday #2)
    * **`1#3`** would be the third Monday (1 Monday #3)

## Examples

### How would I run a CRON every morning at 5AM ?

* Let's leave out the seconds since we don't need that here.&#x20;
* If we don't specify 0 in the minute bit the CRON it will run every minute of 5AM.
* 5AM is 5 in the hour bit.
* The key request is "every day", so let's set the day bit to an asterisk.
* Every other

```
0 5 * * *
```

### How would I run a CRON at 1AM on the last Friday of every month?

* This is where that special L character comes into play.
  * Day-Of-Week starts as 0 Sunday, so Friday would be 5.
  * Asking for the last friday of the month would be L5 in day-of-week bit.
* If we don't specify 0 in the minute bit the CRON it will run every minute of 1AM.
* 1AM in the hour bit is 1
* Asterisks for the other fields

```
0 1 * * L5
```

### How would I run a CRON at 1AM on the second to last day of the month?

* This is where that special L character comes into play again.
  * Asking for the second to last day of of the month would be L-2 in day bit.
* If we don't specify 0 in the minute bit the CRON it will run every minute of 1AM.
* 1AM is the hour bit is 1
* Asterisks for the other bits&#x20;

```
0 1 L-2 * *
```

## The SDK

#### Parse

Call Parse on any CRON string. It will detect if seconds are present.

```csharp
var cparsed = Cron.Parse("0 1 * * 0#1");
```

#### Occurrence

Get the next occurrence from a given date or supply a different time zone to find the next occurrence in that time zone.

```csharp
var nOcc = cparsed.GetNextOccurrence(DateTimeOffset.Now);

//You can also supply a timezone:
var nOcc = cparsed.GetNextOccurrence(DateTimeOffset.Now, TimeZoneInfo.Utc);
```

#### Print info

You can use that parsed CRON to display info about it.

```csharp
Console.WriteLine(cparsed.ToString());
//Prints: on minute 0 on hour 1 on the 1st Sunday
```

#### Inverse Period

The only other method you may care about is the **`InversePeriod`**. **`InversePeriod`** is interesting as it takes the CRON string and determines how consecutively it runs.

```csharp
var inv = Cron.Parse("* 1-2 * * *").GetInversePeriod(DateTimeOffset.Now);
Console.WriteLine($"From {inv.Item1:G} to {inv.Item2:G}");

//Prints: From 1/1/2023 1:00:00 AM to 1/1/2023 2:59:00 AM
```

Notice how this CRON would run from 1AM consistently at every interval (minute) inclusively to 2:59AM? This method is an interesting way to use CRON data to specify ranges of time.

## CRON in Perigee

There are bunch of ways to use CRON strings in Perigee. Let's take a look at a few:

#### Agents

[SyncAgents](/core-modules/event-sources/scheduled-logic/sync-agent) use CRON strings to determine when to run, and even when to create blackout periods. You can see more in the linked section. Here's a quick preview!

{% code lineNumbers="true" %}

```csharp
taskConfig.AddAgent("DailySync", "DailySync", "DailyDB", 
new SyncAgentSourceMemory("SA.json"), AgentRunCondition.RunIfPastDue,

(configAgent) => configAgent.SetSyncLimitPerDay(2).SetSync(null, "55 6 * * *"),

(ct, l, executeHandler) => 
    DailySync.sync(taskConfig, taskConfig.CTS.Token, log, executeHandler, "DailyDB"),

(ct, l, treeHandler) => { },

TimeSpan.FromMinutes(5), TimeSpan.FromMinutes(10), false)
    .LinkToConfig("Agents:DailySyncEnabled");
```

{% endcode %}

#### BlockUntil&#x20;

This is a handy way of creating an awaitable task, or thread blocking mechanism using a CRON string.

```csharp
//Async wait until the 0th second of every 5th minute
await PerigeeUtil.BlockUntil("0 */5 * * * *");

//Or for non async methods
PerigeeUtil.BlockUntil("0 */5 * * * *").GetAwaiter().GetResult();
```

#### Methods using CRON

As part of the core set of events in Perigee, you can easily add CRON methods.

```csharp
PerigeeApplication.ApplicationNoInit("Crons", (c) =>
{
    c.AddCRON("CronMethod", "0 */5 * * * *", (ct, l) => {
        //Run's every 5 minutes at second 0
    });

});
```

## CRON Testing Resources

#### A method to parse and print

A handy little method to print the definition of a CRON string, as well as print the next occurrence:

```csharp
void PrintCRON(string inputStr)
{
    Console.WriteLine(inputStr);
    var cparsed = Cron.Parse(inputStr);
    Console.WriteLine(cparsed.ToString());
    var nOcc = cparsed.GetNextOccurrence(DateTimeOffset.Now);
    Console.WriteLine(nOcc.Value.ToString("G") + Environment.NewLine);
}
```

#### A site to test CRON data

This is an amazing site to visually and instantly see the results of a CRON.&#x20;

{% hint style="warning" %}
FYI, They don't supports seconds or the special character options :thumbsup:
{% endhint %}

{% embed url="<https://crontab.guru>" %}


# What is API Generation?

### Introduction

API Generation empowers developers to accelerate the development process of setting up a new API significantly. Whether you're creating an API for the first time or you're a seasoned veteran, crafting an API is more straightforward with the tools provided by Perigee.

API Generation refers to the creation of an API from a source document, such as Postman, or directly in code using the fluent syntax, without the in-depth knowledge required to configure a new API from scratch. It might seem too good to be true...

{% hint style="success" %}
Did you know you could save **hundreds** of hours by generating an API from a JSON source?
{% endhint %}

### Benefits of API Generation

When contemplating your next API project, here are some points to consider:

#### Mocking

Mocking is the procedure of emulating a production API and creating a "shadow copy" for testing purposes. This ensures tests are conducted without the repercussions of calling the actual API. Such capability grants developers complete control over integrations. They can alter API responses, introduce delays, and disable parts of the API, facilitating better integration development from the outset.

#### A New API?

Embarking on a new API for testing or production? Feed the generator a set of JSON documents and gain a substantial advantage in your new venture. Sidestep the tedious hours spent on configuring authorization, settings, or Swagger examples—let the code handle it!

#### Typo Free

Eliminate concerns over model typos or overlooked code. We generate everything based on a model registry that ensures the output is pristine C# code.

#### Time Savings

In our demo, we replicated the DropBox API, resulting in approximately 35,000 lines of code, encompassing:

* Class Models
* Documentation
* Controllers and Actions
* Swagger Samples
* Comments
* Authorization

{% hint style="success" %}
Ponder over this: How long would it take your developers to rewrite 35,000 lines of code—error-free, typo-free, and meticulously documented? A lot of caffeine might be needed to answer that!
{% endhint %}

#### AI Power

Curious about how OpenAI's ChatGPT API hinting operates? Here's an insight:

Consider an API method you've set up named **`EchoMessage`**. The model defined for this is a class named **`Echo`** that comprises a **`message`** string.

Your AI hint suggests: <mark style="color:blue;">**"Take my echo message method and return a JSON object that sends the user's message back to them."**</mark>

In response, the API Generator composes a specific message for GPT, containing your input/output models and the organized method, providing GPT with the complete context to fulfill your request. It appears like:

{% code overflow="wrap" lineNumbers="true" %}

```csharp
public class Echo { public string message {get; set; } }

[HttpPost]
public IActionResult EchoMessage([FromBody] Echo request) {
    //{Take my echo message method and return a json object that returns the users message back to them}
}
```

{% endcode %}

GPT could suggest the following improved code (this is an actual response from GPT!):

{% code lineNumbers="true" %}

```csharp
[HttpPost("EchoMessage")]
public IActionResult EchoMessage([FromBody] Echo request)
{
    if (request == null)
    {
        return BadRequest("Request body is null");
    }
            
    return Ok(new { echoedMessage = request.message });
}
```

{% endcode %}

Impressive, isn't it?


# API Builder

## APIBuilder

This static class enables users to create an API specification using both custom specifications as well as specifications derived from Postman integration. Most notably, it provides a way to fully generate a complete Web API given an APISpecification.

### From

This method allows users to manually build an API Specification using a fluent syntax.&#x20;

You can easily add endpoints after declaring the specification like so:

#### Example:

```csharp
//Declare spec
var spec = APIBuilder.From("ProjectName", AuthorizationType.Bearer, true, true);

//Add as many endpoints, in this example, an echo endpoint
spec.AddEndpoints(
  APIGeneration.Endpoint.From(spec, "Echo", "/echo", APIGeneration.Method.GET)
    .WithRequestJSON(@"{""echo"": ""message""}")
    .WithAIAssistance("Echo the message back to the use in json"));
```

### FromPostman

This method allows users to build an API Specification from Postman. This is useful for integrating existing Postman collections into new or existing projects.&#x20;

{% hint style="warning" %}
If your collection contains **{{environment variables}}**, please supply the environment.json as well as the collection.json.
{% endhint %}

#### Example:

```csharp
APIBuilder.FromPostman("ProjectName", "PostmanCollection.json", "env.json");
```

### GenerateAPI

This method generates a full web API given an APISpecification. It requires the specification object, the project path, as well as optional parameters for IIS, HTTP and HTTPS Ports, additional installs, additional App Settings, a GPT Token and Model for generative AI, and boolean flags for generating Controller and Method summaries.

#### Example:

```csharp
APIBuilder.GenerateAPI(spec, "ProjectPath", 60978, 7181, 7182, additionalInstalls, additionalAppSettings, "GPTToken", "gpt-4", true, false);
```


# Design and Requirements

For this section, let's walkthrough start to finish how you might design and build your companies specific application needs.&#x20;

Here's the quick bullet list of every step of this process:

* Starting template
* Define Sources
* Requirements

## Starting with a template

* Does our system need to respond to API requests?
  * Is data pushed to your service with POST requests?
  * Does it need to respond to a `ping` request?
  * Does it provide on-demand data through restful calls?
* Do you plan on implementing administrative requests for your system?&#x20;
  * Do you want to be able to shutdown threads with an administrative login?
  * Do you want to check the status, runtime, or other system metrics?

If you answered "yes" to any of the above: lets start with this blueprint for built in hosting:

{% content-ref url="/pages/lNGf3TZSO5B97YPpPNWn" %}
[Perigee With .NET Hosting](/blueprints/perigee-with-.net-hosting)
{% endcontent-ref %}

Otherwise we can create a standard .NET 6 project.


# Define Sources

Let's take a look at what sources we may use and create the configuration, credentials, and refreshes we need to use.

* Do we want to put connection strings in the <mark style="color:green;">**appsettings.json**</mark> and read them?
  * Create the json sections and keys
  * Optionally, <mark style="color:red;">**encrypt them**</mark>
* Do we want to implement a property loader?
  * See [Property Loaders](/perigee-and-beyond/extending-loaders)
* Do we communicate with anything on the web?
  * See [Restsharp Authenticators](/core-modules/credential-management/restsharp-authenticator) and [Credential Management](/core-modules/credential-management).&#x20;
  * Read all about the [HTTP(S) communication and extensions](/core-modules/integration-utilities/http-s-restsharp) here.
* Do we need to define additional services to dependency inject?
  * See the [Core Module: Application](/core-modules/perigeeapplication).
* Do we have any important information we need to keep in synchronized state like pull dates, offsets or delta keys?
  * Define a [Watermark ](/core-modules/integration-utilities/watermarking)for all basic data types
  * Or define a custom [FileSync ](/core-modules/file-system-storage/filesync-+-cache)to track a rich data object
  * Look at the [Limiter ](/core-modules/integration-utilities/limiter)for resource restricted calls.
* Do you need to have things run on a timer?
  * Check out the [CRON thread](/core-modules/event-sources/scheduled-logic/cron-thread).
  * Have a [scheduler ](/core-modules/event-sources/scheduled-logic/scheduler)pick up items from a remote source, like a database.
  * Have a network of [Sync Agent's](/core-modules/event-sources/scheduled-logic/sync-agent) communicating and performing refresh tasks.&#x20;
* Do you need to coordinate a list of steps and NEVER have a failure cause the process to break?
  * Create a [Transaction Coordinator](/core-modules/integration-utilities/transaction-coordinator).
* Talk with third parties:
  * [Salesforce](/core-modules/event-sources/watchers/salesforce)
  * [Microsoft Graph](/core-modules/third-party/microsoft-graph)
  * [DataVerse](/examples-and-demos/graph-delegated-authorization-+-dataverse#for-dataverse)
  * [SmartSheets](/core-modules/third-party/smartsheets)
  * [Azure Service Bus](/examples-and-demos/azure-service-bus)
* Do you have any instances of:
  * Testing [Network Connectivity](/core-modules/utility-classes/network-utility)?
  * [Sorting dependencies](/core-modules/utility-classes/topological-sorting)?
  * [Working in Parallel](/core-modules/perigee-in-parallel)?&#x20;
  * Sending [notifications](/core-modules/alert-managers)?
  * Run logic through a [behavior tree](/core-modules/utility-classes/behavior-trees)?
  * Sort and [query hierarchical data](/core-modules/utility-classes/nested-sets)?


# Requirements

Every application design has requirements, and before starting a new project, or convert an old project you're going to want to define what those requirements are.&#x20;

This is different for every organization and every process so in this walkthrough we'll take a few common examples and show how we might architect those scenarios.&#x20;

## Common Requirements

### We need an API

Whether JSON, plaintext, xml, or file content, the built in .NET hosting with Perigee has you covered. Check out the blueprint here:

{% content-ref url="/pages/lNGf3TZSO5B97YPpPNWn" %}
[Perigee With .NET Hosting](/blueprints/perigee-with-.net-hosting)
{% endcontent-ref %}

### We have an important mission critical daily process that needs to succeed.

For this type of process we have several options.&#x20;

* The first option is our [Sync Agent](/core-modules/event-sources/scheduled-logic/sync-agent):
  * This handy agent is highly configurable and can use everything from recurring timers, CRON strings, blackout periods, behavior trees, inter agent communications and more.
  * You the designer have complete control over the system and how/when it executes the processes
  * They can be easily turned on or off with the SDK.
  * They can communicate with other defined agents and use them as dependencies to execute.
  * They know how to execute behavior trees to determine run conditions
* The second option is a simple [CRON method](/core-modules/event-sources/scheduled-logic/cron-thread):
  * CRON methods are very lightweight and they're only job is to fire on on time.
  * All of the implementation details, retry logic, and execution is up to you.
* The third option is the [Transaction Coordinator](/core-modules/integration-utilities/transaction-coordinator):
  * The coordinator is highly fault tolerant and is typically used with a queue of requests, however they can be used to perform a singular daily task with very high tolerance.
  * The coordinator tracks EVERY step of the process from initialization data to final completion. It stores a highly compressed file at every step of the process and can resume locally and remotely when the application or server is stopped and restarted.&#x20;
  * If you need to replay the same transaction later, you're able to inherit the initial request and replay it again later

### We use Salesforce and need to trigger a process on new records

If you need direct API access or to use push topics and have data streamed to your application, we have that covered here:

{% content-ref url="/pages/swMbXNPWQPzrCSDLJhus" %}
[SalesForce](/core-modules/event-sources/watchers/salesforce)
{% endcontent-ref %}

### We have CSV files dropped in a folder every day and need to import that data

Use the [DirectoryWatcher](/core-modules/event-sources/watchers/directory-watch):

* It checks file locks automatically
* Verifies file size over time to prevent callbacks on actively writing content
* Asynchronous file operations
* Options for failures

### We have scheduled reports that need to be run

Use the built in [Scheduler](/core-modules/event-sources/scheduled-logic/scheduler):

* It allows for individual rows in a database to control when a function is in code executed.&#x20;
* It tracks changes to the rows in real time and will adjust scheduled tasks accordingly when the rules change.
* Accepts a CRON string, a timezone, and a runtime type with arguments.&#x20;

### We need to process customer orders

{% hint style="info" %}
Typically speaking this kind of logic is implemented on the receiving end of a message queue. If you use ActiveMQ, RabbitMQ, Kafka, or anything else, you would end up with a message that has an initial payload (let's say JSON to make life easy).
{% endhint %}

{% hint style="info" %}
An  "order process" typically communicates to a downstream service via REST API calls. In this example, we will be doing the same thing
{% endhint %}

This is where the [Transaction Coordinator](/core-modules/integration-utilities/transaction-coordinator) comes in.

* The coordinator is highly fault tolerant and has a built in multi-threaded processor to handle a defined number of queued transactions using the[ FIFO ruleset](https://en.wikipedia.org/wiki/FIFO_\(computing_and_electronics\)).&#x20;
* The coordinator tracks EVERY step of the process from the initial JSON payload to every single operation that is performed afterwards.
* Immediately upon queuing the transaction, the system can persist that item to disk and it is tracked and maintained in a highly compressed format that is updated as the transaction progresses.
* The Coordinator tracks the responses, requests, timing and codes as part of this transactional process automatically. No more pawing through logs trying to figure out what happened.&#x20;
* Retry logic, automatic transaction requeuing and a rich SDK to fine tune the steps are all available to you.
* If the downstream processor loses a day worth of data to faulty server, you're able able to simply replay an entire transaction process automatically by inheriting the initial JSON payload and walking through the same steps.&#x20;
* NEVER lose an order again.

### We need to import customer created Excel files

Maybe start with the API template if you want to accept a file through an API call:

{% content-ref url="/pages/lNGf3TZSO5B97YPpPNWn" %}
[Perigee With .NET Hosting](/blueprints/perigee-with-.net-hosting)
{% endcontent-ref %}

Then let's use the [ExcelReader ](/core-modules/file-formats/excel)class after we get the file posted to us:

* It's very fault tolerant, especially with customer created data.
* It uses very advanced data detection algorithms to scan for the actual table within a tab which can bypass headers and notes left by a user.

### We need to synchronize data from a third party with a DeltaKey

{% hint style="info" %}
A **DeltaKey**, sometimes called a **NextToken** or **Offset** are all ways of a third party API enabling multiple data retrieval calls by only sending back the new or modified records after the last time it was called.
{% endhint %}

We want to use three different methods to make this process easy:

1. Let's create a new [Watermark ](/core-modules/integration-utilities/watermarking)that stores our **DeltaKey**.
   * This will automatically sync this delta key to the local disk, and restore it upon application restart.
   * It has hooks to initialize the source, and provides event handlers when the data is updated
   * It's very easy to synchronize the watermark to a remote source, like a database or the cloud.
2. Let's register our [RestSharp credentials](/core-modules/credential-management/restsharp-authenticator) so we don't have to worry about authentication issues:
   1. This takes care of the reauthoring the token and making sure it's ready to authorize when needed.
   2. Anytime we create a new <mark style="color:blue;">**RestClient**</mark>, we supply this to the `Authenticator` of the `RestClientOptions`.
3. Let's use a [CRON scheduled thread](/core-modules/event-sources/scheduled-logic/cron-thread) to perform this operation on our schedule.
   1. We now have the **DeltaKey** stored, maintained and refreshed on application load and shutdown.
   2. We have the authentication token and parameters taken care of by the RestSharp Authenticators.&#x20;
   3. Run the logic:
      * Simply call the third party with the token and auth ->&#x20;
      * Process any data if it exists ->&#x20;
      * If you processed data, update the watermark ->&#x20;
      * Let the CRON fire again and repeat.


# PerigeeApplication

## Application initialization

Both application starting points are nearly identical. The full callback has an IPC token and the initialize callback. [Both are described in Hello Perigee](/getting-started/hello-perigee).

```csharp
Application(string appName, string IPCCancelToken, Action<IConfiguration> initialize, Action<ThreadRegistry> taskConfiguration, CancellationTokenSource cancelSource = null, Task HostTask = null, string[] CommandLineArguments = null)
ApplicationNoInit(string appName, Action<ThreadRegistry> taskConfiguration, CancellationTokenSource cancelSource = null, Task HostTask = null, string[] CommandLineArguments = null)
```

You may also run the **`ApplicationNoInit`** as an async method as well:

```csharp
PerigeeApplication.ApplicationNoInit("async", async (c) => { 
    await Task.Delay(1000);
});
```

## Initialize outside a PerigeeApplication

Sometimes you need to initialize outside of the scope of a PerigeeApplication. We do this for API applications, blazor applications, and other scenarios where we need to call something before Perigee.

```csharp
static void Main(string[] args) {

   //To initialize perigee and the thread system:
   ThreadRegistry tr = ThreadRegistry.InstanceWithArgs(args);
   
   
   //Initializing credentials is not usually required unless changing working directories.
   //If you must initialize them, use either A or B:
   
   //A) Call instance
   var cinstance = CredentialStore.Instance;
   
   //B) Congiure
   CredentialStore.Configure()
}
```

## Host Statistics

To get information about the host it's running on, there is a single method:

```csharp
GetHostStatistics()
```

The response class, <mark style="color:blue;">**`HostStatistics`**</mark> contains properties for the machine it's running on including machine name, drive info, cpu time and running directory.&#x20;

## Exit event

To get an exit callback, use the helper method supplied.

After return is executed and the domain/service is about to unload, `OnExit` has a few seconds to perform any last tasks, like persisting data.&#x20;

```csharp
static void Main(string[] args)
{
    PerigeeApplication.OnExit(() => {
        Console.WriteLine("Exiting");
    });

    return;
}
```


# Thread Registry

Most of the Demos have the property named `c` when registering a new <mark style="color:blue;">`PerigeeApplication`</mark>. The `c` simply stands for config. Let's take a look at how you can access and control the managed threads within an application.&#x20;

```csharp
PerigeeApplication.ApplicationNoInit("Demo", (c) => //"c" here is the registry
{     

});
```

## Properties

### The Cancellation Token

There is a single "global" token that all other tokens are joined to. This is a great place to listen for application shutdown as it's cancelled the moment a **SIG\_ABORT** or **CONTROL-C** event is received.

To get the globally registered cancellation token, it's available as such:

```csharp
//Use method
c.GetCancellationToken()

//OR go directly to the source
c.CTS.Token;
```

{% hint style="danger" %}
If you were to cancel this token you will shut off the entire application and trigger a graceful shutdown event. Only do this if you want the whole application to quit.&#x20;
{% endhint %}

### Names, configurations

**`AppName` -** is available for the registered application name, if used for logging or custom logic.

**`Args[]`** - is available if passed into the constructor, and is the application start parameters.

**`Configuration`** - is the IConfiguration that was loaded and built after it's Configuration phase.

**`ServiceProvider`** - The IServiceProvider after service build configuration

**`Event_ConfigurationUpdated`** - Is the event handler for subscribing to hot-reloads. You may also use the helper method `c.ConfigUpdatedEvent((nconfig) => {})`.

**`RegisteredTaskCount`** - The number of registered threads

### Hosted

Hosted application task is respected and shut down alongside Perigee.

**`HostTask`** - When hosting an API application, supply the host task and it is stored here. The demo for this functionality can be seen here:

{% content-ref url="/pages/lNGf3TZSO5B97YPpPNWn" %}
[Perigee With .NET Hosting](/blueprints/perigee-with-.net-hosting)
{% endcontent-ref %}

### Secure properties

**`SecureValueKey`** - The secure key

**`SecureValueIV`** - The secure IV

**`SecureValueSource`** - The secure source, either args, environment, or direct.

To see the demo for this, check out:

{% content-ref url="/pages/JSld9dHasgCserkEYv6H" %}
[Hello Configuration](/getting-started/hello-configuration)
{% endcontent-ref %}

## Configuration Methods

### IConfiguration

#### Configure

To override the `IConfiguration`, call **`ConfigureConfiguration()`**. This builds the IConfiguration with the default options and whatever you've added to the builder.

```csharp
PerigeeApplication.ApplicationNoInit("Configuration", (c) => {

    c.ConfigureConfiguration((cb, env) => {
        cb.AddKeyPerFile("keyDirectory");
    });

});
```

#### Reload Configuration Event&#x20;

```csharp
PerigeeApplication.ApplicationNoInit("Configuration", (c) => {

    c.ConfigUpdatedEvent((config) => {
        c.GetLogger<_PerigeeStartup>().LogInformation("Config updated");
    });

});
```

#### Get a configuration

```csharp
PerigeeApplication.ApplicationNoInit("Configuration", (c) => {

    //Get a value from the config by path
    var Name = c.GetValue<string>("HelloConfig:Name");
    
    //Get a class of the configuration section
    HelloConfig hc = c.GetConfigurationAs<HelloConfig>("HelloConfig");


});

public class HelloConfig
{
    public string Name { get; set; }
    public int Year { get; set; }
    public List<string> Tags { get; set; }
}
/*
 
"HelloConfig": {
    "Name": "HAL 9000",
    "Year": 2001,
    "Tags": [ "Heuristic", "Algorithmic" ]
  },
 
 */
```

### IServiceProvider

If you need to configure the service provider, do so with the **`ConfigureServices()`** callback.

#### Configure and get service

```csharp
PerigeeApplication.ApplicationNoInit("Configuration", (c) => {

    c.ConfigureServices((sc, env) => {
        sc.AddSingleton((isp) => new HelloConfig());
    });

    var hc = c.ServiceProvider.GetRequiredService<HelloConfig>();

});
```

## Windows Startup

### Registering

If you want to register an autostart for the windows platform, it does so by adding values to the registry. The app MUST be run with administrative privileges the first time this key is set.

```csharp
c.RegisterStartup();
```

## Thread Methods

### GetThreads

Get all threads from the management system

#### Example:

```csharp
c.GetThreads();
```

### RestartAllThreads

Restarts all threads in the system. **This will start stopped threads**, it's intended to perform a full reboot of the application and all of the threads, regardless of their current state.

#### Example:

```csharp
c.RestartAllThreads();
```

You could use the **`RunTime`** property to only restart threads that haven't been restarted in a certain period of time:

#### Example:

```csharp
c.GetThreads().Where(f => f.RunTime > TimeSpan.FromSeconds(30)).ToList().ForEach(f =>
{
        l.LogInformation("Restarting thread {n}", f.Name);
        f.StartOrRestart();
});
```

### StartOrRestart

Starts or restarts a thread with the specified name.

#### Example:

```csharp
c.StartOrRestart("MyThread");
```

### Start

Starts a thread with the specified name.

#### Example:

```csharp
c.Start("MyThread");
```

### Stop

**NOTE** We highly recommend using `QueueStop()` over `Stop()`. The reason is that Stop is not thread safe, and may cause issues. It exists only for niche, same thread operation. **Use with caution!**

#### Example:

```csharp
c.Stop("MyThread");
```

### QueueStop

Queues the stop of a thread, waiting for the task to complete.

#### Example:

```csharp
c.QueueStop("MyThread", true);
```

### IsRunning

Checks whether a thread with the specified name is running.

#### Example:

```csharp
bool isRunning = c.IsRunning("MyThread");
```

### StartIfNotRunning

Starts a thread with the specified name if it is not already running.

#### Example:

```csharp
bool started = c.StartIfNotRunning("MyThread");
```

### GetThread

Gets a thread with the specified name, if it exists. Use with caution.

#### Example:

```csharp
ManagedThread myThread = c.GetThread("MyThread");
```

### ContainsThreadByName

Checks if the collection contains a thread with the specified name.

#### Example:

```csharp
bool result = c.ContainsThreadByName("threadName");
```

### ExecuteCRONNow

Executes a CRON thread immediately by its name. Optionally, you can provide a callback to be invoked when the CRON operation is completed and the number of seconds to wait for a start operation

#### Example:

```csharp
bool result = c.ExecuteCRONNow("threadName", () => Console.WriteLine("CRON completed"), 3000);
```

### Add a custom managed thread

The best example of this is shown here:

{% content-ref url="/pages/XyYNcX0BMt2PfeK75lbU" %}
[Extending - Threads](/perigee-and-beyond/extending-threads)
{% endcontent-ref %}

### Link to Configuration

You can link managed threads to configuration values in one of two ways:

1. Use the handy **`.LinkToConfig()`** method immediately following the thread
2. Use the **`.LinkConfigToThread()`** method somewhere later

```csharp
PerigeeApplication.ApplicationNoInit("Configuration", (c) => {

    //Add a CRON thread that is not started by default. Then link it to the HelloConfig:Enabled boolean
    c.AddCRON("MyThread", "0 0 1 1 *", 
        (ct, l) => { 

            l.LogInformation("Running"); 

        }, 
        started: false).LinkToConfig("HelloConfig:Enabled");

    //You may also provide thread linking later:
    c.LinkConfigToThread("HelloConfig:Enabled", "MyThread");
    

});
```

{% hint style="warning" %}
Because configurations are loaded, hot-reloaded, and maintained internally by the configuration system, please also use the **`started: false`** flag on the thread itself. This will prevent the thread from starting while the configuration value is `"false".`
{% endhint %}

## Agent Methods

Agents are explained fully over here:

{% content-ref url="/pages/2DckwnBQc2AZLz9oxnlZ" %}
[Sync Agent](/core-modules/event-sources/scheduled-logic/sync-agent)
{% endcontent-ref %}

### Get agents

To get an agent after it's been added to the system, call **`GetAgent()`**.

```csharp
PerigeeApplication.ApplicationNoInit("Agent", (c) => {

    //Add an agent to run every 2 hours, at most 4 times a day 
    c.AddAgent("MyAgent", "Agent1", "Main", new SyncAgentSourceMemory("AgentDemo.json", c.GetCancellationToken()), AgentRunCondition.RunIfPastDue, (c) => c.SetSyncLimitPerDay(4).SetSync(TimeSpan.FromHours(2)),
        (ct, l, exec) =>
        {
            return exec.Complete(DateTimeOffset.UtcNow.AddHours(1));
        }, null);

    //Get the agent
    var agent = c.GetAgent("MyAgent");

    c.ConfigureAgent("MyAgent", (c) => c.SetSync(TimeSpan.FromSeconds(20)));
    //(MyAgent) Agent1(Main) Next Check in 18 seconds

});
```

### Configure agents

To reconfigure an agent after it's been added to the system:

```csharp
PerigeeApplication.ApplicationNoInit("Agent", (c) => {

    //Add an agent to run every 2 hours, at most 4 times a day 
    c.AddAgent("MyAgent", "Agent1", "Main", new SyncAgentSourceMemory("AgentDemo.json", c.GetCancellationToken()), AgentRunCondition.RunIfPastDue, (c) => c.SetSyncLimitPerDay(4).SetSync(TimeSpan.FromHours(2)),
        (ct, l, exec) =>
        {
            return exec.Complete(DateTimeOffset.UtcNow.AddHours(1));
        }, null);

    //Call configure, changing the timespan check to 20 seconds.
    c.ConfigureAgent("MyAgent", (c) => c.SetSync(TimeSpan.FromSeconds(20)));
    
    //You'll see the log of the next check event:
    //   (MyAgent) Agent1(Main) Next Check in 18 seconds

});
```

### Queue Remote Refresh

Queues an agent for remote refresh. The parameters are:

* The agent name.
* A boolean to say whether or not to queue if the current agent is executing.&#x20;
  * If **TRUE**, it will wait for the current execution to finish and then trigger another exeucution.&#x20;
  * If **FALSE**, it will not trigger another execution, but return.&#x20;
* An optional wait time before giving up. If the wait time is not supplied, it will wait indefinitely.

#### Example:

```csharp
c.Agent_QueueRemoteRefresh("AgentName", true, TimeSpan.FromSeconds(30));
```


# Event Sources


# Scheduled/Logic


# CRON Thread

An Expression Managed Thread is called every N seconds and is expected to exit the method call. It will repeat until the application is shut down or the thread is turned off.

```csharp
PerigeeApplication.ApplicationNoInit("ThreadDemo", (c) =>
{
    c.AddCRON("Repeat", "*/1 * * * *", (ct, l) => {

        l.LogInformation("Starting again, every minute!");
        
    });
});
```


# Scheduler

The Scheduler is a way of declaring tasks to execute on a given schedule and time zone. It provides an easy to use SDK for scheduling, automatic de-scheduling and re-scheduling for event tasks.&#x20;

#### Demo Code

{% code lineNumbers="true" %}

```csharp
PerigeeApplication.ApplicationNoInit("Demo Scheduler", (c) =>
{
   
    //Declare a new memory source, remember to use a single instance of memory/file based sources or locking can occur
    using var MemSource = new MemoryScheduledSource("memSource.json", c.CTS.Token);

    //Add scheduled items.
    //If this was something like a DatabaseScheduledSource, we obviously would control these records from the database, not here.
    MemSource.AddIfNotExists(GenericScheduledItem<ushort>.MemoryItem(0, "A scheduler, 15sec", "A", "a;b;c", "*/15 * * * * *", TimeZoneInfo.Local));
    MemSource.AddIfNotExists(GenericScheduledItem<ushort>.MemoryItem(1, "B scheduler, 45sec", "B", "b;c;d", "45 * * * * *", TimeZoneInfo.Local));

    //Add a scheduler with the MemorySource, a single callback is given for anything required to run (multi-threaded)
    c.AddScheduler("Main", MemSource, (ct, l, item) => { 
        if (item.GetRunType() == "A")
        {
            l.LogInformation("Running A with {args}", item.GetRunArgs());
        }
        else if (item.GetRunType() == "B")
        {
            l.LogInformation("Running B with {args}", item.GetRunArgs());
        }

    });

});
```

{% endcode %}

{% hint style="info" %}
The demo code uses the [**`Memory Scheduler`**](#memory-source) as it does not require a remote source. Typically speaking you would tie the event task descriptions back to a database record (like the MSSQL Scheduler Source).
{% endhint %}

* <mark style="color:blue;">**Line 5**</mark> - Declare a new event source. This demo uses the memory scheduler.
* <mark style="color:blue;">**Line 9-10**</mark> - Add the two scheduled items, A, and B, to schedule and execute
* <mark style="color:blue;">**Line 13**</mark> - Add a scheduler using the source we defined, and declare the callback.
  * You're given a <mark style="color:orange;">**CancellationToken**</mark> for respecting graceful shutdown event.
  * An <mark style="color:orange;">**ILogger**</mark> for logging to the system and defined sink sources.
  * And the <mark style="color:orange;">**GenericScheduledItem\<ushort>**</mark> Which is the interfaced item that allows you to access it's definition values.
* <mark style="color:blue;">**Line 14**</mark> - You can execute or perform any tasks you need. Like generating a report with parameters.
  * You can see the call to `GetRunType()`. There's also `GetRunArgs()`, `GetLastRunDate()`, `GetName()`, etc.

## SDK

## Memory Source

The Memory source stores all records, run times, and event descriptions on the path specified. It's a great way to test, debug, or play with the scheduler without having to stand up a database. Typically speaking for production scenarios, you would likely use a remote source, like a database or file to maintain the scheduled items.

```csharp
//Declare a new memory source, remember to use a single instance of memory/file based sources or locking can occur
using var MemSource = new MemoryScheduledSource("memSource.json", c.CTS.Token);

//Add scheduled items.
//If this was something like a DatabaseScheduledSource, we obviously would control these records from the database, not here.
MemSource.AddIfNotExists(GenericScheduledItem<ushort>.MemoryItem(0, "A scheduler, 15sec", "A", "a;b;c", "*/15 * * * * *", TimeZoneInfo.Local));
MemSource.AddIfNotExists(GenericScheduledItem<ushort>.MemoryItem(1, "B scheduler, 45sec", "B", "b;c;d", "45 * * * * *", TimeZoneInfo.Local));
```

## MSSQL Source

MSSQL Source is the example remote source included with the Scheduler. This source pulls records from a table in MSSQL which allows for 1 database record to create and maintain 1 scheduled task.&#x20;

Using the MSSQL source is very easy, it only required a registered connection string credential.

```csharp
//Register the connection string credential
CredentialStore.RegisterRefresh("MSSQL", (o) => new ConnectionStringCredentialStoreItem() { ConnectionString = c.Configuration.GetConnectionString("TestDB") });

//Supply it to the MSSQL Scheduled Source:
// Partition, CredentialName, Schema, TableName
var SQLSource = new MSSQLScheduledSource("Prod", "MSSQL", "dbo", "Scheduler");
```

{% hint style="info" %}
The code can actually be [found linked below](#code-for-sources).
{% endhint %}

## Generic Scheduled Item \<ushort>

This The included scheduled item interfaced class. It's suitable for most scenarios, but as the whole callback process is interfaced, you're able to implement your own class to use if needed.

Below are the interfaced methods for a scheduled item. These methods provide an easy way to retrieve the relevant properties on a scheduled task regardless of where that event description came from (in a database, a file, remotely, etc).

```csharp
 public interface IScheduledItem<T>
{
    public string GetName();
    public T GetID();
    public string GetCRON();
    public TimeZoneInfo GetTimeZone();

    public DateTimeOffset? GetLastRunDate();
    public DateTimeOffset? GetCreateDate();

    public string GetRunType();
    public string GetRunArgs();

    public DateTimeOffset? GetNextOccurance();

}
```

## Code for Sources

### Memory:

This memory source shows the most simplified way possible of implementing the interface and can be used to learn how it works.

{% file src="/files/hjjqyBzPRQUypNO5D7Ls" %}

### MSSQL:

If you're writing a custom connector to another database engine, this is a great template and guide to do so:

{% file src="/files/5sqh9VkRF76Qvww2m9IC" %}


# Sync Agent

## Resources

{% embed url="<https://youtu.be/D39yYVudaNk>" %}

## Agents

Sync agents are a more powerful and configurable ways of defining tasks that must perform under a given sequence, dependency tree, or schedule. They can be configured in a number of ways that allow for very complex and fine grain control over how and when they execute.

A few of examples of why we would use a sync agent:

* A task or job needs to be fired at a given time
* We need the ability to schedule something in a different time zone
* We want to request that an agent performs it's refresh from a remote source (like a database)
* The task is dependant on other tasks completing
* We have data that may expire if not kept current
* We need to supply multiple CRON strings to specify which times the task runs
* We need to supply a blackout range where the task should not be executed

### Agent callbacks

Agents have several main blocks to them, they are as follows:

```csharp
var MemoryAgentSource = new SyncAgentSourceMemory("MainPartition.json");

c.AddAgent("Agent Name", "TypeKey", "PartitionKey", MemoryAgentSource, AgentRunCondition.RunIfPastDue,

//Configure agent Callback
(configAgent) => configAgent.SetSyncLimitPerDay(2).SetSync(null, "30 6 * * *"),

//Callback Execution
(ct, l, exec) => exec.Complete(DateTimeOffset.Now.AddDays(1)),

//Tree check
(ct, l, tree) => { },

TimeSpan.FromMinutes(30), TimeSpan.FromMinutes(30), false).LinkToConfig("Agents:Level_1A_Enabled");

```

1. The first callback is the configuration section. We can set all kinds of settings including:
   * Maximum executions per day.
   * A timespan of how often to execute
   * An array of CRON strings to specifiy when to execute
   * Blackout periods in the form of Timespan and CRON strings.
     * Setting <mark style="color:red;">**"\* 5 \* \* \*"**</mark> as a blackout CRON would disallow the agent to run during the entire fifth hour of the day (from 5:00AM to 5:59AM inclusive)
2. The execution callback
   * This callback is only ever called when the agent is in an active refresh/sync state.&#x20;
   * You can perform whatever logic you need here, and simply return **`exec.Complete()`** or **`exec.Failure()`** depending on the results of your process
3. Tree check callback
   * This callback is only for late binding trees, in the below example you can see how it's used to setup a behavior tree for checking previous agent runs

{% hint style="info" %}
To learn about behavior trees, check out the page written on [Behavior Trees](/core-modules/utility-classes/behavior-trees) within Perigee.
{% endhint %}

### Example - Three agents configuration

In the below example we configure 3 agents.&#x20;

1. The first is run every 5 seconds, once a day.
2. The second is run on the minute 0 mark, once a day.
3. The level 2 agent has a late binding dependency tree to check to determine whether the first two succeeded and the data is not expired. If this is true, then it runs

```csharp
using Microsoft.Extensions.Logging;
using Perigee;
using Perigee.AI;
using Perigee.Scheduler;

// Visit https://docs.perigee.software to learn more
// Visit https://perigee.software to purchase a license!


PerigeeApplication.ApplicationNoInit("Unparalleled Task Coordination", (c) => {

    //Clear on start, for demo purposes only
    if (File.Exists("MemAgent.json")) File.Delete("MemAgent.json");

    //Source
    var AgentSource = new SyncAgentSourceMemory("MemAgent.json", c.GetCancellationToken());
    
    /* PullData agent */
    c.AddAgent("PullData", "PullData", "Main", AgentSource, AgentRunCondition.RunIfPastDue,
        (configAgent) => configAgent.SetSyncLimitPerDay(1).SetSync(TimeSpan.FromSeconds(5)),
        (ct, l, exec) => {

            l.LogInformation("Pulling and loading data from remote source...");
            Task.Delay(2000).Wait();
            l.LogInformation("Done! Data is valid until {date}", DateTimeOffset.Now.AddDays(1));
            return exec.Complete(DateTimeOffset.Now.AddDays(1));
        },
        (ct, l, tree) => { });

    /* LoadExcel agent */
    c.AddAgent("LoadExcel", "LoadExcel", "Main", AgentSource, AgentRunCondition.RunIfPastDue,
        (configAgent) => configAgent.SetSyncLimitPerDay(1).SetSync(null, "0 */1 * * * *"),
        (ct, l, exec) => {

            l.LogInformation("Loading data from Excel...");
            Task.Delay(2000).Wait();
            l.LogInformation("Done! Data is valid until {date}", DateTimeOffset.Now.AddDays(1));
            return exec.Complete(DateTimeOffset.Now.AddDays(1));
        },
        (ct, l, tree) => { });


    /* Add an agent "ExecuteRefresh" that ONLY runs after the first two have produced valid data */
    c.AddAgent("ExecuteRefresh", "ExecuteRefresh", "Main", AgentSource, AgentRunCondition.RunIfPastDue,
        (configAgent) =>
            configAgent.SetSyncLimitPerDay(1).SetSync(TimeSpan.FromSeconds(5))
            .SetLateBindingBehaviorTrees(true, false),
        (ct, l, exec) => {

            l.LogInformation("Starting refresh of data now that all my sources have non expired data");
            Task.Delay(3000).Wait();
            l.LogInformation("Done! Data is valid until {date}", DateTimeOffset.Now.AddDays(1));

            return exec.Complete(DateTimeOffset.Now.AddDays(1));
        },
        (ct, l, tree) => {

            //Late binding tree update checker
            if (tree.TreeType == AgentTreeType.SyncTree)
            {
                var BT = new BehaviorTree("Check previous level completion").AddSequence("Check expiration",

                    //Returns success if the data is not expired, allowing the sequence check to proceed
                    LeafNodes.AgentDataExpired("PullData", tree.AgentData, l),
                    LeafNodes.AgentDataExpired("LoadExcel", tree.AgentData, l));

                //Set tree for late binding execution
                tree.UpdateTree(BT);

            }
        }, failedTreeReshcedule: TimeSpan.FromSeconds(15));

});
```

## Code for sources:

### MSSQL

The code for the sync agent MSSQL source can be found here. If you're writing a connector to another database engine, this is a template and a guide on how to do so:

{% file src="/files/m7To8n0rS2Z7tNhEgqP5" %}

### Memory

The code for the memory source is linked here. A great example of how to implement the source interface

{% file src="/files/WkHwapynixtVVHy1Az0N" %}


# Watchers


# SalesForce

### Force Client

The <mark style="color:blue;">**PerigeeSalesForceClient**</mark> is an easy to use implementation on top of `NetCoreForce` that allows you to connect and authorize easily. It manages the token refreshes and local disk persistence as well as provides several additional methods for easy communication to SalesForce.

{% hint style="success" %}
We have used and implemented custom logic into `NetCoreForce`. To get more information about it's functionality the client documentation can be [found here](https://github.com/anthonyreilly/NetCoreForce)
{% endhint %}

## Authorization

There are two ways to authorize and keep the connection automatically active.&#x20;

* The Consumer Key and Consumer Secret are from the connected application
* Username (or password if using UserPass flow) are the login user details
* If using JWT, you'll supply the Certificate and optional password that was uploaded to the connected application

```csharp
//Username Password
var client = PerigeeSalesForceClient.UsernamePassword(
consumerKey, consumerSecret, 
user, pass);

//JWT
var client = PerigeeSalesForceClient.JWT(
consumerKey, consumerSecret, 
user, new X509Certificate2("SF.pfx", "ABCD123"), 
"login");
```

Once connected with either of the two methods mentioned above, you'll have full access to the available commands!

## Connected Applications

To get to the connected applications in SalesForce, go to "Setup => Build => Create => Apps"

1. Under the "**Connected Apps**" Create or Edit one
2. Enter a **Name** and **Contact Email**
3. Click the box: **Enable OAuth Settings**
4. Enter a **Callback Url**, something like: `https://login.salesforce.com/services/oauth2/callback`
5. Click **Use digital signatures**
   1. Upload a certificate (**.cer file**) (it can be self-signed)
   2. One option for creating a certificate is the `Java Key Tool`.
   3. Perigee ships with a `CertGen` as well, code is linked below
6. Add **Selected OAuth Scopes**.
   1. An example of these scopes might be:
      1. full
      2. api
      3. refresh\_token,offline\_access
7. Click **Save**
8. There's a button called: "**Manage Consumer Details**" - This will show your **consumer key** and **consumer secret**. Store them.
9. Click the "**Manage**" button at the top of the connected app, and then "**Edit policies**"
   1. Setup the polices as you need.
   2. An example of this would be:
      1. **Permitted Users**: "Admin Approved users are pre-authorized"
      2. **IP Relaxation**: "Relax IP restrictions"

{% hint style="info" %}
To create a self signed cert that is valid for 5 years using Perigee:

```csharp
var x5 = CertGen2.SelfSigned();
CertGen2.SaveX509ToPath(x5, "C:\\SF", "SF", "ABCDEFG12345");
```

{% endhint %}

## Examples

Our little demo model class is available here. As you can see, we've used `Newtonsoft` to remap "`Name`" to "`AccountName`".&#x20;

```csharp
public class SFAccount
{
    public string id { get; set; }

    [Newtonsoft.Json.JsonProperty("Name")]
    public string AccountName { get; set; }

    public string Type { get; set; }

}
```

### Describe an SObject

To perform a single describe call:

```csharp
var res = client.GetObjectDescribe("Account").GetAwaiter().GetResult();
```

### Get Objects

There are a bunch of ways to get objects, including [Querying ](#query-+-soql)for them. You may also supply direct IDS in a few ways as well:

```csharp
//Get a single object by ID, mapped back, supplying the fields
SFAccount byID = client.GetObjectById<SFAccount>("Account", "001f400000Mk8lPAAR", new List<string>() { "id", "name" }).GetAwaiter().GetResult();

//Get a list of objects by ID, dynamically automapped from your class to SalesForce
List<SFAccount> objectsByID = client.GetObjectsAsync<SFAccount>("Account", new List<string>() { "001f400000Mk8lPAAR", "001f400001N4NXqAAN" }).GetAwaiter().GetResult();
```

If you're going to be calling the auto-mapped version frequently, please cache the map results and supply them to the GetObjectsAsync call as shown:

```csharp
//Store the cache somewhere static
var CachedProperties = client.MapProperties<SFAccount>("Account").Values.ToList();

//Supply cache map on frequent and subsequent calls
List<SFAccount> objectsByID = client.GetObjectsAsync<SFAccount>("Account", new List<string>() { "001f400000Mk8lPAAR", "001f400001N4NXqAAN" }, CachedProperties).GetAwaiter().GetResult();
```

### Watch for changes

We provide an asynchronous block that automatically does all the date time handling, offsets, delays, authentication paramaters, etc. You can easily start or stop this process and it will pick up from the last set of records that were sent through.

```csharp
client.WatchAsync<SFAccount>("Account", CTS.Token, (ct, updated, deleted) => {
    
    //updated records, bound back to an SFAccount class
    foreach (var item in updated) { 
        Console.WriteLine($"[{item.id}] {item.AccountName}({item.Type})"); }
        
    //Deleted ID's, along with the deleted date
    foreach (var item in deleted) { 
        Console.WriteLine($"{item.id} - {item.deletedDate:G}"); }
        
}).GetAwaiter().GetResult();
```

#### Helper watch method

To add a watch directly from Perigee Startup as a Managed Thread:

```csharp
PerigeeApplication.ApplicationNoInit("SalesForce Demo", (c) => {

    c.AddSalesForceWatch<SFAccount>("WatchAccounts", "Account", cKey, cSec, sUser, x5092Cert, "login", 
    (ct, log, updated, deleted) => {

        //updated records, bound back to an SFAccount class
        foreach (var item in updated)
        {
            Console.WriteLine($"[{item.id}] {item.AccountName}({item.Type})");
        }

        //Deleted ID's, along with the deleted date
        foreach (var item in deleted)
        {
            Console.WriteLine($"{item.id} - {item.deletedDate:G}");
        }

    });

});
```

{% hint style="warning" %}
Make sure to configure your own:

* **Certificate**
* **Consumer key**
* **Consumer secret**
* **User**
* **Domain**&#x20;

\
[See the Authorization section above](#authorization)
{% endhint %}

### Update a record

There are two easy ways to update a single record

```csharp
//Update by bound object properties, serialized through newtonsoft
client.UpdateRecord<SFAccount>("Account", "001f400000Mk8lPAAR", new SFAccount() { Type = "Prospect" }).GetAwaiter().GetResult();

//Supply a dyanamic object or class, unbound
client.UpdatePatch("Account", "001f400000Mk8lPAAR", new { Rating = "Warm" }).GetAwaiter().GetResult();
```

### Query + SOQL

To execute a query, simply supply the query along with a class to map back to:

```csharp
var accounts = client.Query<SFAccount>("SELECT id,name from account limit 10").GetAwaiter().GetResult();
```

### Many other methods

For the full list of methods and other ways of working with SalesForce, please visit the [GitHub page](https://github.com/anthonyreilly/NetCoreForce)!


# Sharepoint

SharePoint watcher is easy enough to setup and only requires the Graph authorization details.

The Watcher automatically polls for folder changes within a sharepoint library and gives you an SDK as well as a callback any time a new file is added or changed. You will also get the item in the callback if a field has been updated.

This allows for automated processes to be kicked off any time something within the watched SharePoint directory is modified.

## Example Configuration

Here's the fully configured and ready to use snippet of setting this up within Perigee.

```csharp
PerigeeApplication.ApplicationNoInit("Sharepoint Demo", (taskConfig) =>
    {
        
        taskConfig.AddSharepointWatch("Sharepoint",
            taskConfig.GetValue<string>("Sharepoint:tenant"), 
            taskConfig.GetValue<string>("Sharepoint:appID"),
            taskConfig.GetValue<string>("Sharepoint:appSecret"), 
            taskConfig.GetValue<string>("Sharepoint:site"),
            taskConfig.GetValue<string>("Sharepoint:drivePath"), 
            taskConfig.GetValue<string>("Sharepoint:listName"), 
            (ct, log, api, sync, items) =>
            {
                //Process file here
                return true;
                
            }).LinkToConfig("Sharepoint:enabled");

    });

```

All of the above are referencing a node in the <mark style="color:red;">`appsettings.json`</mark> file, you would need to fill this out with your own authorization details.

```json
"Sharepoint": {
    "tenant": "guid",
    "appID": "guid",
    "appSecret": "secret",
    "drivePath": "",
    "site": "https://mydomain.sharepoint.com/sites/demo/",
    "listName": "Documents",
    "enabled": true
  },
```

* **tenant/appID/appSecret** - These will be pulled from the Azure portal app registration.
* The **drivePath** supplied may be blank if you're pulling files from the root of the drive. Otherwise supply the name of the folder to watch.
* The **site** key is the full address of the sharepoint site. It's used to perform a graph lookup of the ID records required.
* The **listName** is the name of the list behind the drive. If using the default document library, this will be "`Documents`". If you've created a custom library, something like "Input", then you will need to set the **listName** to that instead.
* The **enabled** flag is to turn the process on or off and is tied to the `.LinkToConfig()` line above.

## SDK & Callbacks

### Sync Class - Callback Property

The <mark style="color:blue;">**`sync`**</mark> property sent back by the SharePoint watcher contains all of the relevant ID's needed to perform requests within SharePoint. Most importantly:

* ListID
* DriveID
* SiteID
* SiteName

### <mark style="color:blue;">`Items`</mark> callback

When new items arrive to be processed, you'll get a list of those items in that callback. Each item in the list contains all of the properties you'd need to check the item that was changed.&#x20;

```csharp
List<GraphAPIModel.Drive.Children> items;


item.Id;                            // The ID of the item
item.MicrosoftGraphDownloadUrl;     // The URL to download the item
item.Name;                          // The name of the item
item.CreatedBy;                     // The user referencee class of who created it
item.File;                          // If it is a file, this has the file details
item.Folder;                        // If it is a folder, this has the folder details
```

{% hint style="warning" %}
To see the full list and response please check out the [Microsoft documentation ](https://learn.microsoft.com/en-us/graph/api/driveitem-get?view=graph-rest-1.0\&tabs=http#response-1)
{% endhint %}

### Change Notification&#x20;

Want to check if the changed notification is a file?

```csharp
foreach (var item in items)
{
    //Guard change notifications for folders
    if (item.Folder != null || item.File == null) continue;
    
    //Only process file changes
    log?.LogInformation("New file to process from {name} - {item} [{size}]", 
        item.CreatedBy.User.DisplayName, 
        item.Name, 
        item.Size);
}
```

### Get Item + Fields

This call retrieves the item from a drive, and expands the response to include the list detail and fields as well

```csharp
var details = api.GetItemWithList(sync.siteID, sync.driveID, item.Id);
```

The list fields are important as they allow you to get the custom field values. In this example, we have a custom field called "Status" that we can update along the process:

```csharp
var status = details.listItem.fields["Status"];
//Status = "Ready"
```

### Get Item by Path

To get an item if you already have the path.

If expand is true, you'll also receive the list item details along with the response.

```csharp
api.GetItemByPath(sync.siteID, "Folder/File.txt", expandListItem = true)
```

### Get Item by Path In Drive

To get an item if you already have the path for a given DriveID.

If expand is true, you'll also receive the list item details along with the response.

```csharp
api.GetItemByPath(DriveID, "Folder/File.txt", expandListItem = true)
```

### Generate SharePoint Download Link

You can generate a direct download link to a SharePoint item by giving the Site, library, and path to the item.

The resulting string is generated and uses the SharePoint `/Download.aspx` page.

```csharp
api.GenerateSharepointDownloadLink(Site, "Shared Documents", "Folder/File.txt");
```

### Delete an Item

To remove an item by ID:

```csharp
api.DeleteItem(sync.siteID, ItemID);
```

### Patch a Field

After retrieving the [List Details](#get-item-+-fields), you can patch any of the fields with the `PatchField` command:

```csharp
api.PatchField(sync.siteID, sync.listID, details.listItem.id, 
new { 
    Status = "Success",
    Notes = "We are done!"
    });
```

### Get Another Drive

If you need to get a different drive, say a **Processed** drive, you can do so by querying for the drive:

```csharp
var Drives = api.GetSiteDrives(sync.siteID);
var ProcessedDriveID = Drives.Where(f => f.name.Equals("Processed")).FirstOrDefault()?.id ?? "";
```

### Uploading an item

To upload an item to a drive you must supply the `DriveID`, `Name`, `Content`, and `MIME Type`.

We'll upload a document to the [Processed drive as shown here](#get-another-drive).

```csharp
var uploaded = api.UploadFile(ProcessedDriveID, 
    "MyZip.zip", new byte[] {0x0}, "application/zip");

//Get the details from the newly uploaded item
var itemDetails = api.GetItemWithList(sync.siteID, ProcessedDriveID, uploaded.Id);
```

### Download an Item

To download an item from SharePoint we highly recommend first getting the [List Details](#get-item-+-fields) as well as it can provide a backup download link. Then simply call download:

```csharp
if (item.MicrosoftGraphDownloadUrl == null)
{
    //Try resetting it from the details list
    item.MicrosoftGraphDownloadUrl = new Uri(details.DownloadURL);
}

byte[] File = api.DownloadItem(item);
```

### Implementing your own

To call any other method not supplied here use the internal graph call client and supply the right path, the rest will be taken care of automatically.

```csharp
var response = api.RestGraphCall<GraphAPIModel.Generic.Response>(
    $"/sites/{sync.siteID}/lists/{sync.ListName}", Method.Get);
```


# Directory Watch

The Directory Watch is able to monitor a folder and report back when a new file is present. It has several key checks in place to make sure the file isn't actively being written too, or locked by another application before executing the file ready callback.

Directory Watch expects that the file will be removed from the directory after it has been processed. For this reason there are several options on the DirectoryWatchFailurePolicy on how to handle when a file hasn't been removed.&#x20;

{% hint style="success" %}

* Directory Watch is great for file processing where the file is expected to be removed.
* [Directory Notifier](/core-modules/event-sources/watchers/directory-notifier) is great for supporting hot-reload at runtime.&#x20;
  {% endhint %}

### Demo Application

This demo will:

* Watch the `C:\Watch` folder
* It will report on any CSV files (`*.csv`)
* It will search `AllDirectories` (subDirectoties) as well as it's root
* The `DirectoryWatchFailurePolicy` is set to move the file to a **`_Failed`** folder if the file has not been moved or deleted after the callback has completed.&#x20;

As a bonus, we'll [read that CSV data](/core-modules/file-formats/csv) in and report on it's load.

```csharp
PerigeeApplication.ApplicationNoInit("Watcher Demo", (c) =>
{

    c.AddDirectoryWatch("CSV", "C:\\Watch", "*.csv", SearchOption.AllDirectories, (ct, l, path) => {

        //Read the CSV
        var CSVData = CSVReader.ToDataTable(path, out var rRes);

        //Reprt on it
        l.LogInformation("Read CSV {file}[{encoding}]. Columns/Rows: {col}/{row}; Delimiter: {delChar}; Jagged? {jagged}", 
            Path.GetFileName(path), rRes.FileEncoding.EncodingName, rRes.ColumnCount, 
            CSVData.Rows.Count, rRes.FinalDelimiter, rRes.RowShifts.Count > 0 ? "YES" : "NO");

        //You'll notice the file gets moved to the _Failed Folder (Due to DirectoryWatchFailurePolicy supplied below)
        //  Watcher expects the file to be removed after it's processed to prevent infinite loops


    }, policy: ThreadRegistry.DirectoryWatchFailurePolicy.MoveToFailedFolder);

});
```

#### Dummy sample file used here:

When the above example run's against this file, it will log:

```log
Read CSV NewCSV.csv[US-ASCII]. Columns/Rows: 2/2; Delimiter: ','; Jagged? NO
```

{% file src="/files/rnbv5tSaUgBcVzcWLK5F" %}

### Failure Policies

At the moment, Perigee contains 3 different failure policies:

* Redelivery after a certain period of time
* Move to Failed Folder (\_Failed)
* Delete removes the file from the system.


# Directory Notifier

The Directory Notifier is able to monitor a folder and report back when a new file is present. It has several key checks in place to make sure the file isn't actively being written too, or locked by another application before executing the file ready callback.

Unlike the [Directory Watch](/core-modules/event-sources/watchers/directory-watch) that expects the file to be processed out of the folder, notifier is intended to only signal that a file has been changed, added, or removed. It does not contain a failure policy because of this reason.&#x20;

{% hint style="success" %}

* Directory Notifier is great for supporting hot-reload at runtime.
* [Directory Watch](/core-modules/event-sources/watchers/directory-watch) is great for file processing where the file is expected to be removed.
  {% endhint %}

### Demo Application

This demo will:

* Watch the `C:\Watch` folder.
* It will report on any JSON files (`.*\.json$`) - This uses and supports full Regex patterns.
* It will search `TopDirectoryOnly` (no subDirectories).
* NotifyInitial is `true` which tells the system to send notifications on all files currently in the path.

  * If this was `false`, it would not call the callback with the pre-existing files.

```csharp
PerigeeApplication.ApplicationNoInit("HotReloadExample", (c) => {

    c.AddDirectoryNotifier("ReloadConfigs", @"C:\Watch", @".*\.json$", SearchOption.TopDirectoryOnly,
        (ct, l, path) => {
            //path is the full file path of the file that was modified or added, or removed.
            
            //Before loading or reading, verify it's existance:
            if (File.Exists(path))
            {
                //Added / Modified and no longer being written to
            }
            else
            {
                //Removed
            }
        },
        true, null, null, NotifyInitial: true, started: true);

});
```


# IMAP

IMAP watcher is able to watch a single inbox and give a callback any time a new message is available to process.&#x20;

There's a rich SDK that enables the IMAP client to respond to messages, attach images or HTML, get the body body, create reply messages, etc.&#x20;

## Authentication

There are two basic ways to authenticate with your IMAP server:

### User/Pass

This is the "direct" method. If the server supports it, you can supply a username and password.

```csharp
PerigeeApplication.ApplicationNoInit("EmailWatcher",  (c) => {
    c.AddIMAPWatcher("MailWatch", 
        "email@address.com", "MailBot", "password", 
        "hostImap", 993, 
        "smtphost", 587, 
        (ct, l, mail) => { 
            //Mail handler here!
    });
});
```

### SASL

Simple Authentication Security Layer: This is for the authentication methods that require OAUTH2 or other methods.

```csharp
//Direct creation
var saslDirect = new SaslMechanismOAuth2("", "");

//If using GMAIL, we built in the google auth flow
var googleSASL = MailWatcher.SASL_GoogleAPIS("email", "CredentialPath.json");
```

An example of the google SASL callback:

```csharp
 PerigeeApplication.ApplicationNoInit("EmailWatcher",  (c) => {

    c.AddIMAPWatcher("MailWatch",
     "email@address.com", "MailBot",
     "hostImap", 993,
     "smtphost", 587, 
     () => MailWatcher.SASL_GoogleAPIS("email@address.com", "CredentialPath.json"),
     (ct, l, mail) => {
         //Mail handler here!
     });
});
```

## The SDK

All of the SDK references below are available when a callback occurs for new mail messages to be processed.

### Addresses

To get the various addresses:

```csharp
mail.CCAddresses();
mail.FromAddresses();
mail.ToAddresses();

//Or to get to the message envelope
var env = mail.Message.Envelope;
```

### Labels and Flags

```csharp
//Add
mail.AddFlags(MailKit.MessageFlags.Answered | MailKit.MessageFlags.Seen);
mail.AddLabels("bot");

//Get
var labels = mail.GetLabels();
var flags = mail.GetFlags();
```

### Replying

The <mark style="color:blue;">**`BodyBuilder`**</mark> callback is how you configure the outgoing message. You can see an [example here](http://www.mimekit.net/docs/html/T_MimeKit_BodyBuilder.htm) of adding an image with CIDs.

The Reply method automatically configures the method reply parameters including the correct message headers, subject, response addresses, and if <mark style="color:blue;">**`includeReplyText`**</mark> is <mark style="color:blue;">**`true`**</mark>, it will also quote the original message back as any normal client would do.

```csharp
//Generate a reply with the correct message contents
 var mReply = mail.Reply(false, (bb) =>
 {
     //Set HTML, and text fallback content
     bb.TextBody = "text is supported";
     bb.HtmlBody = "<b>html</b> is supported";
     
     //Add an attachment
     //bb.Attachments.Add("MyPDF", File.ReadAllBytes("MyPDF.pdf"));
 }, includeReplyText: true);

 //Send
 mail.SendMessage(mReply);
```

### Is ?

To see if the message is `<FLAG>`:

```csharp
var isAnswered = mail.IsAnswered;
var isSeen = mail.IsSeen;
var isFlagged = mail.IsFlagged;
var isDeleted = mail.IsDeleted;
var isDraft = mail.IsDraft;
```

### Delete Mail

To delete a message, issue the delete command. \
&#x20;  The parameter is for expunging the message from the server as well as issuing the `deleted` flag.

```csharp
mail.DeleteMail(true);
```

### Attachments

You can get a list of attachment parts, and iterate over them to get the actual content, mime type, name, etc.

```csharp
//This does not pull the body or content, and is a fast way of checking how many attachments a message has
var attachcount = mail.Message.Attachments.Count();

//This iterates over the bodyparts to get additional information, it is slower and should be used after there are known messages
var attachments = mail.GetAttachments();
if (attachments.Any())
{
    var attach = attachments.ElementAt(0);
    var name = attach.FileName;
    using MemoryStream attachBytes = mail.GetAttachment(attach);
}
```

### Querying

To query the inbox:

```csharp
var uidsNotAnswered = mail.GetNotAnsweredUIDs();
if (uidsNotAnswered.Any())
{
   var ListMailSummaries = mail.FetchMessages(uidsNotAnswered);
}

var uidsNotSeen = mail.GetNotSeenUIDs();
if (uidsNotSeen.Any())
{
   var ListMailSummaries = mail.FetchMessages(uidsNotSeen);
}

//Or direct access querying:
var uids = mail.Folder.Search(MailKit.Search.SearchQuery.DeliveredAfter(DateTime.UtcNow.AddDays(-1)));
```

### Sent Box

If you need to access the sent box, we provide an easy way to retrieve and open the sent mailbox.

```csharp
var sentBox = mail.GetAndOpenSentFolder();
if (sentBox != null)
{
 var uids = sentBox.Search(MailKit.Search.SearchQuery.DeliveredAfter(DateTime.UtcNow.AddDays(-1)));

 //Fetch using the sentbox, as mail.FetchMessages uses the inbox.
 var ListMailSummaries = sentBox.FetchAsync(uids, mail.MessagePullItems).GetAwaiter().GetResult(); //make sure you're "using MailKit;"
}
```

{% hint style="danger" %}
IMAP only allows a single mailbox to be open at once. Don't forget to call:&#x20;

<mark style="color:blue;">**`mail.OpenInbox();`**</mark>. \
\
This verifies and prevents future issues with any subsequent calls to the mail client.&#x20;
{% endhint %}

### Input Text

Sometimes you just need whatever the person said, excluding their signature and reply content. This method takes several passes at retrieving just the top level user input and skipping the rest:

```csharp
string textOnlyPart = mail.GetOnlyInputTextBody();
```

### Low Level Access

There are a bunch of prebuilt methods to help with a mail client. If you want to do something specific, you can get the client and folder access as so, and use any of the available methods from [MailKit](https://github.com/jstedfast/MailKit):

```csharp
var imapClient = mail.Client;
var imapInbox = mail.Folder;
```

## Best practice watching

We highly recommend:

1. Putting a stop gap on the mail receive handler, something like <mark style="color:blue;">**`IsAnswered`**</mark>, as a way of preventing unwanted reprocessing of messages.
2. Catching the exception and attempting to mark it answered and label it error if the client supports labelling.

```csharp
PerigeeApplication.ApplicationNoInit("MailDemo",  (c) => {

    c.AddIMAPWatcher("MailWatch",
        "email@address.com", "MailBot",
        "hostImap", 993,
        "smtphost", 587,
        () => MailWatcher.SASL_GoogleAPIS("email@address.com", "CredentialPath.json"),
        (ct, l, mail) => 
        {
            try
            {
                if (!mail.IsAnswered)
                {
                    //Do stuff here!
                    
                    
                    //Mark it on success
                    mail.AddFlags(MessageFlags.Answered | MailKit.MessageFlags.Seen);
                    mail.AddLabels("success");
                }
            }
            catch (Exception ex)
            {
                l.LogError(ex, "Uncaught exception in mail processor");
                try
                {
                    mail.AddFlags(MessageFlags.Answered | MailKit.MessageFlags.Seen);
                    mail.AddLabels("error");
                }
                catch (Exception) { }
            }
        });
});
```


# Credential Management


# Connection Strings

You can easily register hot-reloadable connection strings by registering them with the helper methods:

```csharp
PerigeeApplication.ApplicationNoInit("ConnectionStrings", (c) => {

    //Register the connection string
    c.RegisterConnectionString("DB", "devServer");
    
    //Get the connection string later...
    string connectionString = CredentialStore.GetCredential_ConnectionString("DB");
    
    //Or get the credential, and cast it to retrieve
    if (CredentialStore.GetCredential("DB") is ConnectionStringCredentialStoreItem m) {
        var connectionStringFromCred = m.ConnectionString;
    }
});
```

The <mark style="color:red;">`AppSettings.json`</mark> file:

```json
"ConnectionStrings": {
      "devServer": "data source=host;initial catalog=database; User Id=user; Password=abc"
}
```


# Custom Refresh Logic

Credentials are all registered on startup and are usually given an expiration date. This allows for any process later in the application to ask the manager to retrieve a credential. The below example shows how to register **SuperCredential**, and two possible return values:

{% code overflow="wrap" lineNumbers="true" %}

```csharp
CredentialStore.RegisterRefresh("SuperCredential", (o) => {

        //Call third party API
        //Reach out to database
        //Request keys from AWS
        //Do anything you need to get authorization details

        //Then return either a good credential:
        return new CredentialStoreItem() { 
            Expiration = DateTimeOffset.Now.AddMinutes(60),
            Authorization = "ABCDEFG",
            Scope = "offline.access",
            StoreA = "Custom ValueStore"
        };

        //Or a faulted one:
        return new FaultedCredentialStoreItem("External ERROR", new Exception("Exception thrown while trying to get credential!!!"), retry: true);
    });
```

{% endcode %}

When the application loads up or a new credential is created, the local drive is checked and all previously non expired credentials are restored immediately. This allows for applications to be safely shut down and restarted without interrupting or over-retrieving from an external API.

During the retrieval process, the <mark style="color:blue;">**CredentialStore**</mark> checks for existence of the credential, it's expiration and then checks if the expiration is within N number of minutes(user defined) before returning to the caller.&#x20;

{% code overflow="wrap" %}

```csharp
//Use default settings
CredentialStore.GetCredential("SuperCredential"); 

//Set all settings on retrieval 
CredentialStore.GetCredential("SuperCredential", maxRetries: 3, retryMS: 1000, expireTimeBufferSeconds: 600);
```

{% endcode %}

In Summary: the <mark style="color:blue;">**CredentialStore**</mark> does several important things:

* It automatically caches the authorization details to disk and retrieves them again on application reload.
* When supplying expiration dates to a credential, it's able to renew itself when it's required before sending back the old authorization parameters.
* The retrieval call is automatically retried to prevent a blip in connectivity from stopping a process.
* It will automatically renew the token a defined number of minutes before expiration, allowing long running processes not to fail while in the middle of execution.
* &#x20; It integrates seamlessly with RestSharp, allowing all HTTP(S) traffic to automatically and internally pull credentials


# RestSharp Authenticator

To register a specific <mark style="color:blue;">**RestSharp**</mark> credential, just create that type and assign the appropriate Authenticator.

```csharp
CredentialStore.RegisterRefresh("ClientAPI", (o) => {

        return new RestSharpCredentialStoreItem(
                new RestSharp.Authenticators.JwtAuthenticator("MyToken"), 
                DateTimeOffset.UtcNow.AddMinutes(58));
        
});
```

Any time you create a client, simply assign this credential authenticator:

```csharp
var rco = new RestClientOptions("https://localhost.com")
{
    //Assign the CredentialAuthenticator with the name tied to the refresh
    Authenticator = new CredentialAuthenticator("ClientAPI")
};

//Create a new client
using var client = new RestClient(rco);

//Anytime you execute any requests, it's automatically maintained. 
```


# Credential Store SDK

Below are the SDK methods tied to a credential and how they are called.

## Registering

### RegisterRefresh

This is the primary method for registering a refresh action.&#x20;

```csharp
CredentialStore.RegisterRefresh("SuperCredential", (o) => {

        //Call third party API
        //Reach out to database
        //Request keys from AWS
        //Do anything you need to get authorization details

        //Then return either a good credential:
        return new CredentialStoreItem() { 
            Expiration = DateTimeOffset.Now.AddMinutes(60),
            Authorization = "ABCDEFG",
            Scope = "offline.access",
            StoreA = "Custom ValueStore"
        };

        //Or a faulted one:
        return new FaultedCredentialStoreItem("External ERROR", new Exception("Exception thrown while trying to get credential!!!"), retry: true);
    });
```

The **`(o) =>`** action callback is the **`refreshParam`** optionally supplied by calling **`GetCredential()`**. It is not required, but can be optionally used for custom logic

### RegisterConnectionString

To register a connection string as a credential, which is a great way to support hot-reloading:

```csharp
PerigeeApplication.ApplicationNoInit("ConnectionStrings", (c) => {

    //Register the connection string, or with the shortcut
    c.RegisterConnectionString("DB", "devServer");
    CredentialStore.RegisterConnectionString("DB", "devServer");
    
});
```

The <mark style="color:red;">`AppSettings.json`</mark> file:

```json
"ConnectionStrings": {
      "devServer": "data source=host;initial catalog=database; User Id=user; Password=abc"
}
```

### RegisterSalesForceJWT

This is the way you register a SalesForce JWT Authentication method.&#x20;

This is automatically created as part of the SalesForce client included in Perigee. See the [SalesForce page](/core-modules/event-sources/watchers/salesforce) for more info.

```csharp
CredentialStore.RegisterSalesForceJWT("SFJWT", 
"username", "consumerKey", 
new X509Certificate2("SF.pfx", "ABCD123"), 
"login");
```

## Configuration

### Configure

Configure is how we setup credential encryption, credential backup and restore policies.

#### Encryption

Supplying AES Keys will tell Perigee to use an encrypted credential store file. Even if you're already running without encryption, Perigee will detect the request to encrypt and convert the credential file before starting up.&#x20;

#### Backup and restore

The **`initializationCallback`** and **`writeCallack`** can be used to effectively back up and restore your credential file remotely.&#x20;

Every time a new credential file is written the **`writeCallback`** is called, this is your opportunity to store that elsewhere, even in a database blob object or on the cloud.&#x20;

Every time the application starts up and **NO credential file is present**, the **`initializationCallback`** is called. This allows you to restore a credential file written elsewhere.

Here's an example of setting up your Perigee Application with credential encryption, backup and restore.&#x20;

```csharp
PerigeeApplication.ApplicationNoInit("Credentials", (c) => {
  //If calling configure, do so FIRST in the callback.
  
  // Call Configure, Perigee will auto convert non encrypted store to encrypted store
  CredentialStore.Configure(
    initializationCallback: () =>
    {
        //When there are no credentials, restore from remote backup (in this case another file on the hard drive, but it could be a database too)
        return CredentialStore.ConvertBytesToDictionary(File.ReadAllBytes(@"C:\temp\credentialbaks\credentials.pce"), AESKey, AESIV);
    }, 
    writeCallack: (bytes) =>
    {
        //Put the credential bytes anywhere else!
        FileRevisionStore.SaveFile(@"C:\temp\credentialbaks\credentialsBackup.pce", bytes);
    }, 
    AES32Key: AESKey, //Supplying AESKey and AESIV will encrypt the credentials
    AES16IV: AESIV);  //Supplying AESKey and AESIV will encrypt the credentials
});

//To get a new AESKey: AesCrypto.GetNewRandom(32, false)
//To get a new AESIV: AesCrypto.GetNewRandom(16, false)
//Or generate AES256 keys on your own!
```

{% hint style="warning" %}
&#x20;Configure should be called **FIRST** after instanciating a perigee application.
{% endhint %}

{% hint style="success" %}
To remove encryption after encrypting, see the [DecryptAndRevert](#decryptcredentialfileandrevert) call below
{% endhint %}

### CredentialsToBytes

This converts all the current credentials to a byte array.

If AES keys are provided, the bytes are encrypted.

If they are not provided, the bytes are compressed only.

```csharp
CredentialStore.CredentialsToBytes(string AES32Key, string AES16IV)
```

### ConvertDictionaryToBytes / ConvertBytesToDictionary

This converts a dictionary of credentials to an optionally encrypted byte array.&#x20;

If AES keys are provided, the bytes are encrypted.

If they are not provided, the bytes are compressed only.

```csharp
CredentialStore.ConvertDictionaryToBytes(
Dictionary<string, CredentialStoreItem> dictionary, 
string AES32Key, string AES16IV)
```

The inverse of this operation works exactly the same way:

```csharp
CredentialStore.ConvertBytesToDictionary(
byte[] bytes, 
string AES32Key, string AES16IV)
```

### DecryptCredentialFileAndRevert

If you're attempting to decrypt the encrypted credential file and revert back to using a non encrypted file, please call this before application start once, then remove. It will revert back the encryption in place.

The AES Key and IV will need to be supplied.

The altPath is a pointer to revert a different encrytped credential file than the default path. It's optional to supply this value

```csharp
DecryptCredentialFileAndRevert(
string AES32Key, string AES16IV, 
string altPath = null)
```

## Retrieve

### GetCredential

To get a credential again at a later time, call GetCredential(). It will go through the process of synchronously locking and retrieving that credential and re-authorizing if needed.

```csharp
//Use default settings
CredentialStore.GetCredential("SuperCredential"); 

//Set all settings on retrieval 
CredentialStore.GetCredential("SuperCredential", 
    maxRetries: 3, 
    retryMS: 1000, 
    expireTimeBufferSeconds: 600,
    disableRefresh: false, 
    object refreshParam: "Token");
```

The optional parameters are as follows:

* <mark style="color:blue;">`maxRetries`</mark> - If a refresh action returns a faulted credential then it defines the number of times a credential can attempt to "re-retrieve" it.
* <mark style="color:blue;">`retryMS`</mark> - How many milliseconds between retry attempts.
* <mark style="color:blue;">`expireTimeBufferSeconds`</mark> - How many seconds to buffer the expiration so an early refresh is called. Very useful to prevent a lapse in operation.
* <mark style="color:blue;">`disableRefresh`</mark> - If true, it will ONLY return the credential if it exists and it will not refresh or renew it. Useful for pulling expired credentials.
* <mark style="color:blue;">`refreshParam`</mark> - an object that can be passed to the registered refresh. Useful for supplying a one time use authorization token, or additional details to customize the way the refresh happens.

### GetCredential\_ConnectionString

To get a credential of type ConnectionStringCredentialStoreItem:

```csharp
CredentialStore.GetCredential_ConnectionString("DB");
```

### GetCredentialsByAuthorization

If you want to know what credentials have/share an authorization property:

```csharp
var ienumerable = CredentialStore.GetCredentialsByAuthorization("authorizationTokenOrCode");
```

### GetRefreshToken

Get a refresh token from a credential, even if that credential is expired.

```csharp
CredentialStore.GetRefreshToken("credName");
```

### PeekCredential

Will retrieve a credential without refreshing it, if it is invalid.&#x20;

```csharp
CredentialStore.PeekCredential("credName");
```

### RefreshAuthorizationCode

Passes an authorization code the named refresh.&#x20;

```csharp
CredentialStore.RefreshAuthorizationCode("credName", "authCode");

//This is a shorthand helper method that is simply: 
//    GetCredential(name, 2, refreshParam: code)
```

### Awaiting

You can await valid credentials, which is useful when waiting on a refresh or awaiting user interaction to authenticate a client. This method is **`async`** and can be awaited.

It pulls the credential once attempting to refresh it, if that fails then pulls it again on a timer with **`disableRefresh:true`**, meaning it won't try to refresh the credential and will wait on a valid credential.

```csharp
await CredentialStore.AwaitValidCredential("name", CancelToken);
```

## Contains / Query

### ContainsRefresh

Returns true if a refresh action is registered for this credential name.

```csharp
CredentialStore.ContainsRefresh("credName");
```

### ContainsCredential

Returns true if the credentials exists, OR a refresh action is tied to that name.

```csharp
CredentialStore.ContainsCredential("credName");
```

### Query credentials with predicate&#x20;

You can query all credentials without calling the refresh actions by using the `ByPredicate` method.&#x20;

```csharp
CredentialStore.GetCredentialsByPredicate(f => f.Name.Contains("Test"));
```

## Invalidation

### InvalidateCredential

Invalidation simply caused the credential's expiration to be set to `DateTimeOffset.MinValue` and then forces an immediate persist. Any future call to `GetCredential()` will force a refresh since it is now force-expired.

```csharp
CredentialStore.InvalidateCredential("credName");
```

## CredentialStoreItem

The Item has several properties you may use:

```
Name => Name of the credential. (don't set this!) 
Key => A key value.
Value=> A "Value" value.
Scope => If there is a scope associated with the credential.
Environment => What environment, or host does this belong to?
Authorization => a string, authorization, code, or token.
RefreshToken => If the OAUTH2 flow contains a refresh token, store it here.
Attributes => a dictionary of custom attributes, feel free to add whatever here.
Expiration => DateTimeOffset of the expiration of this credential. 

//Custom Store fields
StoreA => A custom field for any value
StoreB => A custom field for any value
StoreC => A custom field for any value

//For faulted
isFaulted => If the credential is a "Faulted" type
FaultReason => Fill this out with more information about why it was faulted
ExceptionGiven => If there was an exception thrown that is associated with the fault.

```

### isExpired(int bufferSeconds = 300)

You can check if a credential is expired, or is about to expire by supplying the `bufferSeconds` parameter.

```csharp
// Will check if the credential is or will expire in the next 2 minutes
item.isExpired(120); 
```

### DecodeJWT(string token)

This will decode a JWT token into the JSON string of the body.

```csharp
item.DecodeJWT(item.Authorization); 
```


# Troubleshooting Credentials

If you are having issues with the credential store, please verify a couple of things. More than likely, it's one of the following issues:

### Pathing

Verify that you are not setting the <mark style="color:blue;">**`current working directory`**</mark> to something outside of the executable while the Perigee is initializing.&#x20;

A typical load cycle for a Perigee Application looks like this:

```csharp
//Initialize Perigee, and configure credentials
PerigeeApplication.ApplicationNoInit("App", (c) => {

   CredentialStore.RegisterConnectionString("main", "main_test");
   CredentialStore.RegisterRefresh("customCred", (o) => {});
   
});
```

This verifies that the current working directory and pathing is correct. This will load the credential file under `$WorkingDirectory/credentialStore/credentials.[pcb|pce]` depending on the encryption settings.

#### Initialize outside Perigee

See the documentation in [PerigeeApplication](/core-modules/perigeeapplication).&#x20;

### Naming the Credential

Unless you've got a VERY specific reason to do so, please don't name the credential. The reason is that you want the **`RefreshName`** to match the **`CredentialName`**.&#x20;

In the below <mark style="color:red;">**BAD**</mark> example, we're naming it <mark style="color:red;">`"DiffName"`</mark>, this will cause the credential to be persisted as this name, not <mark style="color:red;">`"customCred"`</mark>. - the refresh name. If the application was to request a new credential it would forcibly refresh every time as the stored credential name is different.&#x20;

```csharp
// BAD EXAMPLE
CredentialStore.RegisterRefresh("customCred", (o) => {
    return new CredentialStoreItem() { Name = "DiffName", Expiration = DateTimeOffset.UtcNow.AddHours(1) };
});

//Forcibly calls refresh method every time, since the persisted name is different
var c = CredentialStore.GetCredential("customCred");

```


# Integration Utilities


# HTTP(S) - RestSharp

We love and use [RestSharp](https://restsharp.dev/) throughout the project. It's the best possible way of interesting with any modern API. It provides an easy to use method to call, execute, and parse data back into structured classes.&#x20;

With Perigee, we've integrated the [RestSharp ](https://restsharp.dev/)package directly as a dependency, and we've written a few Extension methods to further integrate it into our system.

## First Call with RestSharp

Here's a demo of using RestSharp to call out to `Postman-Echo`, and retrieve your IP address.&#x20;

The steps are as follows:

1. Create a **`RestClient`**, which usually contains the `baseAddress` of the endpoint you're going to be connecting to (<mark style="color:red;">`https://postman-echo.com`</mark>)
2. Create a **`RestRequest`**, this contains information about the specific request being made.
   1. The Uri (<mark style="color:red;">`/ip`</mark>)
   2. The verb (<mark style="color:red;">`POST/GET/PATCH`</mark>)
   3. If you are adding body data, or query parameters (see [demo usage](https://restsharp.dev/intro.html) for adding [body](https://restsharp.dev/usage.html#request-body), or using the other [helper methods](https://restsharp.dev/usage.html#get-or-post))
3. Call `Execute()`.

```csharp
PerigeeApplication.ApplicationNoInit("HTTP", (c) => {

    //Declare a client, assign the timeout to 10 seconds
    using var client = new RestClient(new RestClientOptions("https://postman-echo.com") { MaxTimeout = 10000 });
    
    //Create a request
    var req = new RestRequest("/ip", Method.Get);
    
    //Execute
    var rsp = client.Execute<postmanEchoIP>(req);

    if (rsp.IsSuccessful)
        c.GetLogger<Program>().LogInformation("Response [{code}]: {ip}", (int)rsp.StatusCode, rsp.Data?.ip ?? "");
    else
        c.GetLogger<Program>().LogInformation("Response [{code}]: {content}", (int)rsp.StatusCode, rsp.Content);

});

public class postmanEchoIP { public string ip { get; set; } }
```

**Log:**

> ```log
> [15:11:51 INF]() Response [200]: 100.200.0.123
> ```

## Authentication

This is an identical pattern to above, only this time we've added an authenticator, and changed the request uri.

```csharp
PerigeeApplication.ApplicationNoInit("HTTP", (c) => {

    //Declare a client, assign the timeout to 10 seconds
    var rco = new RestClientOptions("https://postman-echo.com")
    {
        MaxTimeout = 10000,

        //Use a basic authenticator
        Authenticator = new RestSharp.Authenticators.HttpBasicAuthenticator("postman", "password")
    };

    using var client = new RestClient(rco);

    //Create a request
    var req = new RestRequest("/basic-auth", Method.Get);

    //Execute
    var rsp = client.Execute(req);

    //Log
    c.GetLogger<Program>().LogInformation("Response [{code}]: {content}", (int)rsp.StatusCode, rsp.Content);

});
```

**Log:**

> ```log
> [15:14:02 INF]() Response [200]: {
>   "authenticated": true
> }
> ```

## Authentication with Perigee Credentials

This performs the same HTTPS request, only this time, we're using Perigee's[ Credential Store](/core-modules/credential-management/credential-store-sdk) to manage, refresh, and obtain tokens. This gives a lot of flexibility on how to retrieve and maintain an active token state.&#x20;

1. Part of the "secret sauce" here is that any time a credential is about to expire (within a few minutes), a preemptive request is sent to the registered refresh action to renew the token before it's expired.&#x20;
   1. This prevents an expired token from being sent to the API downstream
   2. This prevents the need for complicated patterns when an error occurs due to expired tokens
2. These credentials are automatically persisted to disk, and reloaded on application start. This is explained in more detail in the [Custom Refresh Logic](/core-modules/credential-management/custom-refresh-logic) section.
   1. Some authentication sources will rate limit your authentication requests, this is another method to use to prevent this issue from occurring.

```csharp
PerigeeApplication.ApplicationNoInit("HTTP", (c) => {

    //Register a refresh with the name "RestSharpToken"
    CredentialStore.RegisterRefresh("RestSharpToken", (o) => {

        //Add any logic you need to here, including:
        // 1. Pulling configuration values (like so: c.GetValue<string>("AppSettings:AuthToken") )
        // 2. Executing other authorization requests to obtain a token
        // 3. Reaching out to another library
        // 4. etc

        //In this example we use a basic authentication header, many modern authentication API's now use a Bearer token:
        //      new RestSharp.Authenticators.JwtAuthenticator("eyJ.........");

        return new RestSharpCredentialStoreItem(new RestSharp.Authenticators.HttpBasicAuthenticator("postman", "password"), Expiration: DateTimeOffset.Now.AddSeconds(3600));
    });

    //Declare a client, assign the timeout to 10 seconds
    var rco = new RestClientOptions("https://postman-echo.com")
    {
        MaxTimeout = 10000,

        //Use a Credential Authenticator instead...
        Authenticator = new CredentialAuthenticator("RestSharpToken")
    };

    using var client = new RestClient(rco);

    //Create a request
    var req = new RestRequest("/basic-auth", Method.Get);

    //Execute
    var rsp = client.Execute(req);

    //Log
    c.GetLogger<Program>().LogInformation("Response [{code}]: {content}", (int)rsp.StatusCode, rsp.Content);

});
```

**Log:**

> ```log
> [15:16:26 INF]() Response [200]: {
>   "authenticated": true
> }
> ```

## Extensions

There are a few notable extensions added by Perigee:

### Execute Retry

This method has quite a few overloads you can call, but all of them do the same thing:&#x20;

1. Retry a request if the method failed to connect, or if it timed out.
2. If the third party API suddenly revoked your current API credentials **AND** you are using a [CredentialAuthenticator](/core-modules/credential-management/restsharp-authenticator), it will fire the renewal for a new token before attempting another retry

```csharp
//Execute a retry a total of 2 times (1 original attempt, 1 retry)
var rsp = client.ExecuteRetry<postmanEchoIP>(req, 2);
```

### IsTimeout

If the request timed out, this is an easy Boolean to check so you can proceed with other options.

```csharp
//Check if a timeout occured
bool isTimeout = rsp.IsTimeout();
```


# Transaction Coordinator

## What is the Coordinator?

The Coordinator is like having a group of small robots that you design to each perform a specific task. These robots communicate with each other and make sure their tasks are completed before passing data to the next one.&#x20;

They are designed to be as reliable as possible and can restart or shut down without losing any data.&#x20;

The coordinator works like a message queue: you add a message and it gets processed a short time later. The message is immediately saved to disk in a compressed format and all the robots use this data packet to keep track of their progress. This is what makes the system so fault-tolerant.&#x20;

The coordinator uses a first-in-first-out method to process messages and can handle many messages at once because it is multi-threaded.&#x20;

If the system crashes, the coordinator is smart enough to resume from where it left off.

The coordinator also handles two-way data synchronization with a remote source, making sure that each step is replicated and stored on the remote server.

## A Demo?

To see demos of the coordinator, check out the demo page!

{% content-ref url="/pages/TBuYBrqvOcmeItBonJO5" %}
[Coordinator Demo](/examples-and-demos/coordinator-demo)
{% endcontent-ref %}

### Remote Synchronization and Logging

Every bot's state is replicated to the remote source (usually a database). This allows the Coordinator to resume transactions that have yet to be completed. It also provides your company the ability to view, query and report on business critical tasks.

There are many fields logged and tracked during this process. Everything from the initial payload that was queued to the status and responses from Rest API's, exceptions thrown, modification times, and timestamps.

### Queueing Process

Due to the nature of a two way synchronized transaction log you're able to queue items both from the SDK and by creating new header records in the remote source.&#x20;

The Coordinator is smart enough to pull it's remote source for unprocessed transactions and will pick them up if they are not in an "<mark style="color:red;">**`Error`**</mark>" state.&#x20;

#### Re-queueing

In a healthy system, a transaction only needs to be queued once. All steps will succeed and the header will be marked "<mark style="color:green;">**`Complete`**</mark>". When a system inevitably goes down and we've exhausted all of an [items retries](#retry-limits), the header will still be in a "<mark style="color:purple;">**`Processing`**</mark>" state and will be dequeued.&#x20;

If an item get's dequeued and is not yet completed, it will get re-queued again shortly on the next call to get the remote sources pending transactions. This process is explained in more detail below in the [**ITranasctionCoordinatorDataHandler section**](#itranasctioncoordinatordatahandler).

### Headers, Items, and Data Objects

<figure><img src="/files/XBEjpKu9TWIfMpnlzmr0" alt=""><figcaption></figcaption></figure>

#### Header

The Header is what uniquely identifies a transaction. Without a header, there is nothing to process

The header contains the <mark style="color:green;">**`InitialDataObject`**</mark>, which is the "message" or "payload" of the queued transaction. This can be anything you want, JSON, a string, a custom class, or an array of bytes. It's serialized and compressed during the process.

Headers are identified by a mesh key:

1. <mark style="color:red;">**`ID`**</mark> property which is string.
2. <mark style="color:purple;">**`ReplayID`**</mark> property which is an integer (default 1).

When creating a new transaction, you need to create a new ID. We highly recommend meshing together data from where the process starts to create your ID. \
&#x20;  If you create a transaction with an already processed ID, the coordinator is smart enough to pull the remote system and use that header, which will likely be completed and nothing will occur.

**A few examples** of this would be:

* From a message queue: <mark style="color:red;">**`$"{QueueHost}{QueueName}{ID}"`**</mark>.&#x20;
* From a database row: <mark style="color:red;">**`$"{ServerHost}{Schema}{TableName}{RowID}"`**</mark>.
* From an auto incrementing ID source.
* Implement your own ID system.

#### Items

The items exist as children to the header. You can think of them as logical steps in the process.

Items are executed in order and contain a status field. Only when one item is a success should it move onto the next.

Items contain many properties to help identify and report on its progress. You can view when each item has started, how many times they've been retried, information about request and response times if they represent an http request

Items themselves contain <mark style="color:green;">**`DataObjects`**</mark>. You can assign these data objects to be whatever you like, but they represent completed result for the item's step.&#x20;

{% hint style="success" %}
When using the built in helper methods for executing rest calls, all of the properties and fields for an item are filled out with the results of that request.
{% endhint %}

#### Data Objects

The SDK contains methods for accessing the <mark style="color:green;">**`DataObjects`**</mark> at runtime. You can retrieve the current <mark style="color:green;">**`DataObject`**</mark>, a previous item's <mark style="color:green;">**`DataObject`**</mark> and the<mark style="color:green;">**`InitialDataObject`**</mark> from the header.

### Replay Events

As mentioned above, all transactions are replicated to a remote source, like a database. This provides the unique ability to "Replay" transactions at a later date by simply supplying the transaction ID.&#x20;

The coordinator will automatically go pull that transaction from the remote source, create a new transaction with the given <mark style="color:red;">**`ID`**</mark>, a new <mark style="color:purple;">**`ReplayID`**</mark>, and assign the <mark style="color:green;">**`InitialDataObject`**</mark> from the first time it was run.

This allows you to completely run through all of the logic for a given transaction again at a later date.&#x20;

{% hint style="success" %}
Imagine for a moment that one of your third party brokers informs you they had a system error and lost all your order data from today. \
&#x20;  This would create a major issue for any other linear based system.

Since you have transaction replay at your fingertips, it would only take a few lines of code to replay all of today's transactions and all of your orders would be back where they should be.

You would save countless hours!
{% endhint %}

### Multi-threaded queue

By default all coordinators are configured to be multi-threaded, meaning that incoming transactions can be put on different threads and executed at the same time. You can configure this during the coordinators allocation.&#x20;

```csharp
c.AddTransactionCoordinator("OrderProcess", memHandler, (ct, l, process) =>
{
    //Process code here
}, IsMultithreaded: true, ThreadCount: 10);
```

## Multistep helper

The multistep helper is the easiest way to use a coordinator. It simplifies the logic and does the communication with the assigned data handler. Unless you know you need to do something very specific, I would recommend using this method as the primary method of writing a coordinator function.

{% hint style="success" %}
You may manually go through the process yourself, and that is shown below: [SDK](#sdk).
{% endhint %}

### Defining a MultiStep

The MultiStep processor is part of the process callback when creating a new coordinator.&#x20;

To define a MultiStep transaction, you need to supply a list of steps that will execute, and match those list of steps with a callback method.&#x20;

```csharp
(process) => {
    process.MultiStep(
        new string[] { "GetAccount", "POSTDetails" }, 
        MultiStepOptions.RequireInternet,
        (GetAccount) => {},
        (POSTDetails) => {}
    );
}
```

Each section will be called in order of the array of steps. In the above example, **`GetAccount`** should be the first callback as it is the first step, and **`POSTDetails`** should be the second callback as it is second in the list.&#x20;

To see the [callback SDK, jump here](#the-callback)!

### Multistep Options

The options that can be supplied are related to how a transaction is processed, what conditions are required, and the number of times a header or item can be retried.

There is a `.Default` and `.RequireInternet` option that should suit most needs. If you need to customize it further allocate a class, use the default, and override any of the following properties.

To understand the retry counts, see the below section: [Retry Limits](#retry-limits).

{% code overflow="wrap" %}

```csharp
var opts = MultiStepOptions.Default; // or .RequireInternet

//Item and header retry counts. 
opts.MaxItemExecutionCount = 2;
opts.MaxHeaderExecutionCount = 20;

//Default redelivery time if requesting a redelivery
opts.DefaultRedeliveryTime = TimeSpan.FromSeconds(5);

//If true, require internet connectivity to proceed with processing this request.
opts.RequiresInternetConnectivity = true;

//If true, when the header is completed, all the dataobjects of the items will be NULLED out to reduce data clutter
opts.CleanDataObjectsOnFinalCompletion = true;
```

{% endcode %}

### Retry Limits

There are configurable limits to how many times a given header or item can be retried before falling out of process scope.&#x20;

#### For headers

The header has it's own retry count. When the header has been queued and and there is an attempt to process it, the headers execution count is incremented by 1.

When the header can't successfully complete all of the child items, or there is a call to stop processing, then the header might exhaust all of it's allowable retries.&#x20;

When the header is out of allowable retries, the header <mark style="color:blue;">**`status`**</mark> is set to <mark style="color:red;">Error</mark>. This means no more automatic requeuing will occur.&#x20;

When the header is allowed to retry again later, the header <mark style="color:blue;">**`status`**</mark> is left alone, leaving it as  <mark style="color:purple;">Processing</mark>. [The remote synchronization data source](#itranasctioncoordinatordatahandler) defines a period of time that must pass before requeuing a transaction that is still in <mark style="color:purple;">Processing</mark> status to get reintroduced to the process queue.

#### For Items

Item's retry limits act a bit different than headers. They are a retry limit per queued process. This means that for every time a header is enqueued, the item has N number of retries before it automatically gets dequeued.

This important distinction allows for many retries of a header, and even more retries of each individual item.

### The Status

Both headers and items have a status property, and they mean slightly different things during the process. The three available statuses are:

* <mark style="color:purple;">Processing</mark>
* <mark style="color:green;">Complete</mark>
* <mark style="color:red;">Error</mark>

By default, all new headers and items are in a <mark style="color:purple;">Processing</mark> status.&#x20;

#### For headers

If a header <mark style="color:blue;">**`status`**</mark>  is <mark style="color:purple;">Processing</mark>, it allows the coordinator to enqueue the transaction and work on the steps as long as it has not exhausted the [Retry Limits](#retry-limits).

If the header <mark style="color:blue;">**`status`**</mark> is set to <mark style="color:green;">Complete</mark>, there will be no more enqueuing or automatic retry, as the header is now completed.

If a header <mark style="color:blue;">**`status`**</mark> is set to <mark style="color:red;">Error</mark>, it will also no longer enqueue, and is now in an <mark style="color:red;">Error</mark> state. You may later flip the status back to <mark style="color:purple;">Processing</mark> if you want to retry, or re-enqueue the transaction.

#### For Items

If an item's <mark style="color:blue;">**`status`**</mark> is <mark style="color:purple;">Processing</mark> OR <mark style="color:red;">Error</mark> - it allows the MultiStep to continue retrying the item.

If a item's <mark style="color:blue;">**`status`**</mark> is set to <mark style="color:green;">Complete</mark>, it will also no longer retry or attempt to process this item. The MultiStep processor will move onto the next logical item in the steps defined, or complete the header if all child items are now also <mark style="color:green;">Complete</mark>.

### The callback

Every callback in a multi-step has an SDK of calls you're able to use. They provide a way to interact with the ongoing transaction, perform lookups, request redelivery, or end processing.&#x20;

```csharp
(GetAccount) => {
    GetAccount.Update();
    VerifyAccount.Redeliver();
},
```

#### DataHandler

The DataHandler is the interfaced class to synchronize remote transactions. [See more below](#itranasctioncoordinatordatahandler)!

You can access any of underlying methods by accessing the handler.

```
Order.DataHandler;
```

#### Update()

Update is how you push data back to the file system as well as the remote source. You can force an update at any point during the process if you want to synchronize data before something happens.

Update is called automatically throughout the process, and calling isn't necessary unless you're implementing something custom.

{% code overflow="wrap" %}

```csharp
//Update an order local and remote, default
Order.Update();

//Skip updating remote, use this if you only want to save state local before attempting to do something that might cause an exception or error
Order.Update(false);
```

{% endcode %}

#### Reading info from the objects

You can read the initial data object, previous data objects, the current data object, or even use the [DataHandler](#datahandler) to request other headers.

```csharp
//Get the current data object from this step
GetAccount.GetDataObjectAs<account>();

//Get the data object from last step
GetAccount.GetDataObjectFromLastStepAs<account>();

//Get the initial data object from the header
GetAccount.GetInitialDataObjectAs<account>();

//Using the DataHandler, get a different header and get it's initial data object
GetAccount.DataHandler.GetHeaderByID("abc", 2).GetInitialDataObjectAs<account>();
```

#### Performing http requests

The easiest way to execute request is the Execute<>() call. It will perform two update processes, one before sending the request, and one after so that both the request and response times get synchronized even in the event of a full system crash.

* It automatically has a built in retry and you can specify how many times it will retry the same request.
* It will log the request and response values if available (and the option is not turned off)
* It will log all of the request properties (uri, timestamp, verb, body), then call [`Update()`](#update).
* It will then log all of the response properties (uri, timestamp, status code, body).
* If the response contains a **Deserialized body**, it will be set as the current steps [DataObject](#data-objects).&#x20;
  * If the Execute call is used without the generic parameter as such: `.Execute()` (instead of `.Execute<T>()`) - Then the response will only be available in the `ResponseBody` property if logging is enabled
* If the request status code was a success, the Item is set to <mark style="color:green;">Complete</mark>, if it was not, the Item is set to <mark style="color:red;">Error</mark>.
* [`Update()`](#update) is then called one more time as the response properties are now filled out.&#x20;

```csharp
//Define and use a client, and request.
//This will result in : https://localhost:7216/order?order=123
var client = new RestClient("https://localhost:7216");
var rq = new RestRequest("/order", Method.Get).AddParameter("order", "123");

//Execute the request
var response = Order.Execute<account>(client, rq);

//Check results
if (response.IsTimeout())
{
    //Nothing to deserialize here
}
else if (response.IsSuccessful)
{
    //Get the deserialized account object from the response data
    account acc = response.Data;
}
```

You can specify other options such as not de-serializing any response data, to turn off request and response logging, how many built in retries it performs, and a few other options by setting those parameters in the `.Execute()` call.

Because the `.Execute()` call handles everything necessary, you can set it as the only call in a given MultiStep step. Everything necessary is now set to either move onto the next step, or this step will be retried if it failed.&#x20;

```csharp
(Order) => {
   Order.Execute<account>(client, 
      new RestRequest("/order", Method.Get)
         .AddParameter("order", "123"));
},
(Verify) => {
   account acc = Verify.GetDataObjectFromLastStepAs<account>();
}
```

#### Stop processing

`StopProcessing()` will stop all current item cycling and end the transaction in the state you specify. If it was left in a Processing state, it will get picked back up again on the next call to get remote pending transactions.&#x20;

```csharp
Order.StopProcessing(TransactionStatus.Pending);
Order.StopProcessing(TransactionStatus.Error);
Order.StopProcessing(TransactionStatus.Completed);
```

#### In-Place Redelivery

The redelivery mechanism halts the current thread and redelivers the item when you ask. It will block a running thread, so use this intentionally and only when necessary. It's most useful when you know a short delay will allow an item to succeed.&#x20;

Redelivery does not increment the executions count.

```csharp
//Will redeliver in 10 seconds
Order.Redeliver(TimeSpan.FromSeconds(10));

//Will redeliver in the default redelivery time set by the options
Order.Redeliver();
```

#### Current Process count

The current process count is how many times the current item has been retried "this queued transaction". Every time a header get's dequeued this count goes back to 0. It allows you to check how many retries have occurred since getting queued for the first time, or again.&#x20;

If you want to see how many times an item has been tried in total, check the property `ExecutionCount` instead.

```csharp
//Current process count
Order.CurrentProcessCount;

//Total execution count
Order.Item.ExecutionCount;
```

## SDK

If you want to take full control of the transaction coordinator, you can bypass the MultiStep process and execute calls manually. You have full control over every aspect of this and you are responsible for marking the item and header status, retrying items or processes yourself, creating items(steps) and calling [`Update()`](#update).&#x20;

```csharp
(ct, l, process) => {
    
    //Check if it's a replay
    bool isAReplay = process.IsReplay;
    
    //Get the initial data object
    account ido = process.Header.GetInitialDataObjectAs<account>();
    
    //Use the header to get or create an item
    orderStep = process.Header.AddOrGetItem("Order");
    
    //Check the item status
    if (orderStep.Status != TransactionStatus.Completed)
    {
        if (orderStep.ExecutionCount < 10)
        {
            orderStep.Execute(client, request);
        }
    }
    
    //Verify there are two steps and they are completed
    if (process.Header.AreItemsCompleted(2))
    {
        //Clean transaction data on completion
        process.DataHandler.CleanTransaction(process.Header.ID, process.Header.ReplayID);
    }
    
    //call update
    process.Update();
}
```

### ITranasctionCoordinatorDataHandler

This is the interface that is tied to a coordinator to allow that coordinator to communicate with a remote synchronization source.  It defines interfaced methods to retrieve header data, get replay information, and it defines the period of time to be passed before re-queueing a transaction.&#x20;

```csharp
/// <summary>
/// Retrieve the header by ID, or NULL if it does not exist
/// </summary>
/// <param name="ID">The transaction ID</param>
/// <param name="ReplayID">A replay ID, 1 by default</param>
/// <returns>A <see cref="TransactionHeader"/> or NULL if it does not exist</returns>
public TransactionHeader GetHeaderByID(string ID, int ReplayID = 1);

/// <summary>
/// Synchronize the entire tree back to the remote source
/// </summary>
/// <param name="transactionHeader">The header to sync</param>
/// <returns></returns>
public bool SyncRemoteTransaction(TransactionHeader transactionHeader);

/// <summary>
/// Get the pending transactions
/// </summary>
/// <param name="CoordinatorName">Name of the coordinator</param>
/// <returns></returns>
public List<TransactionHeader> GetPendingTransactions(string CoordinatorName);

/// <summary>
/// Clean the transaction, this is the final call before local cleanup.<br/>
/// <para>* if <paramref name="CleanDataObjects"/> is true, <b>This should null out the <see cref="TransactionItem.DataObject"/> </b>, and allows specific handlers to perform any final cleanup required by the specific handler</para>
/// </summary>
/// <param name="ID">The transaction ID</param>
/// <param name="ReplayID">A replay ID, 1 by default</param>
/// <param name="CleanDataObjects">If true, null out <see cref="TransactionItem.DataObject"/></param>
public void CleanTransaction(string ID, int ReplayID = 1, bool CleanDataObjects = true);

/// <summary>
/// Set a transaction to a specific status, helpful for requeing an errored transaction, or failing a transaction that is no longer valid.
/// </summary>
/// <param name="ID">The transaction ID</param>
/// <param name="ReplayID">A replay ID, 1 by default</param>
/// <param name="status">The status to assign</param>
public void SetTransactionStatus(string ID, int ReplayID = 1, TransactionStatus status = TransactionStatus.Completed);

/// <summary>
/// Get the latest replayID, or NULL if it does not exist
/// </summary>
/// <param name="ID">ID of the transaction to lookup</param>
/// <returns></returns>
public int? GetLastReplayID(string ID);

/// <summary>
/// Retrieve all IDS from the source where the last modified date is between two dates
/// </summary>
/// <param name="startDateInclusive">Start date to search for</param>
/// <param name="endDateInclusive">The end date, or now if not supplied</param>
/// <param name="Queue">Optional queue filter</param>
/// <param name="completeOnly">If true, only completed transactions will be returned</param>
/// <param name="IncludeReplays">If true, include replays as well</param>
/// <returns></returns>
public List<TransactionHeader> GetHeaderIDs(DateTimeOffset startDateInclusive, DateTimeOffset? endDateInclusive, string Queue = "", bool completeOnly = true, bool IncludeReplays = false);
```

There are two examples of this handler and their code listed below.&#x20;

### Memory Handler Code

{% hint style="danger" %}
The "Memory" version of this handler is for testing and debugging only. It would not be suitable for a production system.
{% endhint %}

{% file src="/files/x2x3jgJ1LCWcFEOYBwWM" %}

### SQL Handler Code

For MSSQL:

{% file src="/files/Hllf0BVJHbna2DdP0DSZ" %}


# Limiter

Another integration pattern is limiting the number of calls that can be made during a given period of time. This is important when rate limiting or billing may be an issue and is a perfect stop gap for a critical failure causing an erroneous number of API calls or running up an unwanted bill!

The Limiter auto resets it's count on the defined `TimeSpan`, and will not allow additional executions past the defined limit.

```csharp
using Perigee;
using Perigee.Extensions;

PerigeeApplication.ApplicationNoInit("Limiter", (c) =>
{

    c.AddRecurring("Limiter", (ct, l) => {
    using var APILimit = new RateLimiter("RateLimiter.json", 2, TimeSpan.FromMinutes(1), ct);

    if (APILimit.CanExecute())
    {
        //Perform action
        l.LogInformation("Calling API {n}/{x} executions", APILimit.GetCount(), APILimit.GetLimit());
    }
    else
    {
        l.LogInformation("Out of executions...");
    }
});
});

/*
 [16:35:07 INF] Calling API 1/2 executions
 [16:35:13 INF] Calling API 2/2 executions
 [16:35:18 INF] Out of executions...
 */
```


# Watermarking

We make working with watermarks quite easy and they are very powerful.&#x20;

* Our watermarks are persisted locally to disk automatically and recalled on application startup.
* They are debounced (We cover this in the [updating section](#updating)).
* They are thread safe.
* You can register as many subscribers as you need to the data feed.
* You may push that data externally on update, and recall it on initialization for further backup.

```csharp
//Register a watermark
Watermarking.Register("IntegrationOffset", () => Watermark.FromDateTimeOffset(DateTimeOffset.UtcNow), (nVal) => {
    taskConfig.GetLogger<Watermark>().LogInformation("New value for {name} ({value})", nVal.Name, nVal.GetDateTimeOffset());
});

//Register additional handlers anywhere else, they receive updates to that watermark
Watermarking.RegisterAdditionalEventHandler("IntegrationOffset", (s, nVal) => {
    taskConfig.GetLogger<Watermark>().LogInformation("AddlHandler: New value for {name} ({value})", nVal.Name, nVal.GetDateTimeOffset());
});

//Push updates to this watermark anywhere else
Watermarking.UpdateWatermark("IntegrationOffset", Watermark.FromDateTimeOffset(DateTimeOffset.UtcNow));

//And when you need the value, refer to it again later
Watermarking.GetWatermark("IntegrationOffset").GetDateTimeOffset();
```

{% hint style="warning" %}
The register call should be performed at application initialization if possible to avoid a [race condition](https://en.wikipedia.org/wiki/Race_condition) of pulling for it's value before it is registered. <mark style="color:red;">**Requesting a watermark before it is registered will throw an exception**</mark> .

```csharp
PerigeeApplication.ApplicationNoInit("HelloConfig",
(taskConfig) =>
{
    //Register me first!
    
    
    //Then .Add other methods
});
```

{% endhint %}

### Registering

Registering a watermark is an easy one liner. Let's look at the parameters:

{% code lineNumbers="true" %}

```csharp
Watermarking.Register(

//Name 
"IntegrationOffset", 

//Initialization Callback
() => Watermark.FromDateTimeOffset(DateTimeOffset.UtcNow), 

//OnUpdate (optional)
(nVal) => {
    taskConfig.GetLogger<Watermark>().LogInformation("New value for {name} ({value})", nVal.Name, nVal.GetDateTimeOffset());
});
```

{% endcode %}

* <mark style="color:blue;">**Line 4 - Name**</mark> - The name of the watermark
* <mark style="color:blue;">**Line 7 - Func\<Watermark> Initialization callback**</mark> - If the value does not exist, the initialization callback is called and an initial value is set.
* <mark style="color:blue;">**Line 10 - Action\<Watermark> onUpdate?**</mark> - An optional callback for when the value is updated.

{% hint style="success" %}
To create the other base data types, simply provide that type in the <mark style="color:blue;">**initialization callback**</mark>.&#x20;

```csharp
Watermark.FromString("");
Watermark.FromInt(1);
//etc
```

{% endhint %}

That's it. The underlying system does the heavy lifting of persisting this locally under the **`/watermarks`** folder beside it's running application.

### Registering Handlers

You're able to register as many "subscribers" to the data changes you desire in other parts of the code. These will be called on a background thread with the updated value.

The <mark style="color:green;">**`RegisterAdditionalEventHandler`**</mark> simply takes two parameters:

{% code lineNumbers="true" %}

```csharp
Watermarking.RegisterAdditionalEventHandler(

//Name of the watermark to register
"IntegrationOffset", 

//Callback function
(s, nVal) => {
    taskConfig.GetLogger<Watermark>().LogInformation("AddlHandler: New value for {name} ({value})", nVal.Name, nVal.GetDateTimeOffset());
});
```

{% endcode %}

* <mark style="color:blue;">**Line 4 - Name**</mark> - The name of the watermark you want to update.
* <mark style="color:blue;">**Line 7 - EventHandler\<Watermark>**</mark> - This sends you the <mark style="color:blue;">**`(sender, watermark)`**</mark> back in the callback and you're able to read the value from there

### Updating

The <mark style="color:green;">**`UpdateWatermark`**</mark> call takes two parameters:

{% code lineNumbers="true" %}

```csharp
Watermarking.UpdateWatermark(

//Name
"IntegrationOffset", 

//New value
Watermark.FromDateTimeOffset(DateTimeOffset.UtcNow));
```

{% endcode %}

* <mark style="color:blue;">**Line 4 - Name**</mark> - The name of the watermark you want to update.
* <mark style="color:blue;">**Line 7 - Watermark**</mark> - The new watermark and value.

A lot happens behind the scenes you should be aware of:

* Updates are <mark style="color:purple;">**debounced**</mark> which means that rapid updates don't all push their values at once to any subscribers of the data updates.&#x20;
  1. Let's say you processed 10 records in a matter of 50 milliseconds and every record you updated the watermark so it went from the initial value of <mark style="color:red;">**`0`**</mark> to <mark style="color:red;">**`10`**</mark>.&#x20;
  2. After about a second, all of the subscribers would get **a single updated watermark event** with the value of <mark style="color:red;">**`10`**</mark>.
  3. Debouncing reduces the number of calls both to the filesystem and to your subscribers
* Updates are thread safe as they perform internal item locks before writing to disk and notifying subscribers.&#x20;

### Get

Getting the watermark only requires the <mark style="color:blue;">**Name**</mark> of the watermark to retrieve.&#x20;

```csharp
Watermarking.GetWatermark("IntegrationOffset").GetDateTimeOffset()
```

If there are inflight updates to the watermark, this call may block the thread for a second or two while those debounces get processed. If there are no inflight updates, it returns immediately.&#x20;


# Alert Managers


# SMS

Perigee currently supports two different SMS clients right out of the box. It's easy to register them and use them from anywhere within your application.

1. At the start of your Perigee application, register the related alert managers.&#x20;
2. Anywhere from the code later on, call **`AlertManager.SMS()`** and supply the&#x20;
   * <mark style="color:blue;">**`Name`**</mark> (The name of the account you registered)
   * <mark style="color:blue;">**`ToNumber`**</mark> (Who it is going to, if within the US, start with the digit `1`)
   * <mark style="color:blue;">**`Message Body`**</mark> (The SMS body content)

### Code

```csharp
PerigeeApplication.ApplicationNoInit("SMS",  (c) => {

    //Register once
    AlertManager.RegisterSMS_Vonage("Vonage", "11231234567", "key", "secret");
    AlertManager.RegisterSMS_Twilio("Twilio", "11231234567", "accountkey", "apikey", "apisecret");

    //Alert from anywhere in the application later
    var rsp = AlertManager.SMS("Twilio", "19998887777", "Sending a message via twilio");

});
```


# Email

To store and send email via an SMTP address, register the server at startup and use the **`AlertManager.Email()`** call anywhere in code later.

### Code

```csharp
PerigeeApplication.ApplicationNoInit("Email",  (c) => {

    //Register once
    AlertManager.RegisterSMTPServer("MyName", "MyPassword", "smtp.gmail.com", 587, true);

    var em = new System.Net.Mail.MailMessage();
    em.To.Add("recipient@theirdomain.com");
    em.Body = "Hello!";
    em.Subject = "Test Email";
    AlertManager.Email(em);

});
```


# Discord

To use the embedded discord client. Register the hook URI at start, then call anywhere else

### Code

```csharp
PerigeeApplication.ApplicationNoInit("Discord",  (c) => {

    //Register once
    AlertManager.RegisterDiscordWebhook("bot", "WEBHOOKURI");

    //Call anywhere else
    int IssueCount = 0;
    AlertManager.Webhook_Discord("bot", new DiscordMessage()
    {
        Embeds = new List<DiscordEmbed>() {
            new DiscordEmbed() {
                Title = $"My awesome discord enabled app {(IssueCount > 0 ? "failed" : "completed")}",
                Description = IssueCount > 0 ? "Issues exist, please check log." : "Everything completed as expected",
                Color = IssueCount > 0 ? System.Drawing.Color.Yellow : System.Drawing.Color.Green,
                Fields = new List<EmbedField> {

                    new EmbedField() { InLine = true, Name = "Server", Value = "MyServer"},
                    new EmbedField() { InLine = true, Name = "Issue Count", Value =  IssueCount.ToString() },
                    new EmbedField() { InLine = false, Name = "Location", Value = Directory.GetCurrentDirectory() },
                }
            }
        }
    });

});
```

There's also a builder method is you're creating the same information, it makes the creation a bit more compact and without having to remember the nested syntax:

```csharp
AlertManager.Webhook_Discord("bot", DiscordMessage.Builder(
        $"My awesome discord enabled app {(IssueCount > 0 ? "failed" : "completed")}",
        IssueCount > 0 ? "Issues exist, please check log." : "Everything completed as expected", null,
        IssueCount > 0 ? System.Drawing.Color.Yellow : System.Drawing.Color.Green,
        EmbedField.Builder("Server", "MyServer"),
        EmbedField.Builder("Issue Count", IssueCount.ToString()),
        EmbedField.Builder("Location", Directory.GetCurrentDirectory())));
```


# Teams

Teams requires a third party library and card content.

DEMO coming soon:


# File Formats


# Excel

Perigee provides several easy methods to read Excel files into `DataTables` or `DataSets`.

```csharp
//Get a memory stream of the object to read
using MemoryStream ms = new MemoryStream(File.ReadAllBytes("ExcelFile.xlsx"));

//Read "DataSheet"
var DT = ExcelReader.ReadDataTable(ms, "DataSheet", out DynamicDataTable ddt, TrimCells: true);

//Read two sheets, and return the data set
var dataSet = ExcelReader.ReadDataSet(ms, new List<string>() { "DataSheet", "Lookup" });
```


# CSV

## Read

Perigee ships with several powerful CSV tools that make reading even complicated CSV's very easy and fast with memory efficient span based data reads.

```csharp
//Get a memory stream to the file
using MemoryStream ms = new MemoryStream(File.ReadAllBytes("Products.csv"));

//Read the CSV as a list of T classes
List<Product> products = CSVReader.ReadAs<Product>(ms);

//Read the csv as a DataTable
DataTable ProductTable =  CSVReader.ToDataTable(ms, out var res);
```

{% hint style="info" %}
When using the `.ToDataTable()` methods, you get the resulting parse parameters sent back as an out variable. This allows you to check it's encoding, formatting, delimiters, header row location, etc.&#x20;
{% endhint %}

## Write

To write CSV data supply a `DataTable` and any additional handlers to override specifics on a data type.

* We'll read in the `Products.CSV` as our source.
* Let's then declare a writer, and set it to `BAR` delimited
* Register a decimal handler that write's any decimals with 3 digits after the period
  * The handler sends you back the **object** (in this case a decimal)
  * The **Row Index**.
  * The **Column Name**.
  * It expects a return value of the string converted version, as well as a `boolean` indicating if the transform was successful.
  * Any NON-SUCCESSFUL transformed handlers are added to the writers **LoadLog** property and can be viewed after conversion.
* Then simply call `.Write()`.

```csharp
//Read products CSV from above reader demo
using MemoryStream ms = new MemoryStream(File.ReadAllBytes("Products.csv"));
DataTable ProductTable = CSVReader.ToDataTable(ms, out var res);

//Write this table back out to CSV using a custom decimal format and BAR delimited
CSVWriter writer = new CSVWriter(ProductTable, (d) => "Products").WithDelimiter("|");

//You can register booleans, strings, datetimes, decimals... etc.
writer.RegisterHandler<decimal>((dec, rowIndex, colName) => new Tuple<string, bool>(dec.ToString("N3"), true));    

//Write it out
string content = writer.Write();
```

{% code title="writerResult.csv" %}

```csharp
Products
ID|PRODUCT|PRICE
1|MILK|8.990
2|55-INCH TV|899.990
3|BREAD|1.990
```

{% endcode %}

## Clean

Maybe the only thing you need to do is take the absolutely horrendous CSV data in the [Sample Data section](#sample-data) and just create a CSV that can be cleanly loaded into another system.

```csharp
using MemoryStream ms = new MemoryStream(File.ReadAllBytes("Products.csv"));

string cleanContent = CSVReader.Clean(ms);
```

This transforms the very badly formatted CSV Sample Data into this:

```csv
ID,PRODUCT,PRICE
1,MILK,8.99
2,55-INCH TV @ aisle 4,899.99
3,BREAD,1.99
```

### Sample Data

Included is the sample data and classes used above.

{% code title="Products.csv" %}

```csv
CSVData as of 1/1/2001
By: Yours Truly
ID@PRODUCT@PRICE
1@MILK@8.99
2@'55-INCH TV @ aisle 4'@899.99
3@BREAD@1.99
```

{% endcode %}

```csharp
public class Product
{
    public int id { get; set; } = 0;
    public string product { get; set; }
    public decimal price { get; set; }
}
```


# File System Storage


# File Revision Store

**`FileRevisionStore`** class handles file revision storage. It caters for concurrent safe read/write operations across the entire application using a globally unique thread-safe lock. This class also offers the following features:

* File verification processing
* Data file versioning with a system-level transactional replace to prevent partial file writes or data corruption
* Ability to rewind corrupt files back to a previous version when verification fails
* An `UpdateFile` method that performs a thread-locked read/write on the same transaction

The "revision checked" feature serves as a safety mechanism in the **`FileRevisionStore`**, ensuring the integrity of the files written to disk. Before overwriting, each file is assigned a revision, and the bytes are transactionally verified to prevent partial or corrupt file writes. This meticulous verification process safeguards the data by confirming that only complete and accurate revisions are written, thus minimizing the risk of data corruption or loss due to incomplete or erroneous file writes.

### SaveFile

This method saves a file and returns a boolean value indicating if the operation was successful.

* The Path is supplied to where the file is stored.
* A byte array is passed of the data to store
* A Verification function is optionally supplied to verify the data written to disk.

In the example below, we're writing data using JsonCompress. The verification function is simply checking that we can decompress the bytes again from disk.

#### Example:

```csharp
bool isSaved = FileRevisionStore.SaveFile("data.bin", 
    JsonCompress.Compress(new BitPerson() { Name = "Bit Bob", PersonType = BitPersonType.adult }), 
    (b) => { 
        var d = JsonCompress.Decompress<BitPerson>(b);
        return true;
});
```

### ReadFile Method

`ReadFile` method reads a file and performs verification.

* The Path is supplied to where the file is stored.
* An out boolean is sent back saying whether or not the validation was a failure.&#x20;
* A Verification function is optionally supplied to verify the data read back from the disk.

In the below example, we are using JsonCompress to verify the data can be decompressed from disk without an exception thrown.&#x20;

#### Example:

```csharp
byte[] ReadBytes = FileRevisionStore.ReadFile("data.bin", out var validationFailed,
    (b) => {
        var d = JsonCompress.Decompress<BitPerson>(b);
        return true;
});
```

### UpdateFile Method

`UpdateFile` method performs a thread-locked read/write operation on the same transaction.&#x20;

It's very similar to the above two methods:

* The Path is supplied to where the file is stored.
* An out boolean is sent back saying whether or not the validation was a failure.&#x20;
* A callback with the bytes being read is supplied, this is how you update the file
* A Verification function is optionally supplied to verify the data read back from the disk.
  * This is actually called twice in the update cycle. Once on file read, and a second time on file write.&#x20;

#### Example:

```csharp
FileRevisionStore.UpdateFile("data.bin",
    out bool validationfailed,
    (byteIn) =>
    {
        var d = JsonCompress.Decompress<BitPerson>(byteIn);
        d.PersonType = BitPersonType.child;
        return JsonCompress.Compress(d);
    },
    (b) =>
    {
        var d = JsonCompress.Decompress<BitPerson>(b);
        return true;
}); 
```


# Concurrent File Store

The **`ConcurrentFileStore`** class enables the use of a concurrent dictionary as a means of storing data that is compressed, locally stored, debounced updated, and subject to revision checks. It handles all of the low-level code necessary to implement a concurrent store, offering benefits such as file verification, backup and restore functionalities, and a rich SDK for programmatic management and interaction.

The "revision checked" feature serves as a safety mechanism in the **`ConcurrentFileStore`**, ensuring the integrity of the files written to disk. Before overwriting, each file is assigned a revision, and the bytes are transactionally verified to prevent partial or corrupt file writes. This meticulous verification process safeguards the data by confirming that only complete and accurate revisions are written, thus minimizing the risk of data corruption or loss due to incomplete or erroneous file writes.

This implements [File Revision Store under the hood](/core-modules/file-system-storage/file-revision-store). Check it out!

## Example Use

Here's an exampel that shows allocating and using a concurrent file store.&#x20;

```csharp
var ctslocal = new CancellationTokenSource();

var cfs = new ConcurrentFileStore<string, string>(
    $"strings.bin", //Path
    ctslocal.Token, //Cancel token
    5000, 10000, //Debounce timers
    () => new Dictionary<string, string>() { { "a", "b" } }, //Initialization callback
    (writeCallbackBytes) => { }, //Called when a file write occurs
    (processFunction) => { }); //A function that is called ONCE after initialization or on startup.

cfs.AddOrUpdate("a", "b");
cfs.AddOrUpdate("a", "c");
cfs.AddOrUpdate("b", "d");

//Await any updates to write
cfs.Await();

//Disposing prevents future writes, forces pending updates to write.
cfs.Dispose()
```

## SDK

### ConcurrentFileStore Initialization

This method initializes a new instance of the ConcurrentFileStore class. It takes the following parameters:

* `fileStore` : Path where the file will be stored.
* `cancelToken` : Token used for cancelling the operation.
* `debounceTimeMS` : Specifies the time between updates/deletes until the write occurs. Default is 1000 milliseconds.
* `maximumDebounceTimeMS` : If repeated updates stretch debounces beyond this limit, it will trigger an immediate write. Default is 10000 milliseconds.
* `initialization` : Optional. If no value is read or initialized from the disk, and this callback is set, it will be called to initialize the concurrent store.
* `writeCallback` : Optional. If set, this function is called every time a debounced write is verified and the written bytes are also checked.
* `processFunction` : Optional. If assigned, the Process function is called once on startup when values are loaded back from disk or from the initialization callback. This is final step to modify the data before regular use starts.
* `AES32Key` : Optional. If assigned, contents will be encrypted to disk using this AES 32 bit key, in non hex format.
* `AES16IV` : Optional. If assigned, contents will be encrypted to disk using this AES 16 bit IV, in non hex format.

#### Example:

```csharp
string fileStore = "/path/to/store";
CancellationToken cancellationToken = new CancellationToken();
ConcurrentFileStore concurrentFileStore = new ConcurrentFileStore(
    fileStore, 
    cancellationToken, 
    500, 
    2000, 
    null, 
    bytes => Console.WriteLine(Encoding.UTF8.GetString(bytes)), 
    dictionary => dictionary.Add("extra key", "extra value"), 
    AesCrypto.GetNewRandom(32, false), 
    AesCrypto.GetNewRandom(16, false)
);
```

### ReadAndVerifyPath

A helper method that will read and verify a file path using the built-in compression and validation logic. Useful for initializations outside the scope of the process. This method needs a `path` parameter for the file path, a `FailedVerification` parameter to check if the verification failed, and optional `AES32Key` and `AES16IV` parameters for encryption.

#### Example:

```csharp
ConcurrentFileStore.ReadAndVerifyPath("/some/path/to/file", out bool verificationFailed);
```

### DecompressBytes

This function decompresses bytes, optionally with aes keys. The parameters are `bytes` of the data to be decompressed and optional `AES32Key` and `AES16IV` for encryption.

#### Example:

```csharp
ConcurrentFileStore.DecompressBytes(byteData);
```

### CompressBytes

This function compresses an object to bytes, optionally with aes keys. It requires a `compObject` which is the compression object and optional `AES32Key` and `AES16IV` for encryption.

#### Example:

```csharp
ConcurrentFileStore.CompressBytes(myObject);
```

### Write

This function writes the file using the same logic the ConcurrentFileStore uses internally. Takes parameters `Dict` which is the dictionary to write, `FilePath` which is the file to write to, `Bytes` which are the bytes converted, and optional `AES32Key` and `AES16IV` for encryption.

#### Example:

```csharp
ConcurrentFileStore.Write(myDict, "/path/to/file", out byte[] writeBytes);
```

### GetCache

This function returns the underlying cache. Any changes made here will be reflected and may cause issues if modified.

#### Example:

```csharp
var cache = ConcurrentFileStore.GetCache();
```

### InitializeFromBytes

The function initializes a concurrent dictionary using built-in compression/serialization methods. Requires a `bytes` parameter to initialize from and optional `AES32Key` and `AES16IV` for encryption.

#### Example:

```csharp
var initializedDictionary = ConcurrentFileStore.InitializeFromBytes(myBytes);
```

### Await

This function can be used to await any outstanding items. It does not await items being present.

#### Example:

```
ConcurrentFileStore.Await();
```

### AwaitInitialization

This function allows to await for any source to cause an initialization of values. This may wait indefinitely if no value is sent to the concurrent writer.

#### Example:

```csharp
ConcurrentFileStore.AwaitInitialization();
```

### Get

The function gets an item by key. Requires a `key` as parameter.

#### Example:

```csharp
var value = ConcurrentFileStore.Get(myKey);
```

### Remove

The function removes an item by key. Requires a `key` as parameter.

#### Example:

```csharp
ConcurrentFileStore.Remove(myKey);
```

### Contains

The function checks that an item exists by key. Requires a `key` as parameter.

#### Example:

```csharp
bool doesContain = ConcurrentFileStore.Contains(myKey);
```

### AddOrUpdate

This function adds or updates a value. Takes parameters `key` and `value`.

#### Example:

```csharp
ConcurrentFileStore.AddOrUpdate(myKey, myValue);
```

### Keys

This function returns all keys.

#### Example:

```csharp
var keys = ConcurrentFileStore.Keys();
```

### SignalModified

Signal that the underlying data was modified outside of an `AddOrUpdate` or `Remove`. This is not the recommended way of changing or modifying data, but it does exist if you need to trigger a re-save check

#### Example:

```csharp
ConcurrentFileStore.SignalModified();
```

### UpdateWithCheckout

This allows you to modify the cache while maintaining proper locking. It's intended only to be used when you need to freeze the entire cache and operate on it, instead of individual `Key` objects.&#x20;

#### Example:

```csharp
ConcurrentFileStore.UpdateWithCheckout((c) => {
  //Modify c however you like, the whole cache is locked.
  
  //On return, a save request is executed
});
```

### ValuesFromPredicate

This function searches the values using a predicate. The predicate is a function specifying the condition to be met for the values.

#### Example:

```csharp
var values = ConcurrentFileStore.ValuesFromPredicate(x => x > 10);
```


# FileSync + Cache

<mark style="color:red;">**FSW**</mark> for short is a class suited for synchronizing data to the local drive. In short, you supply the <mark style="color:blue;">**CancellationToken**</mark> from the thread and it safely handles the file locking and writing of newly updated data on a regularly scheduled basis and before the application closes.&#x20;

It's much lighter than the [ConcurrentFileStore](/core-modules/file-system-storage/concurrent-file-store) and [FileRevisionStore](/core-modules/file-system-storage/file-revision-store), as such, there's no transactional lock and write verification fallbacks. The plus side is that there's fewer read/writes and if those features aren't of interest to you, this would be the next best choice!

If you run the below demo multiple times, you'll see the count being restored, incremented and shut down. There's a new file with the data located at `bin\debug\sync\local.json`.

```csharp
//Declare a cancellation token source to control the FSW. 
//If using FSW within a ManagedThread, use the passed cancellation token
CancellationTokenSource CTS = new CancellationTokenSource();

//Local persist data
LocalPersistData localData = new LocalPersistData();

//Declare a new FileSyncWrite, it's generic T type can be any class that supports new()
FileSyncWrite<LocalPersistData> _FSW = new FileSyncWrite<LocalPersistData>($"sync{Path.DirectorySeparatorChar}local.json", 
    CTS.Token,              //The token mentioned above

    rollingDelay: 1000,     //Rolling delay is bumped every time an Update() is pushed in. 
    maximumDelay: 10000,    // Maximum delay is if rolling delay is never expired
                            //  When either event is satisfied, the data is written to disk

    (s,data) => { }         //This is an updated event callback. Any time the data is written, this is called

    );


//If initialized, then a value was loaded back in from the disk.
//If this is FALSE, no value was loaded in
if (_FSW.InitializedValue)
{
    localData = _FSW.Get();
    Console.WriteLine($"FSW Initialized: {localData.Count}, {localData.Offset}");
}

//Register an additional callback
_FSW.UpdatedEvent += (object s, LocalPersistData e) =>
{
    if (e != null)
        Console.WriteLine($"FSW Updated: {e.Count}, {e.Offset}");
};

//Push debounced updates to it:
localData.Count++;
_FSW.Update(localData);

//Tell the FSW to end all pending update queues and sync data back now
CTS.Cancel();

Task.Delay(8000).Wait();
return;
```

The class used above is simply two properties with getter/setters:

```csharp
public class LocalPersistData
{
    public int Offset { get; set; }
    public int Count { get; set; }
}
```


# Third Party


# SmartSheets

There is an included SmartSheets downloader for pulling data from SmartSheets.

The **`AccessToken`** is found in your API credentials.

```csharp
long longSheetID = 12345678;
using MemoryStream smData = SmartSheetClient.GetSheetAsCSV("AccessToken", longSheetID);
CSVReader.ToDataTable(smData);
```


# Microsoft Graph

There is an included Graph client with two authorization models built right in.&#x20;

Most of the prebuilt functionality is around the drive, site, lists and teams workloads. However, you can easily extend the functionality if you need something specific!

## Authorization

To use either, go to <https://portal.azure.com> and create an app registration.&#x20;

### Client\_Credentials

This authorization type is used when supplying direct application ID/Secrets from a registered application. The registered permissions are usually administratively granted and there is no delegation ("as a user") required.&#x20;

```csharp
PerigeeApplication.ApplicationNoInit("Graph", (c) =>
{
    var Graph = new GraphClient("tenant", "appID", "appSecret", c.GetLogger<Program>());
});
```

That's it! Once you have the client, call other methods:

```csharp
var site = Graph.GetSiteByPath(new Uri(@"https://company.sharepoint.com/sites/dev1"));
var drive = Graph.GetSiteDrive(site.id);
```

### Authorization\_Code + Refresh\_Code

This authorization type is best used when you're authorizing a user and your application permissions are assigned as delegated.&#x20;

A good example of this is a service account authorized to pull a DataVerse table, or read teams messages.

```csharp
PerigeeApplication.ApplicationNoInit("Graph", (c) =>
{
    //Define client
    var Graph = new GraphClient("tenant", "appID", "appSecret", 
    "offline_access user.read Team.ReadBasic.All", 
    "https://localhost:7201/api/token", 
    "", //Optional domain, leave blank unless talking to dataverse
    c.GetLogger<Program>());

    //Give it the initial code, so it can refresh and retrieve the authorization_code and refresh_code
    CredentialStore.RefreshAuthorizationCode(Graph.credentialName, "CODEHERE");
    
});
```

And there you have it, once the initial code is supplied the client is automatically maintained from there on out. If a new token is required the refresh token is automatically supplied and you don't have to think about it again!

```csharp
var teams = Graph.GetJoinedTeams();
```

#### Full Demo

To see a full demo including receiving a token from the the response, and awaiting the credentials on load:

{% content-ref url="/pages/CZz3yhy4iDuNhnlhfFge" %}
[Graph Delegated Authorization + DataVerse](/examples-and-demos/graph-delegated-authorization-+-dataverse)
{% endcontent-ref %}

## SDK

The SDK methods closely match what's defined in the [Graph 1.0 documentation](https://learn.microsoft.com/en-us/graph/api/overview?view=graph-rest-1.0).&#x20;

### Custom Graph Call

If a method is missing or you need to override functionality, feel free to use the built in call to submit your own call with authorization, credential management, and retries built in.

Use **`RestGraphCall`**, as shown below:

```csharp
var response = Graph.RestGraphCall<GraphAPIModel.Generic.Response>(
    $"/sites/{sync.siteID}/lists/{sync.ListName}", Method.Get);
```


# Perigee In Parallel


# Parallel Processing Reference

## Parallel Processing basics

Let's take a look at a few things we need to know before jumping into parallel processing libraries.

### Ruleset

The rules for parallel processing are as follows: (Psst, don't get too lost in them, but reading through will help you understand how to design your parallel processing architecture)

* Don't write to anything that isn't a concurrent safe type. (Only write to concurrent safe types!)
* Don't call instantiated class methods in parallel (unless you KNOW you can). Prefer to write static methods when calling in parallel loops to avoid concurrency issues.
* Use synchronization constructs, like locks or semaphores, to protect shared resources and avoid race conditions.
* Ensure that the workload is balanced across all parallel tasks to maximize efficiency and minimize the chance of bottlenecks.
* Be mindful of the trade-offs between parallelism and performance, as not all tasks will benefit from parallelization. In some cases, the overhead of creating and managing parallel tasks may outweigh any potential speedup.
* Test your parallel code thoroughly to ensure it is working correctly and efficiently, as debugging parallel code can be more difficult than debugging sequential code.
* Keep in mind potential issues with exception handling, as exceptions thrown in parallel tasks may be propagated and require proper handling in the calling code.
* Consider the target hardware and environment when designing parallel code, as factors like the number of available cores and memory limitations can impact performance and scalability.

### Hashing

Hashing is a process of converting data into a fixed-size string of bytes, typically using a mathematical algorithm like SHA, MD5, etc. The output, called a hash, is a unique representation of the input data. A small change in the input data will result in a completely different hash, making it useful for verifying data integrity, securely storing passwords, and creating unique identifiers for data.

Hash based data structures, such as hash tables or hash sets, provide a fast and efficient way to look up or verify existing data. These data structures use hashing to determine the location of an item in memory, allowing for quick access and retrieval even in large datasets. This is particularly useful in parallel processing, where multiple threads or processes may be accessing the same data simultaneously.

Perigee fully embraces the hash structures as a way of providing better parallel processing for data sets.

### Parallel write-safe structures

C# only has a few concurrent write-safe structures. You can find them under `System.Collections.Concurrent`.

The two primary concurrent classes we are interested in for this practice are:

1. ConcurrentBag
2. ConcurrentDictionary\<K,V>

Both of these structures provide a thread safe, concurrent way of writing data back during a parallel loop. We'll use both of these while processing data in parallel.

## Intro to Perigee Parallel

There are 3 main parallel concepts within Perigee:

1. Parallel processing lookup data for rapid existence and lookup checks
2. Parallel transforming records into a new type
3. Parallel iteration without a defined output.

## 1 - Parallel Lookup Processing

We have two classes for easy parallel lookups:

1. `GroupProcessor`
2. `SingleProcessor`

### Group Processor

The `GroupProcessor` allows for parallel execution over a list, DataTable, or other enumerable input. The "Group" is because it will perform a "**GroupBy**" on the input data, so that one input key may point to multiple input items. Original input items are retained, and the "key" is used as a hashed lookup. Let's look at some data and an example:

```csv
TypeCategory,Name
SteakRarity, Rare
SteakRarity, Medium-Rare
SteakRarity, Well Done
SteakType, T-Bone
SteakType, Flank
```

If you were to use a `GroupProcessor` on the data above, it would look as so:

```csharp
using Perigee.Helpers;

//Get data, usually from a file, a database, or elsewhere
FoodCategories[] FoodCats = new FoodCategories[]
{
    new FoodCategories { TypeCategory = "SteakRarity", Name = "Rare" },
    new FoodCategories { TypeCategory = "SteakRarity", Name = "Medium-Rare" },
    new FoodCategories { TypeCategory = "SteakRarity", Name = "Well Done" },
    new FoodCategories { TypeCategory = "SteakType", Name = "T-Bone" },
    new FoodCategories { TypeCategory = "SteakType", Name = "Flank" }
};

//Perform parallel lookup
var gpCategoryLookup = FoodCats.ParallelProcessToGroupProcessor(f => f.TypeCategory);

public class FoodCategories { public string TypeCategory { get; set; } public string Name { get; set; } }
```

Once the data has been processed, you can perform existence checks and data retrieval all using hashed values. This means it's parallel existence check safe and parallel data retrieval safe.

```csharp
//Perform a lookup, using an internal hash
bool contains = gpCategoryLookup.Contains("SteakRarity");

if (contains) {

    //Get all SteakRarity values: Rare, Medium-Rare, Well Done
    List<FoodCategories> steakRarities = gpCategoryLookup["SteakRarity"];
}
```

Using our parallel execution loops to produce hashed data lookup has reduced various process times down by almost 500,000% in certain production applications.

### Single Processor

The `SingleProcessor` allows for parallel execution over a list, `DataTable`, or other enumerable input. The "Single" part expects only a single input key to exist within the input data, so that one input key points to a single input item. Original input items are retained and the "key" is used as a hashed lookup. Let's look at some data and an example:

```csv
TypeCategory,Name
SteakRarity, Rare
SteakRarity, Medium-Rare
SteakRarity, Well Done
SteakType, T-Bone
SteakType, Flank
```

If you were to use a `SingleProcessor` on the data above, it would look as so:

```csharp
using Perigee.Helpers;

//Get data, usually from a file, a database, or elsewhere
FoodCategories[] FoodCats = new FoodCategories[]
{
    new FoodCategories { TypeCategory = "SteakRarity", Name = "Rare" },
    new FoodCategories { TypeCategory = "SteakRarity", Name = "Medium-Rare" },
    new FoodCategories { TypeCategory = "SteakRarity", Name = "Well Done" },
    new FoodCategories { TypeCategory = "SteakType", Name = "T-Bone" },
    new FoodCategories { TypeCategory = "SteakType", Name = "Flank" }
};

var spNameLookup = FoodCats.ParallelProcessToSingleProcessor(f => f.Name);

public class FoodCategories { public string TypeCategory { get; set; } public string Name { get; set; } }
```

Once the data has been processed, you can perform existence checks and data retrieval all using hashed values. This means it's parallel existence check safe and parallel data retrieval safe.

```csharp
//Perform a lookup, using an internal hash
bool contains = spNameLookup.Contains("T-Bone");
if (contains) {

    //Get the original class item 
    FoodCategories item = spNameLookup["T-Bone"];
}

```

### A note on Mesh-Keys

Because of the nature of hashed values, you can use multiple inputs as a mesh key.

**Option 1**:

Supply the key as a delimited list. An example might be:

```csharp
var gpPeople = People.ParallelProcessToGroupProcessor(f => $"{f.FirstName ?? "NULL"}|{f.LastName ?? "NULL"}");
```

This would make the hashed lookup a mesh key of FirstName, LastName. And the retrieval of those records would require both values to match.

**Option 2**:

Supply the key as a hash itself. The hash can be calculated from a database, or local depending on your needs. An example using a local hash function for SHA512:

```csharp
var hasher = SHA512.Create();

foreach (var person in People) {
    person.hash = hasher.ComputeHash(Encoding.UTF8.GetBytes($"{f.FirstName ?? "NULL"}|{f.LastName ?? "NULL"}"));
}

var gpPeople = People.ParallelProcessToGroupProcessor(f => f.hash));

```

Notice how we computed the hash outside of a parallel loop? The one caveat to local hashing is that they **CANNOT** be hashed in parallel on the same instance of a `HashAlgorithm`. For this reason I would recommend, when possible, going with `Option 1`.

Hashing the mesh-key is really most useful in two conditions:

1. The hash is pre-calculated on input data, especially when coming from a database or a different system
2. You need to compute and add together multiple hashed keys into a single lookup, so that you can perform rapid existence checks on multiple types of mesh keys.

## 2 - Parallel Transformation Processing

This type of parallel processing is a bit different. Instead of purely processing data for rapid lookup and retrieval, we're taking the input data and transforming it to a new type, class, structure, or even multiple new items to store again later.

For this, we want to use a parallel loop that returns a concurrent safe class. For our example, let's use a concurrent bag:

```csharp
using Perigee.Extensions;
using Perigee.Helpers;

FoodCategories[] FoodCats = new FoodCategories[]
{
   new FoodCategories { TypeCategory = "SteakRarity", Name = "Rare" },
   new FoodCategories { TypeCategory = "SteakRarity", Name = "Medium-Rare" },
   new FoodCategories { TypeCategory = "SteakRarity", Name = "Well Done" },
   new FoodCategories { TypeCategory = "SteakType", Name = "T-Bone" },
   new FoodCategories { TypeCategory = "SteakType", Name = "Flank" }
};

GroceryItem[] Groceries = new GroceryItem[] {
   new GroceryItem { TypeKey = "SteakRarity" },
   new GroceryItem { TypeKey = "SteakType" },
};

var gpCategoryLookup = FoodCats.ParallelProcessToGroupProcessor(f => f.TypeCategory);

ConcurrentBag<GroceryItem> Bag = Groceries.ParallelProcessToBag(f => {

   return new GroceryItem() { 
       Name = "GroupKey", 
       TypeKey = f.TypeKey, 
       rCount = gpCategoryLookup.Contains(f.TypeKey) ? gpCategoryLookup[f.TypeKey].Count : 0
   };
    
});

//Handy quick database conversion
var DataTableFromResult = Bag.ToDataTable();

public class FoodCategories { public string TypeCategory { get; set; } public string Name { get; set; } }
public class GroceryItem { public int rCount { get; set; } public string TypeKey { get; set; } public string Name { get; set; } }
```

`Bag` now contains 2 items: `SteakType, 2`, and `SteakRarity, 3`. There's a lot of performance to gain when performing parallel operations on larger datasets.

P.S, Ready for dinner yet? I am...

## 3 - Parallel Iteration

This one is very similar to what's above, this time we aren't capturing a direct output, but rather sending items to a concurrent dictionary. We'll also introduce the ExceptionRows callback.

```csharp
using Perigee.Extensions;
using Perigee.Helpers;

FoodCategories[] FoodCats = new FoodCategories[]
{
   new FoodCategories { TypeCategory = "SteakRarity", Name = "Rare" },
   new FoodCategories { TypeCategory = "SteakRarity", Name = "Medium-Rare" },
   new FoodCategories { TypeCategory = "SteakRarity", Name = "Well Done" },
   new FoodCategories { TypeCategory = "SteakType", Name = "T-Bone" },
   new FoodCategories { TypeCategory = "SteakType", Name = "Flank" }
};

GroceryItem[] Groceries = new GroceryItem[] {
   new GroceryItem { TypeKey = "SteakRarity" },
   new GroceryItem { TypeKey = "SteakType" },
   new GroceryItem { TypeKey = "CheeseType" },
   new GroceryItem(),

};

var gpCategoryLookup = FoodCats.ParallelProcessToGroupProcessor(f => f.TypeCategory);

ConcurrentDictionary<GroceryItem, int> ReturnedDictionary = new ConcurrentDictionary<GroceryItem, int>();
Groceries.ParallelProcess(f => {

    if (string.IsNullOrEmpty(f.TypeKey)) throw new Exception("TypeKey is null or empty");
    int v = gpCategoryLookup.Contains(f.TypeKey) ? gpCategoryLookup[f.TypeKey].Count : 0;
    ReturnedDictionary.AddOrUpdate(f, v, (k, o) => v);
    
}, 
(exceptionRows) => {
    exceptionRows.ForEach(f => Console.WriteLine($"Item {JsonConvert.SerializeObject(f.Item)} had an exception thrown: {f.exception.Message}"));

    byte[] ExcRows = JsonCompress.Compress(exceptionRows);
    var excRowsDecomp = JsonCompress.DecompressList<ParallelProcessException<GroceryItem>>(ExcRows);
});
```

After running the code, you'll see one item logged to the console, as expected:

> Item {"rCount":0,"TypeKey":null,"Name":null} had an exception thrown: TypeKey is null or empty

We've also created 3 items in the `ReturnedDictionary`, with the `.value` property being the number of items from the grouped lookup.

Finally, I've added the `JsonCompress` class to serialize and deserialize the `ParallelProcessException` items, so that they can be stored, sent, or retrieved later.

## Summary

We've looked at three different ways we can use parallel processing to boost the speed of our data conversion lookups and loops. We've taken a look at what hashing is and how to effectively use it. We've seen several examples of using the `Single` and `Group` processors. We also got to see how the `ExceptionRows` callback allows us to iterate over failed parallel execution items.


# Extensions

## ParallelProcessToDictionary (DataTable)

This extension method processes a DataTable in parallel and returns a `ConcurrentDictionary` containing the results, with the keys generated by the provided callback.

#### Example:

```csharp
DataTable dataTable = GetDataTable();
ConcurrentDictionary<int, DataRow> resultDictionary = dataTable.ParallelProcessToDictionary(row => (int)row["Id"]);
```

## ParallelProcessToDictionary (IEnumerable)

This extension method processes an IEnumerable in parallel and returns a `ConcurrentDictionary` containing the results, with the keys generated by the provided callback.

#### Example:

```csharp
IEnumerable<int> numbers = new List<int> { 1, 2, 3, 4, 5 };
ConcurrentDictionary<int, int> resultDictionary = numbers.ParallelProcessToDictionary(number => new KeyValuePair<int, int>(number, number * 2));
```

## ParallelProcessToGroupProcessor

This extension method processes an IEnumerable in parallel to a new grouped processor.

#### Example:

```csharp
IEnumerable<MyClass> myClasses = GetMyClasses();

GroupProcessor<MyClass, string> groupProcessor = myClasses.ParallelProcessToGroupProcessor((x) => x.groupByField);
```

## ParallelProcessToSingleProcessor

Converts an IEnumerable to a SingleProcessor using a provided callback function.

#### Example:

```csharp
IEnumerable<int> numbers = new List<int> { 1, 2, 3, 4, 5 };
Expression<Func<int, int>> callback = x => x * 2;

SingleProcessor<int, int> singleProcessor = numbers.ParallelProcessToSingleProcessor(callback);
```

## ParallelProcessToBag

This extension method processes an IEnumerable in parallel and returns a `ConcurrentBag` containing the transformed items, with the transformation function provided by the callback.

#### Example:

```csharp
IEnumerable<int> numbers = new List<int> { 1, 2, 3, 4, 5 };
ConcurrentBag<string> resultBag = numbers.ParallelProcessToBag(number => $"Number: {number}");
```

## ParallelProcessToBag (DataTable)

This extension method processes a DataTable in parallel and returns a `ConcurrentBag` containing the transformed items, with the transformation function provided by the callback.

#### Example:

```csharp
DataTable dataTable = GetDataTable();
ConcurrentBag<int> resultBag = dataTable .ParallelProcessToBag(row => (int)row["Id"]);
```

##

## ParallelProcessToBag (with ExceptionRows)

This extension method processes an IEnumerable in parallel, returns a `ConcurrentBag` containing the transformed items, and handles exceptions using the provided callback.

#### Example:

```csharp
IEnumerable<int> numbers = new List<int> { 1, 2, 3, 4, 5 };
ConcurrentBag<string> resultBag = numbers.ParallelProcessToBag(
    number => $"Number: {number}",
    exceptions => {
        foreach (var exception in exceptions)
        {
            Console.WriteLine($"Error: {exception.exception.Message}, Item: {exception.Item}");
        }
    });

```

## ParallelProcess (ConcurrentBag)

This extension method processes a `ConcurrentBag` in parallel, invoking the provided callback for each item.

#### Example:

```csharp
ConcurrentBag<int> numbers = new ConcurrentBag<int>(new List<int> { 1, 2, 3, 4, 5 });
numbers.ParallelProcess(number => Console.WriteLine($"Processing number: {number}"));
```

## ParallelProcess (ConcurrentDictionary)

This extension method processes a `ConcurrentDictionary` in parallel, invoking the provided callback for each key-value pair.

#### Example:

```csharp
ConcurrentDictionary<int, string> dictionary = new ConcurrentDictionary<int, string>();
dictionary[1] = "One";
dictionary[2] = "Two";
dictionary[3] = "Three";
dictionary.ParallelProcess(pair => Console.WriteLine($"Processing pair: {pair.Key}, {pair.Value}"));
```


# GroupProcessor

&#x20;The `GroupProcessor` class is a generic class that provides parallel processing functionality for collections of elements. It allows users to easily perform parallel operations on a group of items and return the results as different types of collections, such as `ConcurrentBag`, `ConcurrentDictionary`, or a `List`.

The "Group" Processor is for a selection where more than one item can be matched for the given selector, also known as a **GroupBy**. If you're looking for a single item in and out without grouping, use the [SingleProcessor](/core-modules/perigee-in-parallel/singleprocessor).

## ParallelProcess

This method processes the collection in parallel and invokes the provided callback for each group of items with the same key.

#### Example:

```csharp
var groupProcessor = new GroupProcessor<Item, Category>(items, item => item.Category);
groupProcessor.ParallelProcess((group, category) => {
    Console.WriteLine($"Processing category: {category}");
    foreach (var item in group)
    {
        Console.WriteLine($"  - {item.Name}");
    }
});
```

## ParallelProcessToBag

This method processes the collection in parallel and adds the results to a `ConcurrentBag` by invoking the provided callback for each group of items with the same key.

#### Example:

```csharp
var groupProcessor = new GroupProcessor<Item, Category>(items, item => item.Category);
ConcurrentBag<string> resultBag = groupProcessor.ParallelProcessToBag((group, category) => {
    int itemCount = group.Count;
    return $"Category: {category}, Item Count: {itemCount}";
});

```

## ParallelProcessToDictionary

This method processes the collection in parallel and adds the results to a `ConcurrentDictionary` by invoking the provided callback for each group of items with the same key.

#### Example:

```csharp
var groupProcessor = new GroupProcessor<Item, Category>(items, item => item.Category);
ConcurrentDictionary<Category, int> resultDictionary = groupProcessor.ParallelProcessToDictionary((group, category) => {
    int itemCount = group.Count;
    return new KeyValuePair<Category, int>(category, itemCount);
});
```

## ParallelProcessKeys

This method processes the keys of the collection in parallel and invokes the provided callback for each key.

#### Example:

```csharp
var singleProcessor = new SingleProcessor<Item, Category>(items, item => item.Category);
singleProcessor.ParallelProcessKeys(key => {
    Console.WriteLine($"Processing key: {key}");
});
```

## ParallelProcessKeysToBag

This method processes the keys of the collection in parallel and adds the results to a `ConcurrentBag` by invoking the provided callback for each key.

#### Example:

```csharp
var singleProcessor = new SingleProcessor<Item, Category>(items, item => item.Category);
ConcurrentBag<string> resultBag = singleProcessor.ParallelProcessKeysToBag(key => {
    return $"Key: {key}";
});
```

## ParallelProcessKeysToDictionary

This method processes the keys of the collection in parallel and adds the results to a `ConcurrentDictionary` by invoking the provided callback for each key.

#### Example:

```csharp
var singleProcessor = new SingleProcessor<Item, Category>(items, item => item.Category);
ConcurrentDictionary<Category, int> resultDictionary = singleProcessor.ParallelProcessKeysToDictionary(key => {
    return new KeyValuePair<Category, int>(key, 1);
});
```

## ParallelToNewSingleProcessor

This method processes the keys of the collection in parallel and returns a new `SingleProcessor` instance containing the results.

#### Example:

```csharp
var singleProcessor = new SingleProcessor<Item, Category>(items, item => item.Category);
SingleProcessor<string, Category> newSingleProcessor = singleProcessor.ParallelToNewSingleProcessor(key => {
    return new KeyValuePair<Category, string>(key, $"New {key}");
});
```

## ParallelToNewGroupedProcessor

This method processes the keys of the collection in parallel and returns a new `GroupProcessor` instance containing the results, grouped by the provided expression.

#### Example:

```csharp
var singleProcessor = new SingleProcessor<Item, Category>(items, item => item.Category);
GroupProcessor<string, Category> newGroupProcessor = singleProcessor.ParallelToNewGroupedProcessor(key => {
    return new KeyValuePair<Category, string>(key, $"New {key}");
}, group => group.Category);
```

## AllKeys

Returns all keys in the processor as an enumerable.

#### Example:

```csharp
var allKeys = processor.AllKeys();
foreach (var key in allKeys)
{
    Console.WriteLine(key);
}
```


# SingleProcessor

The `SingleProcessor` class is a generic class that provides parallel processing functionality for collections of single elements. It allows users to easily perform parallel operations on a collection of items and return the results as different types of collections, such as `ConcurrentBag`, `ConcurrentDictionary`, or a single item.

## ParallelProcess

This method processes the collection in parallel and invokes the provided callback for each item.

#### Example:

```csharp
var singleProcessor = new SingleProcessor<Item, Category>(items, item => item.Category);
singleProcessor.ParallelProcess(item => {
    Console.WriteLine($"Processing item: {item.Name}");
});
```

## ParallelProcessToBag

This method processes the collection in parallel and adds the results to a `ConcurrentBag` by invoking the provided callback for each item.

#### Example:

```csharp
var singleProcessor = new SingleProcessor<Item, Category>(items, item => item.Category);
ConcurrentBag<string> resultBag = singleProcessor.ParallelProcessToBag(item => {
    return $"Item: {item.Name}, Category: {item.Category}";
});
```

## ParallelProcessToDictionary

This method processes the collection in parallel and adds the results to a `ConcurrentDictionary` by invoking the provided callback for each item.

#### Example:

```csharp
var singleProcessor = new SingleProcessor<Item, Category>(items, item => item.Category);
singleProcessor.ParallelProcess(item => {
    Console.WriteLine($"Processing item: {item.Name}");
});
```

## ParallelProcessKeys

This method processes the keys of the collection in parallel and invokes the provided callback for each key.

#### Example:

```csharp
var singleProcessor = new SingleProcessor<Item, Category>(items, item => item.Category);
singleProcessor.ParallelProcessKeys(key => {
    Console.WriteLine($"Processing key: {key}");
});
```

## ParallelProcessKeysToBag

This method processes the keys of the collection in parallel and adds the results to a `ConcurrentBag` by invoking the provided callback for each key.

#### Example:

```csharp
var singleProcessor = new SingleProcessor<Item, Category>(items, item => item.Category);
ConcurrentBag<string> resultBag = singleProcessor.ParallelProcessKeysToBag(key => {
    return $"Key: {key}";
});
```

## ParallelProcessKeysToDictionary

This method processes the keys of the collection in parallel and adds the results to a `ConcurrentDictionary` by invoking the provided callback for each key.

#### Example:

```csharp
var singleProcessor = new SingleProcessor<Item, Category>(items, item => item.Category);
ConcurrentDictionary<Category, int> resultDictionary = singleProcessor.ParallelProcessKeysToDictionary(key => {
    return new KeyValuePair<Category, int>(key, 1);
});
```

## ParallelToNewSingleProcessor

This method processes the keys of the collection in parallel and returns a new `SingleProcessor` instance containing the results.

#### Example:

```csharp
var singleProcessor = new SingleProcessor<Item, Category>(items, item => item.Category);
SingleProcessor<string, Category> newSingleProcessor = singleProcessor.ParallelToNewSingleProcessor(key => {
    return new KeyValuePair<Category, string>(key, $"New {key}");
});
```

## ParallelToNewGroupedProcessor

This method processes the keys of the collection in parallel and returns a new `GroupProcessor` instance containing the results, grouped by the provided expression.

#### Example:

```csharp
var singleProcessor = new SingleProcessor<Item, Category>(items, item => item.Category);
GroupProcessor<string, Category> newGroupProcessor = singleProcessor.ParallelToNewGroupedProcessor(key => {
    return new KeyValuePair<Category, string>(key, $"New {key}");
}, group => group.Category);
```

## AllKeys

Returns all keys in the processor as an enumerable.

#### Example:

```csharp
var allKeys = processor.AllKeys();
foreach (var key in allKeys)
{
    Console.WriteLine(key);
}
```


# Utility Classes


# Metrics

## Metrics Classes

There are two metrics classes currently, MetricDecimal and MetricInteger. They work identically and only store their respective types internally.

{% hint style="success" %}
The Metrics classes employs a bucketed approach to metric calculations, meaning it only stores unique metric values along with their frequency counts rather than keeping every individual metric entry. This method significantly reduces the amount of memory and storage needed, as repeated values are aggregated into a single entry with an associated count. Consequently, even with large streams of data, the class can track and compute statistics like averages, percentiles, and medians efficiently without the overhead of managing vast amounts of duplicate data.
{% endhint %}

## MetricDecimal&#x20;

Metrics are set of classes that implements a metric collection for values. It provides functionality to add metric values and compute various statistics such as average, median, percentiles, minimum, maximum, and sum. In addition, it supports serialization and deserialization of the metric data to and from JSON formats.

## Properties

### MetricName

Represents the name of the metric. This property is used to identify the metric collection.

### MetricType

Indicates the type of the metric. For this class, it is set to "Decimal".

## Methods

### AddMetric(decimal metric, int precision)

Adds a new metric value to the collection after rounding it to the specified number of decimal places. In addition to updating the internal bucket of values, this method updates the maximum, minimum, and sum accordingly.

Parameters:

* metric: The decimal value to add.
* precision: The number of decimal places used for rounding the metric value.

### AddMetric(decimal metric)

Adds a new metric value to the collection after rounding it to 2 decimal places. This method updates the internal bucket as well as the maximum, minimum, and cumulative sum values.

Parameters:

* metric: The decimal value to add.

### Average()

Calculates and returns the average of the metric values. The average is computed by dividing the cumulative sum of metric values by the total count of entries in the collection.

### Max()

Returns the maximum metric value that has been added to the collection.

### Median()

Computes and returns the median of the collected metric values. This method identifies the middle value by using the frequencies from the bucket of values. In cases where the cumulative frequency exactly equals the midpoint, the previous value is used.

### Min()

Returns the minimum metric value recorded in the collection.

### Percentile(decimal k, bool Interpolate = false)

Calculates the kth percentile of the recorded metric values. If k is 50, the method delegates to the Median() calculation. For other percentiles, it determines the appropriate index within the ordered set of unique metric values. If the computed index is a whole number, it returns the average of the two adjacent values; otherwise, it may compute an interpolated result based on the Interpolate parameter or return the ceiling value.

Parameters:

* k: The percentile value to compute (e.g., 25, 50, 75).
* Interpolate (optional): A boolean flag that, if true, forces interpolation between adjacent values. The default value is false.

### PercentileRank(decimal k)

Calculates the percentile rank of a specific metric value k. The percentile rank is computed with the formula:

(cf\_l + 0.5 f\_i) / N \* 100%

where cf\_l is the cumulative frequency of values less than k, f\_i is the frequency of the value k, and N is the total count of all entries.

Parameters:

* k: The metric value for which the percentile rank is to be determined.

### Sum()

Returns the cumulative sum of all metric values added to the collection.

### FromJson(string json)

Reconstructs the MetricDecimal instance from a JSON string representation of the metric data. This method updates the sum, minimum, maximum, and bucket of frequencies based on the JSON content.

Parameters:

* json: A JSON formatted string representing the metric data.

### AsJson(bool valuesOnly = true)

Serializes the current state of metric data into a JSON string. Basic statistical information such as sum, min, max, average, median, and count are always included. If the valuesOnly parameter is false, then the full bucket containing all metric frequencies is also included.

Parameters:

* valuesOnly (optional): A boolean flag indicating whether only basic stats should be serialized (true by default).

Returns:

* A JSON formatted string representing the metric data.

### AsJObject(bool valuesOnly = true)

Serializes the metric data into a JObject. Similar to AsJson, it always includes the basic statistical information. When the valuesOnly parameter is false, the complete bucket data is also inserted into the JObject.

Parameters:

* valuesOnly (optional): A boolean flag indicating whether only basic stats should be included in the JObject (true by default).

Returns:

* A JObject containing the metric data.

#### Example:

```csharp
// Create a new MetricDecimal instance
MetricDecimal metricDecimal = new MetricDecimal("ResponseTime");

// Add metrics with and without precision
metricDecimal.AddMetric(123.4567M, 2);
metricDecimal.AddMetric(89.123M);
metricDecimal.AddMetric(101.789M, 1);

// Calculate and display statistical values
Console.WriteLine("Average: " + metricDecimal.Average());
Console.WriteLine("Max: " + metricDecimal.Max());
Console.WriteLine("Median: " + metricDecimal.Median());
Console.WriteLine("Min: " + metricDecimal.Min());
Console.WriteLine("Sum: " + metricDecimal.Sum());

// Calculate percentiles
Console.WriteLine("40th Percentile (no interpolation): " + metricDecimal.Percentile(40));
Console.WriteLine("95th Percentile (interpolated): " + metricDecimal.Percentile(95, true));

// Calculate percentile rank for a specific value
Console.WriteLine("Percentile Rank for 100: " + metricDecimal.PercentileRank(100));

// Serialize to JSON
string json = metricDecimal.AsJson(false);
Console.WriteLine("Serialized JSON: " + json);

// Reconstruct from JSON
metricDecimal.FromJson(json);
JObject jObject = metricDecimal.AsJObject(false);
Console.WriteLine("Reconstructed JObject: " + jObject.ToString());
```


# F(x) Expressions

## What is F(x)?

**F(x)** is a powerful expression evaluator integrated within Perigee, designed to enhance data manipulation and computation capabilities. Much like the "Formula" bar in Excel, F(x) allows users to input complex formulas incorporating functions, mathematical operations, column references, and parentheses. However, F(x) goes beyond basic evaluation by offering advanced features:

* **Custom Functionality:** Users can add custom classes with functions, expanding the evaluator's capabilities to suit specific needs.
* **Performance Optimization:** Instead of repeatedly tokenizing, parsing, and evaluating expressions, F(x) compiles expressions into Intermediate Language (IL) code. This compilation results in a direct expression tree that can be executed swiftly, making it ideal for processing large datasets efficiently.

## How can I use F(x)?

Possibilities are endless, but let's examine a few cool ideas.

* Enable an input box to accept math expressions allowing the user to easily double a value, or figure out what a third of their original input was.&#x20;
* Execute an expression across an entire DataTable, modifying the values of each row. This allows for easy data manipulation and cross references to other columns.&#x20;
* Enabling users to create dynamic data output for a report.
* Allow the user to write their own filter on data, tables, report output, or data ingestion.&#x20;

## Examples

### Example 1) Math expression with identifiers

In this example, we'll see how to create an <mark style="color:blue;">**`Fx`**</mark> class, register functions, compile a formula, and get results. We can see what the identifier callback is and how to use it.&#x20;

Notice we return <mark style="color:blue;">**`FxValue`**</mark>? This special class handles all of the data types and conversions for the evaluator. If you're passing data in or out of <mark style="color:blue;">**`Fx`**</mark>, it will be in the form of a <mark style="color:blue;">**`FxValue`**</mark>.&#x20;

```csharp
PerigeeApplication.App("Fx", (c) => {

    //Declare a new Fx class, and register the default functions shipped alongside it.
    Fx fx = new Fx();
    fx.RegisterRoot<FxDefaultFunctions>();

    //Compile a new expression
    var fnMethod = fx.Compile("abs([a]) * 2.5");

    //Get the results
    FxValue fnResults = fnMethod(
        //the idCallback will be called when an identifier [value] is found and needs to be referenced. 
        (idCallback) =>
        {

            if (idCallback.Identifier == "a")
                return FxValue.From(10m);
            else
                return FxValue.From(1m);
        });

    //prints 25.0
    c.GetLogger<Program>().LogInformation("Result: {v}", fnResults);

    c.ExitApplication();
});
```

### Example 2) Method overrides

Just like last time we'll be compiling an expression, but this time we'll add the method override. This special override allows you inject your own method handing. In this case, we'll inject a <mark style="color:red;">`"custom"`</mark> method that we divide the value by 100. If the requested method isn't <mark style="color:red;">`"custom"`</mark>, then we allow fx to call the methods as it usually would with **`fx.CallMethod(fn, arg)`**.

```csharp
PerigeeApplication.App("Fx", (c) => {

    //Declare a new Fx class, and register the default functions shipped alongside it.
    Fx fx = new Fx();
    fx.RegisterRoot<FxDefaultFunctions>();

    //Compile a new expression, with a method override
    var fnMethod = fx.Compile("custom([a]) * 2.5", (arg, fn, token, _) => { 
        if (fn.Equals("custom") && arg.Length > 0)
        {
            return FxValue.From(arg[0].AsDecimal() / 100.0m);
        }
        return fx.CallMethod(fn, arg);
    });

    //Get the results
    FxValue fnResults = fnMethod(
        //the idCallback will be called when an identifier [value] is found and needs to be referenced. 
        (idCallback) =>
        {
            if (idCallback.Identifier == "a")
                return FxValue.From(10m);
            else
                return FxValue.From(1m);
        });

    //prints 0.25
    c.GetLogger<Program>().LogInformation("Result: {v}", fnResults);

    c.ExitApplication();
});
```

### Example 3)  Input parameters

Sometimes you need input context when processing methods, the CompileWithInputParameter allows you to do exactly this, pass in anything that conforms to the object  type (including a class) and it will be available for you in the callback. This is especially useful when processing lists, tables, or modifying behavior based on the index, row, user, etc.

This time we'll be returning a string value, and prepending "name: " to it. The passed in input parameter allows us to reference our lookup dictionary from within the method override call.

```csharp
PerigeeApplication.App("Fx", (c) => {

    //Declare a new Fx class, and register the default functions shipped alongside it.
    Fx fx = new Fx();
    fx.RegisterRoot<FxDefaultFunctions>();

    Dictionary<string, string> NameReferences = new Dictionary<string, string>() { { "0", "bob" }, { "1", "jane" }, { "2", "john" }, { "3", "ruth" } };

    //Compile a new expression, with a method override
    var fnMethod = fx.CompileWithInputParameter<string>("'name: ' & custom()", (arg, fn, token, inp) => { 
        if (fn.Equals("custom"))
        {
            return FxValue.From(NameReferences.GetValueOrDefault(inp, ""));
        }
        return fx.CallMethod(fn, arg);
    });

    //Get the results, this time passing in "0" as the input parameter
    FxValue fnResults = fnMethod("0",
        //the idCallback will be called when an identifier [value] is found and needs to be referenced. 
        (idCallback) =>
        {
            
            if (idCallback.Identifier == "a")
                return FxValue.From(10m);
            else
                return FxValue.From(1m);
        });

    //prints "name: bob"
    c.GetLogger<Program>().LogInformation("Result: {v}", fnResults);

    c.ExitApplication();
});
```

### Example 4) Custom functions

This time we'll add a CustomFunctions class to our project, and allow Fx to call it. We added a square root method called "root". Running this example will call the method and return the value (2.449 ...)

```csharp
PerigeeApplication.App("Fx", (c) => {

    //Declare a new Fx class, and register the default functions shipped alongside it.
    Fx fx = new Fx();
    fx.RegisterRoot<FxDefaultFunctions>();
    fx.RegisterRoot<CustomFunctions>();

    //Compile a new expression, with a method override
    var fnMethod = fx.Compile("root(6)");

    //Get the results
    FxValue fnResults = fnMethod(
        (idCallback) => FxValue.From(0m));

    //prints  2.4494897
    c.GetLogger<Program>().LogInformation("Result: {v}", fnResults);

    c.ExitApplication();
});

public class CustomFunctions
{
    public static FxValue root(FxValue dbl) => FxValue.From(Math.Sqrt(dbl.AsDouble()));
}
```

### Example 5) Table evaluation

In this example, we'll run over a data table with a 1000 rows. We can supply each columns expression allowing us to perform various operations on each column, sequentially.&#x20;

We'll also use a partitioned sum to set the **`Calc`** column (identical to a **`SUM(Amount) / group by Type`**).

Then finally, override the Type column with a concatenation of the Org and Type.

```csharp
//Generate 1K rows
DataTable DT_Sample = new DataTable();
DT_Sample.Columns.Add("Org", typeof(int));
DT_Sample.Columns.Add("Type", typeof(string));
DT_Sample.Columns.Add("Amount", typeof(decimal));
DT_Sample.Columns.Add("Calc", typeof(decimal));
_FillTable(DT_Sample, 1000);

PerigeeApplication.App("Fx", (c) => {

    //Declare a new Fx class, and register the default functions shipped alongside it.
    Fx fx = new Fx();
    fx.RegisterRoot<FxDefaultFunctions>();

    //Run over the data and set the Calc field to a sum partition, and then reassign Type to a concatenation
    fx.CompileTable(DT_Sample, new Dictionary<string, string>() {
        { "Calc", "SUM([Amount] PARTITION BY [Type])" },
        { "Type", "[Org] & '-' & [Type]"}
    });

    c.GetLogger<Program>().LogInformation("Result 0: {@v}", DT_Sample.Rows[0].ItemArray.ToList());

    c.ExitApplication();
});

void _FillTable(DataTable table, int count)
{
    string[] types = { "A", "B", "C", "D", "E" };

    Random rand = new Random();

    table.BeginLoadData();

    try
    {
        for (int i = 0; i < count; i++)
        {
            int org = rand.Next(1, 1001); // Random integer between 1 and 1000
            string type = types[rand.Next(types.Length)]; // Random type from the array
            decimal amount = Math.Round((decimal)(rand.NextDouble() * 10_000), 2); // Random decimal between 0.00 and 10,000.00

            table.Rows.Add(org, type, amount, 0.0m);
        }
    }
    finally
    {
        table.EndLoadData();
    }
}

```

## Valid types

* Booleans values are supplied as: `true, false, yes, no`
  * When coercing a String or Number value into a boolean, a `0, 1` will also be accepted
* Numbers are supplied as whole or with a decimal point: `5, 2.5`
* Strings are within double quotes or single quotes: `"name", 'day'`
* Date values are supplied in a string: `'01-01-1900'`
* Timespan values are supplied variably:
  * `01:10` is 1 hour, 10 minutes
  * `01:10:22` is 1 hour, 10 minutes, 22 seconds
  * `01:10:22:55` is 1 day 10 hours, 22 minutes, 55 seconds
  * `01:10:22:55.110` is is 1 day 10 hours, 22 minutes, 55 seconds, 110 milliseconds

## Valid Operators

* \+ for addition
* \- for subtraction
* \* For multiplication
* / for division
* ^ for power
* & for concatenation
* % for modulus
* \== or = for equals
* !=  for not equals
* All < > >=  <= comparison symbols for greater/lesser than.
* && Logical AND
* || Logical OR
* ! Logical NOT&#x20;

## Dot Chaining

You may supply functions in a dot chain, which makes readability easier in certain scenarios:

```clike
'a'.equals('b', true)
```

Internally, all . chained function calls are written to take the left hand side of the dot and put them inside the first argument. This allows anything, even custom methods to be dot chained.

```clike
'a'.equals('b', true) --> equals('a', 'b', true)
('hello' & ' world').upper() --> upper(('hello' & ' world'))
```

## Default Functions

All of the functions listed below are included in the <mark style="color:blue;">**`FxDefaultFunctions`**</mark> class.

## Value Conversion

### ID (`id`)

Takes any string input and converts the value into an Fx Identifier, allowing data lookup. \
`id('v') -> [v]`

```csharp
codeFx.Compile("id('value')");
```

### Try Decimal (`trydecimal`)

Safely converts a value to decimal and returns a fallback, or `null`, when conversion fails.

```csharp
codeFx.Compile("trydecimal('$123.45')");
```

### Try Integer (`tryint`)

Safely converts a value to integer and returns a fallback, or `null`, when conversion fails.

```csharp
codeFx.Compile("tryint('42.99', 0)");
```

### Try Date (`trydate`)

Safely converts a value to a date and returns a fallback, or `null`, when conversion fails.

```csharp
codeFx.Compile("trydate('01-01-1900')");
```

### Decimal(`decimal`)

Returns either a decimal value, or error if the value cannot become a decimal

```csharp
codeFx.Compile("decimal('1.62')");
```

### Bool(`bool`)

Returns either a Boolean value if the value, string, or decimal can be converted into a Boolean .&#x20;

`1`, `true`, `y` and `yes` all are considered `true`.

Otherwise false is returned.

```csharp
codeFx.Compile("bool('true')");
```

### Int(`int`)

Returns either an int value, or error if the value cannot become an int. Rounding may occur if forcing a decimal into an integer

```csharp
codeFx.Compile("int('1.12')");
```

### String(`string`)

Returns the string representation of the value

```csharp
codeFx.Compile("string(1.12)");
```

### Timespan(`timespan`)

Returns the timespan representation of the value, or timespan zero.

```csharp
codeFx.Compile("timespan(1500)"); //1.5 seconds
```

### date(`date`)

Returns the date representation of the value, or error if it cannot be parsed or converted

```csharp
codeFx.Compile("date('2050-01-01)"); 
```

## Format / Multi-use

### Format (`Format`)

Formats a date, time span, or decimal according to the specified format. Culture is optional and follows the [CultureInfo](https://learn.microsoft.com/en-us/dotnet/api/system.globalization.cultureinfo.name?view=net-9.0#system-globalization-cultureinfo-name) defined by Microsoft.

```csharp
 codeFx.Compile("Format(fmtValue, format, cultureInfo = null)");
```

In the below examle, this would format a string value containing a decimal in France currency with 2 decimal places.

```csharp
format('12345.234', 'C2', 'fr-FR')
// 12 345,23 €
```

### Default Value (`default`)

Returns a fallback when the value is null, blank, or an error.

```csharp
codeFx.Compile("default(trydate('not a date'), 'fallback')");
```

## Number Functions

### Absolute Value (`abs`)

Ensures the output value is always positive.

```csharp
codeFx.Compile("abs(1)");
```

### Maximum (`max`)

Returns the larger of two numbers.

```csharp
codeFx.Compile("max(5, 10)");
```

### Minimum (`min`)

Returns the smaller of two numbers.

```csharp
codeFx.Compile("min(5, 10)");
```

### Sine (`sin`)

Calculates the sine of a given angle (in radians).

```csharp
codeFx.Compile("sin(0)");
```

### Cosine (`cos`)

Calculates the cosine of a given angle (in radians).

```csharp
codeFx.Compile("cos(0)");
```

### Tangent (`tan`)

Calculates the tangent of a given angle (in radians).

```csharp
codeFx.Compile("tan(0)");
```

### Log Base 10 (`log10`)

Calculates the base-10 logarithm of a number.

```csharp
codeFx.Compile("log10(100)");
```

### Square Root (`sqrt`)

Calculates the square root of a number.

```csharp
codeFx.Compile("sqrt(16)");
```

### Round (`round`)

Rounds a number to a specified number of decimal places.

```csharp
codeFx.Compile("round(3.14159, 2)");
```

### Places (`places`)

Rounds a number to a specified number of decimal places without exceeding the original value.

```csharp
codeFx.Compile("places(3.145, 2)");
```

### Ceiling (`ceil`)

Rounds a number up to the nearest integer.

```csharp
codeFx.Compile("ceil(3.14)");
```

### Floor (`floor`)

Rounds a number down to the nearest integer.

```csharp
codeFx.Compile("floor(3.14)");
```

***

## Null Handling

### Null If Blank (`nullifblank`)

Returns `null` when a value is empty or whitespace so it can be handled with `isnull`, `coalesce`, or `default`.

```csharp
codeFx.Compile("nullifblank('   ')");
```

### Null If (`NullIf`)

Returns `null` if the first value equals the fallback value; otherwise, returns the first value.

```csharp
codeFx.Compile("NullIf(value, fallback)");
```

### Is Null (`IsNull`)

Returns the fallback value if the first value is `null`; otherwise, returns the first value.

```csharp
codeFx.Compile("IsNull(value, fallback)");
```

***

## Conditionals

### Let Variables (`let`)

Creates local variables inside an expression so you can reuse intermediate values and keep complex logic readable.

```csharp
codeFx.Compile("let([full], trim([Name]), [full] & ' - proces
```

### Case (`case`)

Evaluates condition and value pairs and returns the first matching result, with an optional final else value.

```csharp
codeFx.Compile("case(false, 'no', 3 > 2, 'yes', 'fallback')");
```

### If (`If`)

Returns `true` if the condition is true; otherwise, returns `ifFalse`.

```csharp
codeFx.Compile("if(condition, ifTrue, ifFalse)");
```

### In(`in`)

Returns `true` if the value is in the parameters list of values.&#x20;

```csharp
codeFx.Compile("in(values, params[] values)");
```

### Coalesce (`Coalesce`)

Returns the first non-null value from the provided conditions.

```csharp
codeFx.Compile("Coalesce(value1, value2, value3)");
```

***

### Logical Operations

### And (`and`)

Returns `true` if all conditions are true; otherwise, returns `false`.

```csharp
codeFx.Compile("and(condition1, condition2)");
```

### Or (`or`)

Returns `true` if any condition is true; otherwise, returns `false`.

```csharp
codeFx.Compile("or(condition1, condition2)");
```

### Not (`not`)

Inverts the boolean value of the condition.

```csharp
codeFx.Compile("not(condition)");
```

### If Error (`iferror`)

Returns the fallback value if the first value is an error; otherwise, returns the first value.

```csharp
codeFx.Compile("iferror(value, fallback)");
```

### Is Error (`iserror`)

Checks if the value is an error.

```csharp
codeFx.Compile("iserror(value)");
```

### Is Number (`isnumber`)

Checks if the value is a number.

```csharp
codeFx.Compile("isnumber(value)");
```

### Is String (`isstr`)

Checks if the value is a string.

```csharp
codeFx.Compile("isstr(value)");
```

### Is Blank (`isblank`)

Checks if the value is `null` or an empty string.

```csharp
codeFx.Compile("isblank(value)");
```

### Is Boolean (`isbool`)

Checks if the value is a boolean.

```csharp
codeFx.Compile("isbool(value)");
```

***

## Financial Functions

### Payment (`pmt`)

Calculates the payment for a loan based on constant payments and a constant interest rate.

```csharp
codeFx.Compile("pmt(rate, nper, pv, fv)");
```

### Principal Payment (`ppmt`)

Calculates the principal part of a payment for a specific period.

```csharp
 codeFx.Compile("ppmt(rate, per, nper, pv, fv, type)");
```

### Interest Payment (`ipmt`)

Calculates the interest part of a payment for a specific period.

```csharp
codeFx.Compile("ipmt(rate, per, nper, pv, fv, type)");
```

***

## Date Functions

Any date functions that require a part, you may use any of the below listed keywords.

| Keyword(s)           | Description                         |
| -------------------- | ----------------------------------- |
| `year`, `yy`, `yyyy` | Extracts the year                   |
| `month`, `m`, `mm`   | Extracts the month                  |
| `day`, `d`, `dd`     | Extracts the day                    |
| `hour`, `hh`         | Extracts the hour                   |
| `minute`, `mi`, `n`  | Extracts the minute                 |
| `second`, `ss`, `s`  | Extracts the second                 |
| `ms`, `millisecond`  | Extracts the millisecond            |
| `microsecond`, `mcs` | Extracts microseconds (approximate) |

### Today (`today`)

Returns the current date.

```csharp
codeFx.Compile("today()");
```

### Now (`now`)

Returns the current date and time.

```csharp
codeFx.Compile("now()");
```

### Date (`date`)

Creates a date from year, month, and day.

```csharp
codeFx.Compile("date(year, month, day)");
```

### Date Add (`DateAdd`)

Adds a specified number of intervals to a date.

```csharp
codeFx.Compile("DateAdd(datePart, number, date)");
```

### Date Difference (`DateDiff`)

Calculates the difference between two dates based on the specified date part.

```csharp
codeFx.Compile("DateDiff(datePart, date1, date2)");
```

### Date Part (`DatePart`)

Get the integer based value based on the specified date part.

```csharp
codeFx.Compile("DatePart(datePart, date1)");
```

### End Of Month (`eomonth`)

Returns the last day of the month for a date, with an optional month offset.

```csharp
codeFx.Compile("eomonth(date(2026, 4, 10), 1)");
```

***

## String Functions

### Contains (`contains`)

Returns a boolean of whether or not the string contains a value

```csharp
codeFx.Compile("contains(stringToSearch, valueToFind, caseSensitive = false)");
```

### Equals (`equals`)

Returns a boolean of whether or not the string equals another value, allowing case sensitivity if needed

```csharp
codeFx.Compile("equals(stringA, stringB, caseSensitive = false)");
```

### Name Parts (n`ame`)

Parse a name and return a name part. Useful when a column contains a full name and you need to split it.&#x20;

Valid name parts:

* `title`
* `first`
* `last`
* `middle`
* `nickname` (nickname)
* `suffix`
* `surname` (optional middle name(s) and last names)
* `fullname` (first middle last)
* `all` (all name parts, just cleaned up and optionally title cased)

```csharp
codeFx.Compile("name(nameValue, namePart, TitleCaseResult = false)");
```

### Name Format (`nameformat`)

Just like the name function, it allows you the freedom to format the name result in any way you like. Example: `{first}/{last} -> Bob/Jones`

Valid name replacement strings:

* `{title}`
* `{first}`
* `{last}`
* `{middle}`
* `{nickname}` (nickname)
* `{suffix}`
* `{surname}`
* `{fullname}`
* `{all}`

```csharp
codeFx.Compile("nameformat(nameValue, format, TitleCaseResult = false)");
```

### Split and Take (rejoin) (`split_take`)

Split take works a lot like split, but you can specify a range of results to rejoin.&#x20;

```csharp
codeFx.Compile("split_take(value, range, join, separators[])");
```

An example of this is:

```csharp
split_take('a,b,c,d,e,f,g', '0,1,5-20', '-', ',')
```

This would return `a-b-f-g`. as it takes the first two elements, then elements 5 through 20 if they exist.

### Split (`split`)

Split a string and return a split value

```csharp
codeFx.Compile("split(value, index, defaultValue, separators[])");
```

The index is zero based, meaning 0 is the first item. You can use 'first', or 'last' as well to retrieve those values.

`defaultValue` can be supplied when an index is out of range, or the value is null.

You may supply as many string separators as you need, such as:

```csharp
split([Notes],'last', 'N/A', ',', '|', '@')
```

### Repeat (`repeat`)

Repeats a sequence of strings a specified number of times.

```csharp
codeFx.Compile("repeat(count, seq)");
```

### Concatenate (`concat`)

Concatenates multiple strings into one.

```csharp
codeFx.Compile("concat(value1, value2, value3)");
```

### Substring (`substr`)

Extracts a substring from a string starting at a specified index with a specified length.

```csharp
codeFx.Compile("substr(text, start, length)");
```

### Left (`left`)

Returns the leftmost specified number of characters from a string.

```csharp
codeFx.Compile("left(value, len)");
```

### Right (`right`)

Returns the rightmost specified number of characters from a string.

```csharp
 codeFx.Compile("right(value, len)");
```

### Trim (`trim`)

Removes leading and trailing whitespace from a string.

```csharp
codeFx.Compile("trim(value)");
```

### Trim with Characters (`trim`)

Removes specified characters from the start and end of a string.

```csharp
codeFx.Compile("trim(value, chars)");
```

### Replace (`replace`)

Replaces all occurrences of a specified substring with another substring.

```csharp
codeFx.Compile("replace(value, search, replacement)");
```

### Upper (`upper`)

Converts a string to uppercase.

```csharp
codeFx.Compile("upper(value)");
```

### Lower (`lower`)

Converts a string to lowercase.

```csharp
codeFx.Compile("lower(value)");
```

### Starts With (`startswith`)

Checks whether a string begins with the provided text, with optional case sensitivity.

```csharp
codeFx.Compile("startswith('Perigee Software', 'Peri')");
```

### Ends With (`endswith`)

Checks whether a string ends with the provided text, with optional case sensitivity.

```csharp
codeFx.Compile("endswith('Perigee Software', 'ware')");
```

### Trim Start (`trimstart`)

Removes whitespace, or specified characters, from the beginning of a string.

```csharp
codeFx.Compile("trimstart('   hello')");
```

### Trim End (`trimend`)

Removes whitespace, or specified characters, from the end of a string.

```csharp
codeFx.Compile("trimend('hello   ')");
```

### Pad Left (`padleft`)

Pads the left side of a string to a fixed width using spaces or a supplied character.

```csharp
codeFx.Compile("padleft('42', 5, '0')");
```

### Pad Right (`padright`)

Pads the right side of a string to a fixed width using spaces or a supplied character.

```csharp
codeFx.Compile("padright('42', 5, '_')");
```

### Title Case (`titlecase`)

Converts text into title case so each word begins with an uppercase letter.

```csharp
codeFx.Compile("titlecase('the quick brown fox')");
```

### Pascal Case (`pascalcase`)

Converts text into PascalCase by removing separators and capitalizing each word.

```csharp
codeFx.Compile("pascalcase('the_quick-brown fox')");
```

### Length (`len`)

Returns the length of a string.

```csharp
codeFx.Compile("len(value)");
```

***

## Aggregate Functions

### Sum Values (`sumvals`)

Calculates the sum of multiple numerical values.

```csharp
codeFx.Compile("sumvals(value1, value2, value3)");
```

### Average Values (`avgvals`)

Calculates the average of multiple numerical values.

```csharp
codeFx.Compile("avgvals(value1, value2, value3)");
```


# Multi-Threaded Processor (Scatter Gather)

## Multi-Threaded Processor

Multi-Threaded Processor allows you to efficiently process data in parallel across multiple threads, using both simple and advanced approaches for scatter-gather operations.

Unlike a traditional "scatter-gather", MTP allows you to separate the loading and processing across threads and then await the results. This is incredibly powerful when the loading is done from a remote source where latency is involved.

### An Example

```csharp
PerigeeApplication.ApplicationNoInit("MTP", (c) => {

    c.Add("Multi-Threaded Processor", (ct, l) => {

        //Let's declare a list of fruits to work on
        var Fruits = new List<string>()
        {
            "Apples",
            "Bananas",
            "Cherries",
            "Dates",
            "Elderberries",
            "Figs",
            "Grapes",
            "Honeydew",
            "Indian Fig",
            "Jackfruit",
            "Kiwi",
            "Lemon",
            "Mango",
            "Nectarine",
            "Oranges",
            "Papaya",
            "Quince",
            "Raspberries",
            "Strawberries",
            "Tangerines",
            "Ugli Fruit",
            "Vanilla Bean",
            "Watermelon",
            "Xigua",
            "Yellow Passion Fruit"
        };

        l.LogInformation("--------============ Example 1 ============--------");
        //Example 1: Using the IEnumerable extension method to simple "scatter gather" across a number of defined threads. In this case, 5 threads are used
        var mtpResult = Fruits.ParallelProcessMultiThread((s) =>
        {
            l.LogInformation("Processing {fruit}", s);
            Task.Delay(400).Wait(); //Artificial delay
            return s.GetHashCode();
        }, null, concurrency: 5);

        //Every object in this case is wrapped in a result object, giving you exceptions thrown, process time, and access to the input/output
        foreach (var rs in mtpResult)
        {
            l.LogInformation("Passed in {in}, got {out}, in {time}ms", rs.InData, rs.OutData, rs.ProcessTime?.TotalMilliseconds.ToString("N0") ?? "");
        }

        //Example 2: Separate the loading and processing of the scatter gather across threads
        //  In this example, we're declaring the multi-threaded processor directly, along with the input type, output type, and the method to be called.
        //  Notice the 3 on the ThreadCount? This will only process and declare 3 threads to work on input items
        l.LogInformation("--------============ Example 2 ============--------");
        var mtp = new MultiThreadedProcessor<string, int>((s) =>
        {
            l.LogInformation("Processing {fruit}", s);
            return s.GetHashCode();
        }, ct, ThreadCount: 3, l);

        //To actively watch for processed items, attach to the event
        mtp.OnDataProcessed += (sender, args) =>
        {
            l.LogInformation("Passed in {in}, got {out}, in {time}ms", args.InData, args.OutData, args.ProcessTime?.TotalMilliseconds.ToString("N0") ?? "");
        };

        //Now let's simulate a delayed loading of the items by using Enqueue
        foreach (var fruit in Fruits)
        {
            mtp.Enqueue(fruit);
            Task.Delay(Random.Shared.Next(50, 200)).Wait(); //Artificial random delay
        }

        //Once all of the items have been enqueued, wait for the last item to be processed
        mtp.AwaitProcessed(ct);


        //Done! Everything has been processed and we have successfully awaited a multi-threaded, separated "scatter gather"


        while (PerigeeApplication.delayOrCancel(1000, ct)) { };

    });

});
```

## SDK

### ParallelProcessMultiThread

Processes a collection of items in parallel using a specified processing function.

**Parameters:**

* `items` (`IEnumerable<TIn>`): The collection of items to process.
* `Process` (`Func<TIn, TOut>`): The function to process each item.
* `cancelToken` (`CancellationToken?`, optional): An optional cancellation token to cancel the processing.
* `concurrency` (`int`, optional): The number of concurrent threads to use. Default is 3.
* `Logger` (`ILogger`, optional): An optional logger for logging.

**Returns:**

* `List<MultiProcessResult<TIn, TOut>>`: A list of processing results.

#### Example:

```csharp
var results = myItems.ParallelProcessMultiThread(item => ProcessItem(item));
```

### Enqueue

Enqueue an item to be processed.

**Parameters:**

* `item` (`TIn`): The item to be processed.

#### Example:

```csharp
processor.Enqueue(myItem);
```

###

### AwaitProcessed

Await until all pending executions have been processed. Optionally accepts a cancellation token or a time span to limit the wait.

**Example:**

```csharp
processor.AwaitProcessed();

// With CancellationToken
processor.AwaitProcessed(cancellationToken);

// With TimeSpan
processor.AwaitProcessed(TimeSpan.FromMinutes(1));
```

## Class Reference

### MultiProcessResult\<TIn, TOut>

A class that represents the result of processing an individual item.

#### InData

The input data that was processed.

#### OutData

The output data produced by the process.

#### Exception

An optional exception that occurred during processing.

#### ProcessTime

An optional timespan representing the processing time.


# OpenAI Client - (Responses)

## OpenAIClient

The **`OpenAIClient`** class provides functionality to interact with OpenAI’s ChatGPT API using the latest Responses endpoints. These new endpoints unlock a wide range of powerful features, including vector store search, batching, tool calling, and more.

We built these classes to make development simple and intuitive. They include numerous convenient overloads, static helpers, and a fluent syntax that lets you quickly assemble complete requests with minimal effort.

Tool calling is fully integrated. The internal client manages all the complexity, including reflection-based tool mapping, argument parsing, and the back and forth communication between your code and the OpenAI servers, so you don’t have to.

### A quick example

Here we'll create a new client with our API key. Create and submit a request to `gpt-5.1`, in only a few lines of code.&#x20;

{% code overflow="wrap" %}

```csharp
//Declare a client
var aic = new OpenAIClient(apiKey);

//Get a response
var response = await aic.GetResponseAsync(
   OpenAIClient.GPT51("It's this easy to message AI??"));

//Use the built in MessageContent Property to retrieve the latest message
if (response.IsSuccessful)
    Console.WriteLine(response.Data.MessageContent);

```

{% endcode %}

### Converse, with ease!

Using the responses API allows us to optionally include a previous response ID, allowing for an incredibly easy way to manage conversation state.

```csharp
var aic = new OpenAIClient(apiKey);
OpenAIClient.Responses.ResponseBody? prev = null;

while (true)
{
    prev = (await aic.GetResponseStreamAsync(
        OpenAIClient.GPT5Mini(Console.ReadLine()).WithPreviousResponseID(prev?.Id ?? string.Empty),
        (ev) => Console.Write(ev.delta))).response;
    Console.WriteLine();
}
```

Check out the gif to see how this looks running in an app!

<figure><img src="/files/nOkDQjotCPT62X4KWaOx" alt=""><figcaption><p>What the above code looks like running in a console application</p></figcaption></figure>

### Tool calling

Tool calling (custom functions) are very easy to use. Simply decorate a method with the <mark style="color:purple;">AITool</mark> attribute, and optionally provide <mark style="color:purple;">AIParameter</mark> attributes to any parameters to give GPT more context about the given parameter or input class. After using <mark style="color:purple;">RegisterTools</mark>, the client handles the internal fun of reflection mapping, argument parsing, calling, and responses back to the server.&#x20;

```csharp
var aic = new OpenAIClient(apiKey)
    .RegisterTools<ToolsExample>(); 

var rs = await aic.GetResponseAsync(OpenAIClient.GPT5Mini("What is the weather like in Seattle Washington?"));
if (rs.IsSuccessful)
    Console.WriteLine(rs.Data!.MessageContent);

```

The sample <mark style="color:orange;">ToolsExample</mark> class. You may either have multiple parameters, or one input class as a parameter which will be deserialized for you.&#x20;

```csharp
public class ToolsExample
{
    [OpenAIClient.AITool("Get the current tempurature at a location in fahrenheit")]
    public string GetWeather([OpenAIClient.AIParameter("state code, 2 characters")] string location)
    {
        return "currently 84 degrees";
    }
}
```

> ***It's currently 84°F in Seattle, WA.***

### JSON Schema

To use your own classes as json schema, simply register them and then retrieve them again with the MessageContent overload to deserialize the response.&#x20;

In this example, we also show providing model instructions, telling OpenAI not to store the message (which is required if you intend to have OpenAI manage conversation state), disabling the tools use, we also set the reasoning to <mark style="color:$danger;">**medium**</mark>, and finally let the client serialize our <mark style="color:purple;">ItemCategory</mark> class as the response format.

Using fluent syntax, it's really easy to build up a message exactly how we need. Simply deserialize the response into yrou model format by using the <mark style="color:purple;">MessageAs<></mark> overload.

```csharp
var aic = new OpenAIClient(apiKey).RegisterTools<ToolsExample>();

var resp = await aic.GetResponseAsync(
    OpenAIClient.GPT5Nano("Necklace, 14CT Gold")
        .WithInstructions("Categorize the item into the provided available buckets")
        .WithStore(false)
        .WithoutTools()
        .WithReasoning("medium")
        .WithJsonSchema<ItemCategory>());

ItemCategory itc = resp.Data.MessageAs<ItemCategory>();
```

Here's an example <mark style="color:orange;">ItemCategory</mark> class. We may optionally use the <mark style="color:purple;">Description</mark> (From System.ComponentModel) attribute to provide additional detail to the model.

```csharp
public class ItemCategory
{
    [Description("Item type, try to match based on what the item is.")]
    public ItemType Type { get; set; } = ItemType.na;
}

public enum ItemType
{
    na,
    electronic,
    household,
    clothing,
    jewelry,
    furniture,
    other
}
```

### Vector Store

The responses API allows us to use and search our Vector Stores. Simply add the <mark style="color:purple;">WithFileSearch</mark> call to the builder chain and OpenAI will use the provided vector stores to search for content before replying.&#x20;

```csharp
var aic = new OpenAIClient(apiKey);

var fileSearch = await aic.GetResponseAsync(
    OpenAIClient.GPT5Mini("How do I enter my billing time into the system?")
        .WithInstructions(@"Ensure that response messages remain concise and suitable for a help desk message")
        .WithVerbosity("low")
        .WithFileSearch(["vs_12345678900987654321"], 3));
```

### Batching

In this example, I show how you can easily turn a client request into a batched request. First build the base model request (`GPT5Mini`), then use <mark style="color:purple;">AsBatchedList</mark>. The dictionary input provides the CustomID (Key) and the new user message (Value) for each batched request.&#x20;

<mark style="color:purple;">CreateBatchAsync</mark> does multiple things for you:

1. It creates the jsonl file.
2. Uploads it using the Files API and marks the file for batch completion.
3. Creates a new batch request based on this uploaded file.

The resulting **file** and **batch** classes are returned in a tuple.

<mark style="color:purple;">GetBatchAsync</mark> retrieves the batch object. This tells you if it's currently processing, complete, errored out, etc.&#x20;

There is a little helper, <mark style="color:purple;">.IsDone</mark>, that tells us that the batch is no longer processing. This does not mean everything completed successfully. It does however signal we should no longer be polling for any future status changes.

<mark style="color:purple;">GetBatchedResults</mark> retrieves the final output jsonl document(s). Both the error file and the completed file.&#x20;

Since batched requests are not all guaranteed to succeed, we automatically join the errored results to the completed results, deserialize each request and give you the results in one list. You may iterate over these results and check for errors, get the CustomID (<mark style="color:$danger;">a</mark>, <mark style="color:$danger;">b</mark> as shown below), and if the request was a success, get the full response.&#x20;

{% hint style="danger" %}
It is **NOT** advised that you pull for batches every 2 minutes as shown below, however, for this simple example showing how to perform a full round trip, it works for the demo. Please implement a better method of pulling for batched completions, or register a webhook for the best possible experience.
{% endhint %}

```csharp
var aic = new OpenAIClient(apiKey);

var createBatch = await aic.CreateBatchAsync(
    OpenAIClient.GPT5Mini("").AsBatchedList(new() {
    {"a", "What is 5+2"},
    {"b", "What is 91+2"}
}));

if (createBatch.batch?.IsSuccessful ?? false)
{
    var batch = await aic.GetBatchAsync(createBatch.batch.Data!.ID);
    while (!(batch?.Data?.isDone ?? false))
    {
        //Async block until each 2 minute mark using CRON
        await PerigeeUtil.BlockUntil("*/2 * * * *");
        batch = await aic.GetBatchAsync(createBatch.batch.Data.ID);
    }

    var rs = await aic.GetBatchedResults(batch.Data!);
    foreach (var batchedResponse in rs.results)
    {
        var error = batchedResponse.Error?.Message ?? string.Empty;
        var key = batchedResponse.CustomID;
        var response = batchedResponse.Response;
    }
}
```

### Flex Service Tier

You may use the flex processing tier for near half priced requests (check pricing page!). Simply add the <mark style="color:purple;">WithFlexServiceTier</mark> option.

```csharp
var aic = new OpenAIClient(apiKey);

var response = await aic.GetResponseAsync(
    OpenAIClient.GPT5("Flex pricing!").WithFlexServiceTier());
```

### Vision Requests (Attach images)

Any message can have attached image content. There are multiple built in methods to make this process easier right on the ResponseContent class.&#x20;

```csharp
var aic = new OpenAIClient(apiKey);

var rsp = await aic.GetResponseAsync(
    OpenAIClient.GPT5Mini("What can you tell me about how these two songs would mix?")
        .WithContent(OpenAIClient.Request.ResponseContent.FromImage(
            File.ReadAllBytes("/DJ.png"), 
            OpenAIClient.Request.ImageFormat.PNG, 
            OpenAIClient.Request.ImageDetail.High)));

```

### Web Search

You can use the WebSearch tool by simply supplying that as an option. You can get back the annotations (list of sources and urls) searched from this tool.

```csharp
var aic = new OpenAIClient(apiKey);

var webResults = await aic.GetResponseAsync(
    OpenAIClient.GPT5Mini("whats the top new story today?")
        .WithWebSearch(OpenAIClient.Request.WebSearchActions.sources));
```

### Pricing

You can get the price of a request in several ways. There's a built in pricing model calculator, and all of the default pricing models are available.

We also internally keep track of token totals throughout a process. As an example, when a tool is called, those tokens are added to the final response after a tool completion call. This allows for much easier price and token tracking.&#x20;

{% hint style="info" %}
We update these models every few months, and pricing may change between updates.&#x20;
{% endhint %}

```csharp
//ResponseBody.USDPrice
decimal price = response.Data.USDPrice;

//Under the hood, that property calls this:
decimal price = OpenAIClient.Pricing.PriceOf(response.Data);

//You can supply your own pricing models. It's a simple class with:
// request model, input/cache/output token price per million, service tier
decimal price = OpenAIClient.Pricing.PriceOf(response.Data, priceModels: OpenAIClient.Pricing.USD_PricingLatest());
```

You can easily get the latest pricing models available in the application with the following code. In this example we grab our defaults, then add in a custom model with pricing per million tokens. The pricing model then has access to use this model. If you want to supply your own pricing models, feel free to build a custom list of Pricing models and supply that to the PriceOf call shown above.

```csharp
List<OpenAIClient.Pricing?> priceModels = OpenAIClient.Pricing.USD_PricingLatest();
priceModels.Add(new OpenAIClient.Pricing()
{
    Billing = "default", //Batch, flex
    Cached = 1.0m,
    Input = 2.0m,
    Output = 4,
    Model = "gpt-4million",
    Type = "Text" //Audio, Video... 
});
```

### Fluent Syntax

There's various fluent syntax builders built into the application. Start typing <mark style="color:$success;">With...</mark> and see what comes up! There's everything from reasoning efforts, verbosity, tools use, caching, message history, caching, and more. These fluent builders make writing OpenAI requests very intuitive and easy.

```csharp
var req = OpenAIClient.GPT5("Hello world")

    // Add system/developer instructions
    .WithInstructions("You are a helpful assistant.")

    // Add or append user content
    .WithContent(OpenAIClient.Request.ResponseContent.From("Additional user message."))

    // Enable JSON schema output
    .WithJsonSchema<MySchemaType>()

    // Adjust verbosity (high, medium, low)
    .WithVerbosity("high")

    // Enable/disable storage for this request
    .WithStore(false)

    // Set reasoning effort + optional summary (minimal, low, medium, high)
    .WithReasoning("medium", summary: "concise")

    // Set prompt cache retention (key optional)
    .WithPromptCacheRetention("cache-key-xyz", "24h")

    // Or set prompt cache key directly
    .WithPromptCacheKey("my-short-key")

    // Add previous response ID for continued conversation context
    .WithPreviousResponseID("resp_123")

    // Rebuild message history from an existing response body
    .WithMessageHistory(previousMessage)

    // Enable web search tool with actions (sources), optional location, and domain filters
    .WithWebSearch(
        actions: OpenAIClient.Request.WebSearchActions.sources,
        location: new OpenAIClient.Request.WebSearchUserLocation { country = "US", city = "Dallas" },
        filteredDomains: new[] { "example.com" },
        externalWebAccess: true
    )

    // Enable flex service tier
    .WithFlexServiceTier()

    // Or auto service tier
    .WithAutoServiceTier()

    // Disable all tool usage
    .WithoutTools()

    // Add file search tool (vector stores + optional max results)
    .WithFileSearch(new[] { "vs_123", "vs_456" }, maxNumResults: 10)

    // Supply explicit tool choice options
    // FYI: You can't supply both of these options at once, check out the documentation to see how to use this. 
    .WithToolChoice(
        ForceFunction: "MyFunctionName",
        choice: OpenAIClient.Request.AllowedToolChoice.required,
        allowedTools: new[] { "ToolA", "ToolB" },
        mode: OpenAIClient.Request.ToolChoiceMode.required
    );
```

### Predefined GPT Models

Starting from GPT-5 onwards, the general use models are availabe in a static builder right off the main OpenAIClient. Here you can supply the user message, the user (safety ID), reasoning and more. They are the base for building the request and then allow you to use the fluent syntax for configuring the request.&#x20;

```csharp
OpenAIClient.GPT5Mini();
OpenAIClient.GPT51();
OpenAIClient.GPT5Pro();
//... and more!
```


# GPTClient (Chat)

## GPTClient

{% hint style="warning" %}
For the newest OpenAI client for the responses API with batching, tool calling, vector stores, and more. Visit the [OpenAI Client](/core-modules/utility-classes/openai-client-responses) page
{% endhint %}

The `GPTClient` class provides functionality to interact with the OpenAI GPT API. It offers methods for building message histories, submitting both synchronous and asynchronous chat and vision requests (including streaming responses), determining model versions and their context window sizes, and retrieving available models. Additionally, it defines several public constants representing chat roles and supported model identifiers.

### A quick example

Here we'll create a new client with our API key. Create and submit a request to `o3-mini`, we can set the reasoning effort, message, and even force json\_schema mode with a class.&#x20;

You can see how easy it is to operate and integrate with OpenAI!

```csharp
var gptClient = new GPTClient(ThreadRegistry.Instance.GetValue<string>("AppSettings:OAIKey"));
var GPTResponse = gptClient.SubmitRequest(new GPTClient.Request()
{
    MaxTokens = 90_000,
    Model = "o3-mini",
    ReasoningEffort = "high",
    user = "zach@perigee.software",
    Messages = new List<GPTClient.Message>()
    {
        new GPTClient.Message()
        {
            Role = GPTClient.ROLE_USER,
            Content = $@"User Content here"

        }
    }
}.WithJsonSchema(typeof(DocumentFormat)));
```

### Converse, with ease!

This sample is using the absolute minimum amount of code possible to achieve a full conversation with context window limits, model selection, token encoding, and a full chat history. We're using the [`TikToken`](https://www.nuget.org/packages/Tiktoken/) package to feed the client with a method to get token counts. The GPT client does the rest when using the Conversation modes. It keeps track of message history, client messages, context token sizes, and more!

```csharp
//Get a token encoder, GPTClient conversation will manage context window size
var tokenEncoder = new Tiktoken.Encoder(new Tiktoken.Encodings.Cl100KBase());

//Declare a new client with the model and token counter so we can use the built in conversation functions, read our API key from the config
var client = new GPTClient(
    ThreadRegistry.Instance.GetAppSetting<string>("OAIKey"), 
    GPTClient.Request.O3Mini(), tokenEncoder.CountTokens);

//Start a conversation!
while (true)
{
    client.StreamConversation(Console.ReadLine(), Console.Write, null, Environment.NewLine).GetAwaiter().GetResult();
}
```

Check out the gif to see how this looks running in an app!

<figure><img src="/files/nOkDQjotCPT62X4KWaOx" alt=""><figcaption><p>What the above code looks like running in a console application</p></figcaption></figure>

## Properties

### ApiKey

Gets the API key used for authenticating requests with the OpenAI API.

### ROLE\_USER

Represents the role for a user in a chat conversation.

### ROLE\_ASSISTANT

Represents the role for the assistant in a chat conversation.

### ROLE\_SYSTEM *<mark style="color:red;">(deprecated for ROLE\_DEVELOPER)</mark>*

Represents the system role in a chat conversation.

### ROLE\_DEVELOPER

Represents the developer role in a chat conversation.

## Methods

### StreamConversation

Conversation methods allow every message of the "conversation" to be managed and maintained via the client. This simplifies worrying about context token sizes, managing message state and history, etc. Simply feed a new message into the conversation any time and history will be maintained.&#x20;

#### Parameters:

* `string newUserMessage`: A new message to feed into the conversation.
* `Action<string> res`: The response stream feed, use this to append to a logger, feed to the console, etc.
* `CancellationToken? cancelToken`: An optional cancellation token.
* `string EndOfStream`: If provided, will append this content to the end of the current response. Useful if you need to statically append html, newlines, or other EOF content.&#x20;

{% hint style="success" %}
To use **Conversation methods**, please allocate the GPTClient with the `APIKey`, The `RequestModel`, and `a method` to return token counts, or `(s) ⇒ 0`if you want to disable context window management\
\
We're using the [`TikToken`](https://www.nuget.org/packages/Tiktoken/) package to feed the client with a method to get token counts. If running this sample, install this package as well.
{% endhint %}

```csharp
//Get a token encoder, GPTClient conversation will manage context window size
var tokenEncoder = new Tiktoken.Encoder(new Tiktoken.Encodings.Cl100KBase());

//Declare a new client with the model and token counter so we can use the built in conversation functions, read our API key from the config
var client = new GPTClient(
    ThreadRegistry.Instance.GetAppSetting<string>("OAIKey"), 
    GPTClient.Request.O3Mini(), tokenEncoder.CountTokens);

//Start a conversation!
while (true)
{
    client.StreamConversation(Console.ReadLine(), Console.Write, null, Environment.NewLine).GetAwaiter().GetResult();
}
```

### ClearConversation

If using the conversation model, you can easily clear all history and reset state by using this method.

```csharp
client.ClearConversation();
```

### BuildMessageWithHistory

Builds a list of messages by prioritizing the user message and then appending historical messages as long as they do not exceed the specified context window token size. This method uses a provided token count function to ensure that the combined messages fit within the allowed token budget. It returns a tuple containing the list of messages, the number of tokens used (calculated as the difference between the initial context window size and the remaining tokens), and the total tokens counted from all messages.

**Parameters:**

* `Func<string, int> Count`: A function that returns the token count for a given string.
* `string userMessage`: The current user message to include.
* `string systemMessage`: An optional system message to include.
* `int ContextWindowTokenSize` (default: 128000): The maximum allowed token count.
* `IEnumerable<Message> MessageHistory`: An optional collection of historical messages (ordered from oldest to newest).

**Example:**

```csharp
// Define a simple token counting function (for example, counting words)
int TokenCount(string s) => s.Split(' ').Length;

var historyMessages = new List<Message>
{
    new Message(GPTClient.ROLE_USER, "This is a previous conversation message.")
};

var result = GPTClient.BuildMessageWithHistory(
    TokenCount,
    "Hello, how are you?",
    "System instructions for context.",
    128000,
    historyMessages
);

// result.Item1: List<Message> containing the constructed messages
// result.Item2: Number of tokens used (ContextWindowTokenSize - remaining tokens)
// result.Item3: Total tokens counted from the messages
```

### GetGPTVersion

Determines the version of a GPT model based on its identifier string and sets the corresponding context window token size. The method compares the input `gptModel` against known model names and patterns and returns the model version as a decimal value while outputting the appropriate context window size.

**Parameters:**

* `string gptModel`: The GPT model identifier (e.g., "gpt-3.5-turbo", "gpt-4-turbo").
* `out int ContextWindowSize`: An output parameter that will be set to the context window token size associated with the model.

**Example:**

```csharp
int contextSize;
decimal version = GPTClient.GetGPTVersion("gpt-3.5-turbo", out contextSize);
Console.WriteLine($"Model Version: {version}, Context Window Size: {contextSize}");
```

### SubmitRequestAsync

Submits a chat request asynchronously to the OpenAI API. This method sends the provided `Request` object as a POST request and awaits a response. On success, it sets the model on the returned `ChatCompletion` object and associates the original request with the response.

**Parameters:**

* `Request request`: The request object containing the chat parameters.
* `CancellationToken? cancelToken` (optional): A cancellation token to cancel the request if needed.

**Example:**

```csharp
RestResponse<ChatCompletion> response = await gptClient.SubmitRequestAsync(request, cancellationToken);
if (response?.Data != null)
{
    Console.WriteLine(response.Data.Choices.FirstOrDefault()?.Message.Content);
}
```

### SubmitRequest

Submits a chat request synchronously to the OpenAI API. It sends the provided `Request` object as a POST request and returns a `RestResponse` containing the chat completion result. The response’s model is set based on the request.

**Parameters:**

* `Request request`: The request object containing the chat parameters.
* `CancellationToken? cancelToken` (optional): A cancellation token to cancel the request if needed.

**Example:**

```csharp
RestResponse<ChatCompletion> response = gptClient.SubmitRequest(request, cancellationToken);
if (response?.Data != null)
{
    Console.WriteLine(response.Data.Choices.FirstOrDefault()?.Message.Content);
}
```

### SubmitVisionRequestAsync

Submits a vision request asynchronously to the OpenAI API. This method accepts a `GPTVisionPayload.Request` object containing vision-specific parameters and sends it as a POST request. If successful, the returned `ChatCompletion` object will have its model property set from the request.

**Parameters:**

* `GPTVisionPayload.Request request`: The vision request object.
* `CancellationToken? cancelToken` (optional): A cancellation token to cancel the request if needed.

**Example:**

```csharp
RestResponse<ChatCompletion> visionResponse = await gptClient.SubmitVisionRequestAsync(visionRequest, cancellationToken);
if (visionResponse?.Data != null)
{
    Console.WriteLine(visionResponse.Data.Choices.FirstOrDefault()?.Message.Content);
}
```

### SubmitVisionRequest

Submits a vision request synchronously to the OpenAI API. It accepts a `GPTVisionPayload.Request` object and returns a `RestResponse` containing the chat completion result, with the model property set based on the request.

**Parameters:**

* `GPTVisionPayload.Request request`: The vision request object.

**Example:**

```csharp
RestResponse<ChatCompletion> visionResponse = gptClient.SubmitVisionRequest(visionRequest);
if (visionResponse?.Data != null)
{
    Console.WriteLine(visionResponse.Data.Choices.FirstOrDefault()?.Message.Content);
}
```

### SubmitStreamRequest

Submits a chat request that streams results back from the OpenAI API. This method enables streaming by setting `req.Stream` to true, and it processes the incoming stream by invoking a provided callback (`res`) with each new token received. The method aggregates the response into a complete `ChatCompletion` object that is returned once streaming is finished.

**Parameters:**

* `Request req`: The chat request object with streaming enabled.
* `Action<string> res`: A callback action invoked with each new token as it is received.
* `CancellationToken? cancelToken` (optional): A cancellation token to cancel the streaming operation if needed.

**Example:**

```csharp
ChatCompletion completion = await gptClient.SubmitStreamRequest(
    request,
    token => Console.Write(token),
    cancellationToken
);
Console.WriteLine("Streaming complete.");
```

### GetModels

Retrieves the list of available models from the OpenAI API. This method sends a GET request to the models endpoint and returns a `RestResponse` containing a `ModelResponse` object with the models information.

**Example:**

```csharp
RestResponse<ModelResponse> modelsResponse = gptClient.GetModels();
if (modelsResponse?.Data != null)
{
    foreach (var model in modelsResponse.Data.Models)
    {
        Console.WriteLine(model.Id);
    }
}
```

## Quick Model Methods

There are quite a few "quick" request methods available, these methods create the request object to be sent to GPT. These can be used to rapidly create new messages from users, override context window sizes, pre-append developer(system) prompts, and create GPT clients ready for [Conversation methods](#converse-with-ease). They come pre-configured with the maxiumum completion tokens, model names, and context window size information.&#x20;

{% hint style="info" %}
I won't list the models here as they change and get updated frequently, however, we keep these relatively up to date, and the latest greatest models should be available to use. :thumbsup:
{% endhint %}

```csharp
GPTClient.Request.O3Mini("How many cups of sugar does it take to get to the moon?", "user@user.com");
GPTClient.Request.O1("Are you the droid we're looking for?");
GPTClient.Request.GPT4o().WithContextWindowSize(50_000);
GPTClient.Request.O1Mini().WithDeveloperMessage("You are smart, brave, and capable");
```


# XML Converter

The XML Converter is a useful class designed to transform a simple XML "List" into a structured list of classes. In the example provided, there are three `test_scores` elements nested within the `data` element. Utilizing the converter simplifies the process of reading and utilizing the relevant data effectively.

```csharp
//Sample data
string XScores = @"
<root>
  <result>
    <data>
      <test_scores>
        <firstName>John</firstName>
        <lastName>Doe</lastName>
        <score>87.5</score>
      </test_scores>
      <test_scores>
        <firstName>Jane</firstName>
        <lastName>Smith</lastName>
        <score>92.3</score>
      </test_scores>
      <test_scores>
        <firstName>Alice</firstName>
        <lastName>Brown</lastName>
        <score>78.9</score>
      </test_scores>
    </data>
  </result>
</root>";

//Read and convert the 3 test_scores to a List<APIXMLSample>
var xml = XMLConverter.FromXML<APIXMLSample>(XScores, "//result/data/test_scores");


/* Sample class, using XmlElement attribute */
public class APIXMLSample
    {
        [XmlElement("firstName")]
        public string FirstName { get; set; }

        [XmlElement("lastName")]
        public string LastName { get; set; }

        [XmlElement("score")]
        public decimal Score { get; set; }
    }
```


# Dynamic Data Table

## Dynamic?

Dyanmic Data Tables work similiarly to DataTables. The key difference being they are very loosely defined until the data is solved.&#x20;

* This allows for rows to be added anywhere without keeping up if that row is currently present.&#x20;
* Headers are automatically detected within the data set
* Column types are solved, and support solving mesh types within a column.
* Metrics are stored and calculated about each row and column.
* They can easily be converted to fully structurally defined DataTable's at any point.

### The example table

Let's take a look at a basic table with 3 columns, and 3 rows. <br>

| ID | Name  | Age |
| -- | ----- | --- |
| 1  | John  | 25  |
| 2  | Smith | 30  |
| 3  | Jane  | 29  |

To create this the standardized way using DataTable in the shortest possible way, here's how to recreate this table:

```csharp
DataTable DT = new DataTable();
DT.Columns.Add("ID", typeof(int));
DT.Columns.Add("Name", typeof(string));
DT.Columns.Add("Age", typeof(int));

DT.Rows.Add(1, "John", 25);
DT.Rows.Add(2, "Smith", 30);
DT.Rows.Add(3, "Jane", 29); 
```

Here is how you would do the same thing with a dynamic data table:

```csharp
DataTable DTDyn = new DynamicDataTable()
.AddRowValues(0u, "ID", "Name", "Age")
.AddRowValues(1, 1, "John", 25)
.AddRowValues(2, 1, "Smith", 30)
.AddRowValues(2, 1, "Jane", 29)
.ToDataTable();
```

### Data Typing

In the above example, notice what's different between the two? The Data Types are not present! This is one of the key differences and the reason behind the **Dyanmic** in the class name.&#x20;

We also do not have to worry about what rows we've added, or not added. They keep up with themselves.&#x20;

<mark style="color:blue;">**`DynamicDataTable`**</mark> supports several additional "smart" features that allow it to process and solve the data while processing it. This is a huge advantage when loading data that is not a pristine export.&#x20;

If you were to change row 3 in the first example you would generate an **`ArgumentException`**:

```csharp
DT.Rows.Add(3, "Jane", "29"); <-- ArgumentException
```

Changing row 3 in a <mark style="color:blue;">**`DynamicDataTable`**</mark> will convert that column into a string:

```csharp
.AddRowValues(2, 1, "Jane", "NA")
```

Data types will be auto solved after N(default 1000) rows are added and will then be readjusted as rows are added.&#x20;

{% hint style="success" %}
This is the secret sauce behind the [Excel Reader](/core-modules/file-formats/excel), it uses a <mark style="color:blue;">**`DynamicDataTable`**</mark> to solve and strip header content before load.
{% endhint %}

### Header solve

What happens when your data is not on the first row? This is another big problem when dealing with a client file. There may be rows above the actual table and we don't need that information.

```csharp
DynamicDataTable DTDyn = new DynamicDataTable()
.AddRowValues(0u, "My awesome file")
.AddRowValues(1, "Data as of:", "6/5/1920")
.AddRowValues(2, "ID", "Name", "Age")
.AddRowValues(3, 1, "John", 25)
.AddRowValues(4, 1, "Smith", 30)
.AddRowValues(5, 1, "Jane", "NA");

DTDyn.FinishDataLoad(); //Auto called on ToDataTable

uint HeaderRowIsAt = DTDyn.HeaderRow; //Value 2 (0 based)
```

You can see it automatically solved the header row after calling `.FinishDataLoad()`. The header, column data types, fill rates, data lengths and data type counts will all be solved and available.&#x20;

### Data Table methods

There are two primary methods for converting the dynamic table into a standard DataTable.&#x20;

The `.ToDataTable_ColumnsOnly()` version does not convert any data, only the schema of the table (the columns).

The `.ToDataTable()` version has two optional parameters for splicing the table. If left at default values, the whole table is converted and returned.

```csharp
DynamicDataTable.ToDataTable_ColumnsOnly()
DynamicDataTable.ToDataTable(inclusiveFromRow = -1, InclusiveToRow = -1)
```

### CSV

You can easily create a CSV out of the data by calling `.ToCSV()`. This is a handy method for quickly exporting data or debugging.

```csharp
DynamicDataTable DTDyn = new DynamicDataTable()
.AddRowValues(0u, "My awesome file")
.AddRowValues(1, "Data as of:", "6/5/1920")
.AddRowValues(2, "ID", "Name", "Age")
.AddRowValues(3, 1, "John", 25)
.AddRowValues(4, 1, "Smith", 30)
.AddRowValues(5, 1, "Jane", "NA");

var csv = DTDyn.ToCSV();

/*
ID,Name,Age
1,John,25
1,Smith,30
1,Jane,NA
*/
```

### Static Values

You may add static values to the data table, they will be appended to the end of the columns load set.

```csharp
DynamicDataTable DTDyn = new DynamicDataTable()
.AddStatic("BatchID", 1)

.AddRowValues(0u, "My awesome file")
.AddRowValues(1, "Data as of:", "6/5/1920")
.AddRowValues(2, "ID", "Name", "Age")
.AddRowValues(3, 1, "John", 25)
.AddRowValues(4, 1, "Smith", 30)
.AddRowValues(5, 1, "Jane", "NA");

var csv = DTDyn.ToCSV();

/*
ID,Name,Age,BatchID
1,John,25,1
1,Smith,30,1
1,Jane,NA,1
*/
```

### "Special" Columns&#x20;

The dynamic table comes with a few included "Special" columns that can be automatically added during the load.&#x20;

```csharp
DynamicDataTable DTDyn = new DynamicDataTable()
.SetSpecialColumns(DDTSpecialColumns.RowIndex)

.AddRowValues(0u, "My awesome file")
.AddRowValues(1, "Data as of:", "6/5/1920")
.AddRowValues(2, "ID", "Name", "Age")
.AddRowValues(3, 1, "John", 25)
.AddRowValues(4, 1, "Smith", 30)
.AddRowValues(5, 1, "Jane", "NA");

var csv = DTDyn.ToCSV();

/*
ID,Name,Age,DDT_RowIndex
1,John,25,3
1,Smith,30,4
1,Jane,NA,5
*/
```

### Data Metrics

To retrieve data statistics after the call to `.FinishDataLoad()`, you can easily use `.GetStatistics()` to retrieve a data statistics class with information like:

* Column names,
* Types
* Fill rates
* Unpopulated row counts
* Jagged counts
* Row counts

This is a helpful method for post load data analysis.

```csharp
DynamicDataTable DTDyn = new DynamicDataTable()
.AddRowValues(0u, "My awesome file")
.AddRowValues(1, "Data as of:", "6/5/1920")
.AddRowValues(2, "ID", "Name", "Age", "Notes")
.AddRowValues(3, 1, "John", "", "")
.AddRowValues(4, 1, "Smith", 30, "", "what?")
.AddRowValues(5, 1, "Jane", "", "");

DTDyn.FinishDataLoad();
var stats = DTDyn.GetStatistics();
foreach (var namekvp in stats.ColumnNames)
{
    Console.WriteLine($"[{namekvp.Key}] {namekvp.Value}({stats.ColumnTypes[namekvp.Key].Name}) Fill: {(stats.FillRate[namekvp.Key]*100.0m):N2}%");
}
```


# Debounce

## Debounce Class

The Debounce class is a utility class in C# used to prevent the rapid firing of events. Particularly useful in scenarios where an action should only be performed after an event has ceased to occur for a specified duration, like key-up events on textboxes that trigger searches.

### Bounce Method

The `Bounce` method is called whenever an event occurs. It resets the debounce timeout. If this method is not called again within that timeout, the action specified in the Debounce constructor will fire. The `Bounce` method can optionally take a parameter, which will be passed to the action when it fires.

#### Example:

```csharp
var debouncer = new Debounce(() => {
    //Perform action here after debounce has fired
});

debouncer.Bounce();
debouncer.Bounce();


var debouncer_int = new Debounce<int>((i) => {
    //Perform action here after debounce has fired, in this case, (i = 3) is received
});

debouncer_int.Bounce(1);
debouncer_int.Bounce(2);
debouncer_int.Bounce(3);
```

In the first example, the `Bounce` method is called without a parameter, so when the action fires it won't receive any parameters. In the second example, the `Bounce` method is called with an integer parameter, so the action will receive the last integer passed when it fires.

### Disposing

When disposing the <mark style="color:blue;">**Debounce**</mark> class that doesn't take any generic parameters, no additional callbacks will be fired.

When disposing the <mark style="color:blue;">**Debounce\<T>**</mark> class, there is an immediate one time fire of the bounce callback that has the latest value supplied. This is particularly useful when you need to dispose of a resource quickly, but still need to access the latest value in the pipeline without waiting on the bounce to fire.


# Thread Conditions

## Thread Conditional Wrap

There are times when you want to turn off or disable something running when a condition occurs. An example of this would be to only run a Coordinator when there is a known network connection available.&#x20;

This is made possible by a <mark style="color:blue;">**`ThreadCondition`**</mark>:&#x20;

```csharp
c.Add("OrderProcessing", (parentToken, l) =>
{
    ThreadCondition.Wrap(parentToken, 
        (childToken) => coordinator.StartAsync(childToken), 
        () => NetworkUtility.Available(), 
        TimeSpan.FromSeconds(5));
});
```

Let's take a look at what's happening:

1. The method itself is thread blocking, so it won't return out until the <mark style="color:blue;">**`parentToken`**</mark> is cancelled.
2. The first callback supplies a <mark style="color:blue;">**`childToken`**</mark> to be used in any method that returns a Task.&#x20;
   * This could be your own Task or "async" method.
3. The second callback should return <mark style="color:blue;">**`TRUE`**</mark> if the method should be running, or start for the first time.&#x20;
   * If it returns <mark style="color:blue;">**`FALSE`**</mark>, the condition will cancel the <mark style="color:blue;">**`childToken`**</mark> and await the <mark style="color:blue;">**`Task`**</mark> from the first callback.
4. The final parameter you can supply is how often this check occurs.&#x20;

{% hint style="info" %}
You may also use [Behavior Tree's](/core-modules/utility-classes/behavior-trees) in the condition callback. This will process the tree on every run.

```csharp
() => BehaviorTree.NewSequence("Conditionals", LeafNodes.NetworkAvailable)
```

{% endhint %}

#### Running the demo

In this example, flipping off the Wi-Fi radio of your development box will stop the coordinator from receiving new messages. Turning it back on will start the coordinator again.

```log
//Off
[11:43:11 INF](OrderProcess) Coordinator OrderProcess cancellation requested
[11:43:11 INF](OrderProcess) Coordinator OrderProcess cancellation complete

//Back on
[11:43:16 INF](OrderProcess) Coordinator OrderProcess starting
```


# Perigee Utility Class

## Block Until

This handy method takes a CRON string and is an easy way of creating an awaitable task. It returns True if the await finished without being cancelled by the optional token.

```csharp
//Async wait until the 0th second of every 5th minute
await PerigeeUtil.BlockUntil("0 */5 * * * *");

//Or for non async methods
PerigeeUtil.BlockUntil("0 */5 * * * *").GetAwaiter().GetResult();

//Block until the next 5 minute mark, or 10 seconds. Whichever comes first
CancellationTokenSource CTSource = new CancellationTokenSource();
CTSource.CancelAfter(TimeSpan.FromSeconds(10));
var done = PerigeeUtil.BlockUntil("*/5 * * * *", null, CTSource.Token).GetAwaiter().GetResult();
```

## Retry and Rety Async

One of the utility class methods is a <mark style="color:blue;">**`Retry`**</mark>and <mark style="color:blue;">**`RetryAsync`**</mark>. They provide an easy ability to retry <mark style="color:red;">**on exception thrown**</mark> with a delay.&#x20;

The response from these classes is a Tuple where&#x20;

* <mark style="color:blue;">**`Item1`**</mark> is a `boolean` indicating if it was a success(true), or failed the maximum number of times (false).
* <mark style="color:blue;">**`Item2`**</mark> is the exception thrown if it was not a succeed

```csharp
PerigeeApplication.ApplicationNoInit("CancelTokens", (c) => {

    c.AddRecurring("Recurring", (ct, l) => {

        //This will be tried 5 times, with 10 seconds between retries. 
        Tuple<bool, Exception> Retry = PerigeeUtil.Retry(5, (i) => {

            bool Success = false;
            if (Success == false)
            {
                throw new Exception("Do or do not, there is a retry");
            }

        }, 10000);

        if (!Retry.Item1)
        {
            l.LogError(Retry.Item2, "Retries exceeded");
        }

    
    });
});
```

## RetryExponentialBackoff

Another retry strategy is the Exponential Backoff method. Unlike a constant delay between retries, this method progressively increases the delay (incorporating jitter) to prevent overwhelming a remote system with requests.&#x20;

You can define both a base delay (in milliseconds) and a maximum delay (in milliseconds) to ensure the delay between requests scales appropriately.

```csharp
PerigeeApplication.ApplicationNoInit("Backoff", (c) => {

    c.AddRecurring("Exponential", (ct, l) => {

        //Log out the backoff delays, logging them is an easy way to test and see what times are going to be used.
        l.LogInformation("Backoff times: {time}", string.Join(", ", PerigeeUtil.GetExponentialBackoffDelays(20, 1000, 1800000)));

        // Use the .RetryExponential to follow the same times as shown above, with a small jitter to each delay
        PerigeeUtil.RetryExponentialBackoff(20, (i) => {

            l.LogInformation("Retry number {i}", i);
            throw new Exception("Throwing to cause another retry");

        }, 1000, 1800000);

    });
    
});

/*
Backoff times: 956, 2102, 4469, 8470, 17127, 31337, 57203, 152968, 234956, 575255, 901233, 1645927, 1800000, 1800000, 1800000, 1800000, 1800000, 1800000, 1800000, 1800000
*/
```


# Network Utility

## Network Available

To check whether or not a network is available for use, use the NetworkUtility class. It returns <mark style="color:blue;">**true**</mark> if there should be a network connectivity, and <mark style="color:blue;">**false**</mark> if there should not be.

```csharp
NetworkUtility.Available()
```


# Lists

{% hint style="info" %}
All methods are under the **`Perigee.Extensions`** namespace
{% endhint %}

## MatchToList

This handy method uses several de-duplication methods, as well as the Soundex and Levenshtein algorithms to produce a best-guess match between two different lists.&#x20;

&#x20;  It will always match **A => B**. Meaning items that items in A will only attempt matches to items in B, not the other way around.

In the below example, **`Peech`** is matched to **`PeachJuice`** even though it's misspelled and **`Agave`** has no match. Every other item is matched with it's equivalent juice.

<pre class="language-csharp"><code class="lang-csharp">List&#x3C;string> Fruits = new List&#x3C;string>()
{
    "Apple",
    "Banana",
    "Pear",
    "Orange",
    "Pineapple",
    "Strawberry",
    "Blueberry",
    "Raspberry",
    "Blackberry",
    "Watermelon",
    "Cantaloupe",
    "Grapefruit",
    "Grape",
    "Lemon",
    "Lime",
    "Mango",
    "Papaya",
<strong>    "Peech",
</strong><strong>    "Agave"
</strong>};

List&#x3C;string> FruitJuices = new List&#x3C;string>()
{
    "AppleJuice",
    "BananaJuice",
    "PearJuice",
    "OrangeJuice",
    "PineappleJuice",
    "StrawberryJuice",
    "BlueberryJuice",
    "RaspberryJuice",
    "BlackberryJuice",
    "WatermelonJuice",
    "CantaloupeJuice",
    "GrapefruitJuice",
    "GrapeJuice",
    "LemonJuice",
    "LimeJuice",
    "MangoJuice",
    "PapayaJuice",
    "PeachJuice"
};

var match = Fruits.MatchToList(FruitJuices);
Console.WriteLine("Matched:");
match.Item1.ForEach(s => Console.WriteLine($"{s.Key} => {s.Value}"));
Console.WriteLine(Environment.NewLine + "Unmatched:");
match.Item2.ForEach(s => Console.WriteLine($"{s}"));
</code></pre>

## MatchToList (Dictionary)

This version of list matching is almost identical to what is listed above, the main difference is that your input dictionary defines the keys to match, and the value is a comma separated list of additional "hints" to match by.

In this example, we can match the key **`Apple`** with **`Appljuise`**, because of the additional hints supplied by the dictionary.&#x20;

{% hint style="info" %}
Notice we also supplied `3, true`?&#x20;

* **`3`** Means that our distance should be less than or equal to 3 edits. There are some additional preprocessing that occurs to attempt to reduce prefix and postfix content, this distance is applied and checked after.&#x20;
* **`true`** means **`MonoMatch`** is turned on, disallowing the same "list" item to be matched with multiple Keys from my dictionary. If this was **`false`**, you could have the same list item matched with as many keys as it matched!
  {% endhint %}

```csharp
Dictionary<string, string> InList = new Dictionary<string, string>() { 
    { "Apple", "AppleJuice,Apple Juice,jus de pomme,jugo de manzana" } 
};

var rs = InList.MatchToList(new List<string>() { 
"Peach Juice", "Banana Juice", "Appljuise", "mangojuce" }, 3, true);

foreach (var m in rs.Item1)
    Console.WriteLine($"{m.Key} Matched with {m.Value}");
    
//Will print: Apple Matched with Appljuise
```

## MatchToList\_Quality

If you're attempting to debug your list matching and want to understand the match values being returned by this, use the \_Quality function. It will return a rich object that is easy to read showing the matched value for each key.&#x20;

## JoinBy

Takes every item in a list and joins it with the delimiter

```csharp
string joined = Fruits.JoinBy(",");
```

## DistinctBy

Works identically to the classic LINQ Distinct, however it works on classes as well.

```csharp
Items.DistinctBy(f => f.SomeProperty);
```

## ToDataTable

Sometimes you have a list of classes,  and need to convert it to a table. This uses reflection to perform the conversion.

```csharp
ToDataTable(this List<T> items, string tableName = "table", string schema = "dbo")
```

## WhereSubclassOfType\<T>

Enable you to filter a list of classes that conform to the subclass of another class

```csharp
ListOfClasses.WhereSubclassOfType(typeof(otherClass))
```

## Flatten\<T,R>

Recursively flatten a data structure and return the new type

```csharp
ListOfX.Flatten(f => f.otherList)
```

## FromHierarchy\<T>

Recursively select down a tree until something is null. Great for returning a list of all inner exceptions in order.

```csharp
thrownException.FromHierarchy(f => f.InnerException);
```

## RemoveDuplication

Our first example was a bunch of fruit juices. The remove duplication method attempts to find any common pattern in the list of items and remove them.

```csharp
// Strips the "Juice" from the end of each item
FruitJuices.RemoveDuplicationOfCommonOccuranceSuffix(); 

//There's also a prefixed version
FruitJuices.RemoveDuplicationOfCommonOccurancePrefixes();
```


# FileUtil

## MoveToChildDirectory

This handy helper takes a file and a child directory and does the lookups, directory creation, and move operation

{% code overflow="wrap" %}

```csharp
//Moves item to c:\temp\processed\item.txt
FileUtil.MoveToChildDirectory(@"C:\temp\item.txt", "processed", overwrite: true, createDirectory: true);
```

{% endcode %}

## CreateDirectoryIfNotExists

Verify if a directory exists for a given item

{% code overflow="wrap" %}

```csharp
//Verifies directory c:\temp\ exists
FileUtil.CreateDirectoryIfNotExists(@"C:\temp\item.txt");
```

{% endcode %}

## CleanFilenameWithPath

Clean a filename with the OS invalid file characters.

{% code overflow="wrap" %}

```csharp
//produces: C:\temp\it-em-.txt
var valid = FileUtil.CleanFilenameWithPath(@"C:\temp\it|em|.txt");
```

{% endcode %}


# Inclusive2DRange

A helper class when dealing with a range of data or cells

## Instantiate

To create a new range, supply two initial values:

{% code overflow="wrap" %}

```csharp
var ir = new Inclusive2DRange("A3", "C1");
Console.WriteLine($"{ir.CorrectedA}:{ir.CorrectedB}{Environment.NewLine}|{ir.MinX_ZeroBased}  -->  {ir.MaxX_ZeroBased}|{Environment.NewLine}|{ir.MinY_ZeroBased}{Environment.NewLine}|{Environment.NewLine}|{ir.MaxY_ZeroBased}");

/* Prints
A1:C3
|0  -->  2|
|0
|
|2
*/
```

{% endcode %}

* As you can see it corrected the range by fixing the starting point to **`A1`**, and the ending point to **`C3`**.
* The zero based indexes of the range are **`0 to 2 inclusive`**

You can also convert the common Excel locators using the built in functions:

{% code overflow="wrap" %}

```csharp
Console.WriteLine($"1 is {ir.GetExcelColumnName(1)}, 27 is {ir.GetExcelColumnName(27)}");
Console.WriteLine($"A is {ir.GetExcelColumnNumberFromName("A")}, AA is {ir.GetExcelColumnNumberFromName("AA")}");

/* Prints
1 is A, 27 is AA
A is 1, AA is 27
*/
```

{% endcode %}


# Strings, Numbers, Dates

{% hint style="info" %}
All methods are under the **`Perigee.Extensions`** namespace
{% endhint %}

## Range Extraction

Range extraction allows you to split an input string into it's parts.

```csharp
var rangeExtracted = "Section A, B and C";
Console.WriteLine(JsonConvert.SerializeObject(rangeExtracted.RangeExtract()));
// ["Section A","Section B","Section C"]

var rangeExtracted = "1-8";
Console.WriteLine(JsonConvert.SerializeObject(rangeExtracted.RangeExtract()));
//[" 1"," 2"," 3"," 4"," 5"," 6"," 7"," 8"]
```

## Fast String

These methods use the fastest possible comparisons and Boolean checks available for the various tasks.&#x20;

```csharp
FastContains(); //contain
FastSuffix(); //suffix
FastPreFix(); //prefix
FastContainsAndPrefixOrSuffix(); //Must contain and (begin or end with)
FastContainsAndPrefix(); //contain and prefix
FastContainsAndSuffix(); //contain ans suffix
FastAndContains(); //Contain1 AND contain2, n
FastOrContains(); //Contain1 OR contain2, n
```

## String manipulation

```csharp
RemoveFromSuffix(); //Remove a suffix from a string
RemoveFromPrefix(); //Remove a prefix from a string
TrimDuplicateWhitespace(); //Replace duplicate whitespace characters in a string
Truncate(); //Truncates string so that it is no longer than the specified number of characters. Allows for negative signs
TruncateAndReport(); //Truncate a string and report if a truncation did occur
```

## Data and object or partial detection

```csharp
ReBracketString(); //Rebracket a bracketed or un-bracketed string, useful for database commands

getAllSubstrings(); //Cross application of all available substring for a given word

Soundex(); //Returns the soundex string for the word
LevenshteinDistance(); // Levenshtein distance

IsStringDate(); //Check whether a string is a date in the given(or default culture)
HasSpecialChars(); //Anything not a letter or digit
IsAllDigits(); //Are all characters digits (- sign allowed at position 0)
AlphaPercent(); //Percentage of characters that are all alpha characters. This algorithm is great for header detection
IsAllDigitsAndContainsPeriod(); //Is all digits, AND contains period
IsAllDigitsAndContainsPeriodAndCurrency(); //Checks for currency as well
StripCurrencySymbols(); //Strip currency symbols from input
StripCurrencySymbolsAndSeparators(); //Strip currency and separators

IsScientificNotation(); //Is it scientific notation?
ToInt(); //Converts a string to an integer, ignoring alpha characters and using a fast conversion algorithm
ToLong(); //Converts a string to a long, ignoring alpha characters and using a fast conversion algorithm
StripInt(); //Strip alpha charcters leading up to an integer in a string
ToDecimal(); //Convert a string to a decimal using fast conversion logic


//Decimal info provides a lot of information about a decimal, very useful when dealing with a system with strict requirements
DecimalInfo(); //Get's the decimal information, as well returns the trailing truncated version of the string.
// ^^  Returns the precision, scale, effective precision, effective scale, reparsed result if zero truncation is enabled, if truncation occured

SplitExcelLocatorToColAndRow(); //Split an excel location to the row and column (ex, Y5)
ToBase26ExcelLookup(); //Convert an excel base 26 characters string to the unsigned int reference, 1 based
ToBase26ExcelLookup_ZeroBased(); //Convert an excel base 26 characters string to the unsigned int reference, 0 based
ToExcelColumnName(); //To excel column name from an integer
```

##


# Nested Sets

Nested Sets provide a fantastic way of traversing hierarchical data. Once processed, they are able to very rapidly walk large data trees.

Suppose you're given a list of products and are asked:

* "What products does the clothing category contain?"
* "What products are my siblings?"
* "Do I have any products under my category?"

All of these questions are easily answered by processing the list of items into a Nested Set. Once the conversion process is finished, it's very easy to query the set and it's incredibly fast.

## Example - Products

```csharp
//Adjacency list
List<Product> productList = new List<Product>
{
    //Root
    new Product() { id = 0, name = "All Products" },

    // L1 nodes
    new Product() { id = 1, parent = 0, name = "Electronics" },
    new Product() { id = 2, parent = 0, name = "Food" },
    new Product() { id = 3, parent = 0, name = "Clothing" },

    //L2 nodes
    new Product() { id = 4, parent = 1, name = "Phones" },
    new Product() { id = 5, parent = 1, name = "Televisions" },
    new Product() { id = 6, parent = 1, name = "Computers" },
    new Product() { id = 7, parent = 2, name = "Frozen" },
    new Product() { id = 8, parent = 2, name = "Fresh" },
    new Product() { id = 9, parent = 3, name = "Shirts" },
    new Product() { id = 10, parent = 3, name = "Pants" },

    //L3 nodes
    new Product() { id = 11, parent = 4, name = "Samsung" },
    new Product() { id = 12, parent = 4, name = "Apple" },
    new Product() { id = 13, parent = 4, name = "Windows" },
    new Product() { id = 14, parent = 7, name = "Pizza" },
    new Product() { id = 15, parent = 7, name = "Vegetables" },


};
```

#### Class used in this example

{% hint style="info" %}
The sample class is here

```csharp
public class Product
{
    public int id { get; set; } = 0;
    public int parent { get; set; } = 0;
    public string name { get; set; }
}
```

{% endhint %}

## SDK

### Converting the list

To convert a list of items to a nested set, simply create a new <mark style="color:blue;">**`NestedSet`**</mark> by supplying the `Root`, `ID`, and `Parent` fields.

```csharp
var nsProduct = new NestedSet<Product>(productList, 
    
    //Select the first item that has an ID of 0. This is our root.
    (l) => l.First(f => f.id == 0), 
    
    //Select the ID(key) field, and the Parent(fk) field 
    (f) => f.id, (f) => f.parent);
```

Once finished, this gives you access to all of the other query abilities

### Upline

Upline is how you traverse a tree upwards. So starting from key 15(vegetables), let's walk all the way back to "All Products".

```csharp
foreach (var item in nsProduct.Upline(15, true)) 
    Console.WriteLine($"[{item.HLevel}]({item.ID}) {item.Node.name}");

//Prints:
//[4](15) Vegetables
//[3](7) Frozen
//[2](2) Food
//[1](0) All Products
```

### Downline

Downline is how you traverse a tree downwards. So starting from key 1(electronic), let's walk all the way down.

```csharp
foreach (var item in nsProduct.Downline(1, true)) 
    Console.WriteLine($"[{item.HLevel}]({item.ID}) {item.Node.name}");

//Prints:
//[2](1) Electronics
//[3](6) Computers
//[3](5) Televisions
//[3](4) Phones
//[4](13) Windows
//[4](12) Apple
//[4](11) Samsung
```

### Siblings

Siblings is how you traverse a tree sideways. So starting from key 14(pizza), let's see what other siblings we have.

```csharp
foreach (var item in nsProduct.Siblings(14, true)) 
    Console.WriteLine($"[{item.HLevel}]({item.ID}) {item.Node.name}");

//Prints:
//[4](15) Vegetables
//[4](14) Pizza
```

### The Nested Set Node

Every item is converted by creating a new <mark style="color:blue;">**`NestedSet<T>`**</mark> class, where the generic parameter is the type of objects that were originally processed. This class provides several additional properties available for use, as well as access to the original class used to convert.

Here's an example of retrieving the root node (key 0).&#x20;

```csharp
var NestedNode_Root = nsProduct[0];
```

Let's look at some of the properties of this <mark style="color:blue;">**`NestedSet<`**</mark><mark style="color:orange;">**`Product`**</mark><mark style="color:blue;">**`>`**</mark> below.

#### ID / ParentID

These properties are assigned from the lookup. They are the ID and Parent fields from the supplied class

#### HLevel

This property is the horizontal level in the tree, starting from 1(root) to n(lowest level)

#### Left / Right

These properties are the left and right identifiers for where the node is located in the tree

#### NodeNumber

A numbered index starting from 1, moving down and across the tree

#### NodeCount

How many nodes does this node contain in it's downline, including itself.

#### Node

The original class, in our example, this is a <mark style="color:orange;">**`Product`**</mark>.


# Behavior Trees

## What is a tree?

A behavior tree allows for a complex set of requirements and tasks to be defined in such a way that a decision can be made based on an infinite number of states. \
&#x20;  Behavior Trees are used in AI, robotics, mechanical control systems, etc. We use them with [SyncAgent's ](/core-modules/event-sources/scheduled-logic/sync-agent)for fine grain execution control.&#x20;

## An example, please?

Let's break that down to something we can all follow, like programming the AI of a video game.

The AI needs to do **two** things:

* Check for enemies in the area, If there are enemies in the area, then:
  * Check if they want to attack, or can attack
  * Only if the above statement is true, move into combat range
* Check for non combat activities after checking that there is no immediate danger in the area
  * Am I hungry?
  * Am I thirsty?

The **two** state checks (enemy check, non combat check) are known as a **`list of fallbacks`**. The reason for this is that every subsequent child node in a **`Fallback`** is executed in order until one succeeds.

As almost an opposite to **`Fallback`** nodes - **`Sequence`** nodes only execute their children in order if the previous one succeeds.

{% hint style="success" %}
Use **`Fallback`** nodes for an ordered list of items to execute, where a failure moves onto the next node\
\
Use **`Sequence`** if the children need to succeed to proceed to the next node
{% endhint %}

The demo below uses simple bool variables to control state, but in a real scenario, these would be callback to check within a radius of the AI, or pull it's current hunger/thirst levels.

```csharp
bool Enemies = true;
bool Attackable = true;

bool Hungry = false;
bool Thirsty = true;

var btt = new BehaviorTree("AI").AddFallback("Activities",
    new Fallback("Check for enemies",
        new Sequence("Any enemies around?",
            new Leaf("Enemy Checker", (l) => { Console.WriteLine("Enemy Checker"); return Enemies ? NodeStatus.SUCCESS : NodeStatus.FAILURE; }),
            new Leaf("Enemy Attackable?", (l) => { Console.WriteLine("Enemy Attackable?"); return Attackable ? NodeStatus.SUCCESS : NodeStatus.FAILURE; }),
            new Leaf("Move in for combat", (l) => { Console.WriteLine("Move in for combat"); return NodeStatus.SUCCESS; }))),

     new Fallback("Non Combat Activities",
        new Sequence("Am I hungry?",
            new Leaf("Hungry test", (l) => { Console.WriteLine("Hungry test"); return Hungry ? NodeStatus.SUCCESS : NodeStatus.FAILURE; }),
            new Leaf("Hungry - eat food", (l) => { Console.WriteLine("Hungry - eat food"); return NodeStatus.SUCCESS; })),
        new Sequence("Am I Thirsty?",
            new Leaf("Thirsty test", (l) => { Console.WriteLine("Thirsty test"); return Thirsty ? NodeStatus.SUCCESS : NodeStatus.FAILURE; }),
            new Leaf("Thirsty - drink", (l) => { Console.WriteLine("Thirsty - drink"); return NodeStatus.SUCCESS; }))
    )
);
```

With that code in place, let's print and run our tree:

```csharp
Console.WriteLine(btt.Print());
var status = BTTickEngine.RunOnce(btt);
Console.WriteLine($"Status: {Enum.GetName(status)}");
```

#### Results:

If you run the code as shown above, you'll notice the last node to be executed is: \ <mark style="color:red;">**Move in for combat**</mark>.&#x20;

The reason for this is because `"Check for Enemies"` takes priority over `"Non Combat Activities"`.

#### Change the results

Let's set **`bool Enemies = false;`** and run again. The last node to run this time is:

<mark style="color:red;">**Thirsty - drink**</mark>.

That's because our fallback node didn't have any enemies to check for, and our Thirsty bool is true.

This is what makes behavior trees so powerful. Simple state management changes the outcome of what it decides to do. Perigee has a built in SDK to make working with Behavior Trees quite easy.

## SDK

### The Print() Command

The print produces a nice breakdown of the tree itself. Showing nodes and their children

```
AI (BehaviorTree)
    Activities (Fallback)
        Check for enemies (Fallback)
            Any enemies around? (Sequence)
                Enemy Checker (Leaf)
                Enemy Attackable? (Leaf)
                Move in for combat (Leaf)
        Non Combat Activities (Fallback)
            Am I hungry? (Sequence)
                Hungry test (Leaf)
                Hungry - eat food (Leaf)
            Am I Thirsty? (Sequence)
                Thirsty test (Leaf)
                Thirsty - drink (Leaf)
```

### The BTTickEngine

The tick engine runs a tree until success or failure. The run code is effectively processing the tree until it's no longer **`running`**:

```csharp
//Use the built in TickEngine
var status = BTTickEngine.RunOnce(btt);

//Or run it manually
NodeStatus st = NodeStatus.RUNNING;
while (st == NodeStatus.RUNNING)
{
    st = btt.Process();
    Task.Delay(10).Wait();
}
```

## Nodes and Types

The three main types are Fallback, Sequence, and Leaf. Leaf nodes are "special" nodes as they are the only nodes that contain a callback for code to be executed to determine the node state.

### Node States

The three states are:

* Success - It's completed.
* Processing - It's still working on it, try again...
* Failure - It failed, stop.

### Fallback&#x20;

*(Sometimes called a "Selector Node")*

Fallback nodes process children nodes in order until a child node is a success, then fall out of the loop.

### Sequence

Processes all children in order, if a child fails, it will return a failure and start back at the first child on next rerun (tick)

### Leaf

Execute code to determine what status a node is in.

## Node Operations

There are several special operations that can be performed on nodes.&#x20;

### Shuffle

You can shuffle a set of nodes by using this extension. The example below randomly shuffles whether the hunger check or the thirst check happens first

```csharp
new Fallback("Non Combat Activities",
        new Sequence("Am I hungry?",
            new Leaf("Hungry test", (l) => { Console.WriteLine("Hungry test"); return Hungry ? NodeStatus.SUCCESS : NodeStatus.FAILURE; }),
            new Leaf("Hungry - eat food", (l) => { Console.WriteLine("Hungry - eat food"); return NodeStatus.SUCCESS; })),
        new Sequence("Am I Thirsty?",
            new Leaf("Thirsty test", (l) => { Console.WriteLine("Thirsty test"); return Thirsty ? NodeStatus.SUCCESS : NodeStatus.FAILURE; }),
            new Leaf("Thirsty - drink", (l) => { Console.WriteLine("Thirsty - drink"); return NodeStatus.SUCCESS; }))
    ).Shuffle()
```

### Sort

Every node has a default **`SortOrder`** property. You can assign nodes a sort order or re-prioritize them at runtime/tree creation.&#x20;

Sort orders these in ascending order. In this example, we sort **Thirsty** above **Hungry**.

```csharp
new Fallback("Non Combat Activities",
        new Sequence("Am I hungry?", 2,
            new Leaf("Hungry test", (l) => { Console.WriteLine("Hungry test"); return Hungry ? NodeStatus.SUCCESS : NodeStatus.FAILURE; }),
            new Leaf("Hungry - eat food", (l) => { Console.WriteLine("Hungry - eat food"); return NodeStatus.SUCCESS; })),
        new Sequence("Am I Thirsty?", 1,
            new Leaf("Thirsty test", (l) => { Console.WriteLine("Thirsty test"); return Thirsty ? NodeStatus.SUCCESS : NodeStatus.FAILURE; }),
            new Leaf("Thirsty - drink", (l) => { Console.WriteLine("Thirsty - drink"); return NodeStatus.SUCCESS; }))
    ).Sort()
```

### Invert

Invert reverses statuses. Success become failure, and failure become success.

Even though the bool **`Hungry = false;`** - the inversion node inverts the node status to be **`SUCCESS`**.

```csharp
new Fallback("Non Combat Activities",
        new Sequence("Am I hungry?",
            new Leaf("Hungry test", (l) => { Console.WriteLine("Hungry test"); return Hungry ? NodeStatus.SUCCESS : NodeStatus.FAILURE; })
                .Invert(),
           
             new Leaf("Hungry - eat food", (l) => { Console.WriteLine("Hungry - eat food"); return NodeStatus.SUCCESS; })),
        new Sequence("Am I Thirsty?",
            new Leaf("Thirsty test", (l) => { Console.WriteLine("Thirsty test"); return Thirsty ? NodeStatus.SUCCESS : NodeStatus.FAILURE; }),
            new Leaf("Thirsty - drink", (l) => { Console.WriteLine("Thirsty - drink"); return NodeStatus.SUCCESS; }))
    )
```

### Retry

Retry does as it sounds, it retries the node X number of times if the node returns a FAILURE status:

You'll see `"Hungry test"` print 3 times (original + 2 retries).

```csharp
new Fallback("Non Combat Activities",
        new Sequence("Am I hungry?",
            new Leaf("Hungry test", (l) => { Console.WriteLine("Hungry test"); return Hungry ? NodeStatus.SUCCESS : NodeStatus.FAILURE; })
                .Retry(2),
            new Leaf("Hungry - eat food", (l) => { Console.WriteLine("Hungry - eat food"); return NodeStatus.SUCCESS; })),
        new Sequence("Am I Thirsty?",
            new Leaf("Thirsty test", (l) => { Console.WriteLine("Thirsty test"); return Thirsty ? NodeStatus.SUCCESS : NodeStatus.FAILURE; }),
            new Leaf("Thirsty - drink", (l) => { Console.WriteLine("Thirsty - drink"); return NodeStatus.SUCCESS; }))
    )
```

### Forces

There is both a **`ForceFailure`** and a **`ForceSuccess`** node. These are helpful when building certain trees that require a forceful response.

## Prebuilt Leaf nodes and the fluent SDK

### Fluent SDK

There are two handy built in methods for quickly creating the two kinds of trees:

```csharp
BehaviorTree.NewSequence("Conditionals", 
    LeafNodes.NetworkAvailable, 
    LeafNodes.PingSuccess);

BehaviorTree.NewFallback("Conditionals", LeafNodes.NetworkAvailable);
```

### LeafNodes

There are multiple pre-built leaf nodes available to use. They return a Leaf Node that is already pre-coded to return the correct Node Status.

#### Network

To check if the network is available

```csharp
LeafNodes.NetworkAvailable;
```

#### PingSuccess

To check if a ping to **`8.8.8.8`** is available

```csharp
LeafNodes.PingSuccess;
```

#### PingAddress

To check if the address responds positively to a ping&#x20;

```csharp
LeafNodes.PingAddress(new byte[] { 8,8,8,8});
```

#### SQLAvailable

To check if SQL Server can open a connection

```csharp
LeafNodes.SQLAvailable("connectionString");
```

#### Agent Exists

To check if an [Agent ](/core-modules/event-sources/scheduled-logic/sync-agent)exists

```csharp
LeafNodes.AgentExists("AgentName", treeHandler.AgentData);
```

#### Agent Data Expired

To check if an [Agent](/core-modules/event-sources/scheduled-logic/sync-agent) has expired data. Returns **SUCCESS** if the data is **NOT** expired.

```csharp
LeafNodes.AgentDataExpired("AgentName", treeHandler.AgentData);
```


# JsonCompress

A static class for serializing, compressing, and decompressing objects using JSON serialization and Brotli compression.

### Compress

Serializes and compresses an object using JSON serialization and Brotli compression.

#### Example:

```csharp
object data = new { Name = "John", Age = 30 };
byte[] compressedData = JsonCompress.Compress(data);
```

### Decompress

Decompresses the given byte array and deserializes it into type T.

#### Example:

```csharp
byte[] compressedData = ...; // The compressed byte array
MyClass data = JsonCompress.Decompress<MyClass>(compressedData);
```

### DecompressList

Decompresses the given byte array and deserializes it into a List of type T.

#### Example:

```csharp
byte[] compressedData = ...; // The compressed byte array
List<MyClass> dataList = JsonCompress.DecompressList<MyClass>(compressedData);
```

### EncryptCompress

Serializes, encrypts, and compresses an object using JSON serialization and Brotli compression.

#### Example:

```csharp
var obj = new MyObject();
var key = "mykey";
var iv = "myiv";

byte[] result = EncryptionHelper.EncryptCompress(obj, key, iv);
```

### DecryptDecompress

Decrypts and decompresses the given byte array and deserializes it into type T.

#### Returns:

Type T deserialized from the decompressed byte array.

#### Example:

```csharp
byte[] compressedData = GetCompressedData();
var key = "mykey";
var iv = "myiv";

MyObject obj = DecryptionHelper.DecryptDecompress<MyObject>(compressedData, key, iv);
```

### DecryptDecompressList

Decrypts and decompresses the given byte array and deserializes it into a List of type T.

#### Example:

```csharp
byte[] compressedData = GetCompressedData();
var key = "mykey";
var iv = "myiv";

List<MyObject> list = DecryptionHelper.DecryptDecompressList<MyObject>(compressedData, key, iv);
```


# Topological Sorting

TopoSort is a static class that provides functionality to perform a topological sort on a collection of items with dependencies.

## Sort

This method takes a source collection of items and a function that returns the dependencies of each item. It returns a sorted list of items based on their dependencies.

#### Example:

```csharp
var items = new List<string> { "A", "B", "C", "D" };
var dependencies = new Dictionary<string, List<string>>
{
    { "A", new List<string> { "B", "C" } },
    { "B", new List<string> { "C", "D" } },
    { "C", new List<string> { "D" } },
    { "D", new List<string>() }
};

var sortedItems = TopoSort.Sort(items, item => dependencies[item]);
// sortedItems will be ["D", "C", "B", "A"]
```


# DBDownloader

This class provides functionality for downloading data from a database and storing the result in a provided class. It supports multithreaded asynchronous calls, and allows for a queue of threaded download operations. It has automatic retry capability built in.

The type of DB Connection passed determines the database language it uses. You could for example provide a MySql connection instead.

{% hint style="info" %}
It's like saying, "Hey downloader, I have a class with several properties I want filled from my database, take care of the rest".
{% endhint %}

#### Quick implementation

```csharp
//Generate a connection string with custom properties set
string _CNS() => new SqlConnectionStringBuilder(c.GetConnectionString("main")) { Pooling = true, MaxPoolSize = 200, MultipleActiveResultSets = false, PacketSize = 32767 }.ToString();

//Create an instance of our data class with proeprties to hold results
var DataObject = new CircuitData();

//Allocate and assign with downloader extension.
var dl = Downloader.DBDownloader(DataObject, () => new SqlConnection(_CNS()))
    .Assign(f => f.circuits, "SELECT ID,Type,Name from dbo.Circuit", ConnectionPreExecute: "SET ARITHABORT ON")
    .Assign(f => f.circuitTypes, "SELECT * from util.CircuitType", ConnectionPreExecute: "SET ARITHABORT ON")
    
    //Wait can be called inline, or later! 
    //    You can proceed to do other operations until data is needed
    .Wait();

Console.WriteLine($"DL time: {dl.GetDownloadTime().TotalMilliseconds:F0}");
```

### Downloader Extension

There is an easy way to create the DBDownloader by using the static extension method.

```csharp
Downloader.DBDownloader(InClass, () => new Connection());
```

### Assign / AssignSingle

Assigns the downloaded data to a property of the base object. Can be called multiple times using fluent syntax to fill multiple properties. The downloader automatically manages the multithreaded and asyhcnronous operations for filling each property.

It uses [Dapper](https://github.com/DapperLib/Dapper) behind the scenes to perform the mapping and query execution. If you want to supply parameters, you can use the <mark style="color:blue;">`object`</mark>`Param` parameter.

If you're not assigning a list, but a single object, use `AssignSingle()`.

#### Example:

```csharp
var downloader = new DBDownloader<MyClass>(myInstance, connectionFactory);
downloader.Assign(x => x.PropertyName, "SELECT * FROM table");
```

### Wait

Waits for all download tasks to complete. This can be called inline or later right before the downloaded data is required. It is thread blocking.

#### Example:

```csharp
downloader.Wait();
```

### GetDownloadTime

Gets the total time taken for all download tasks to complete.

#### Example:

```csharp
TimeSpan totalTime = downloader.GetDownloadTime();
```

### Downloads

You can get to the list of tasks created by accessing this property.&#x20;

Every DownloadResult has properties for the success boolean, if an exception was thrown, the name of the property it set, and dates to indicate start and end times.&#x20;

```csharp
List<Task<DownloadResult>> Downloads;
```


# Bit Serializer

Perigee's proprietary serialization tool, Bit, stands out as a high-performance, high-compression module for serializing and deserializing data. Comparable to Avro or Protobuf in function but distinct in its foundation, Bit is developed entirely with a unique algorithm in 100% C# code. It is integral to several internal modules at Perigee, facilitating scenarios that demand exceptional performance and minimal disk usage.

Key Features of Bit include:

* Serialization and deserialization of classes, structs, lists, datatables, interfaced types, and properties. All without special "tagging" and pre-work
* Support for reserialization and "patching" to update data without full rewrites.
  * If the type can be serialized, you can easily "deep clone" your object tree
* Capability for partial deserialization, useful for adapting to revised data maps or focusing on specific properties.
* Built-in compression to minimize data size.
* Facilities for map reading and generation, enabling dynamic data structuring.
* Tools to generate C# classes and schemas directly from data maps.
* Very high performance serialization
* Attributes for serialization events
* Utilities for reference type patching

### How Bit Works

Bit optimizes data storage by creating a map for each property, determining the necessity of writing each field based on defaults and nullability. This selective approach, combined with the efficient compression of values, significantly reduces the size of the output byte array. In practice, this can compress lists of objects by over 95% compared to their JSON document equivalents.

### Why Choose Bit?&#x20;

Unlike many high-compression algorithms that impose strict data input conditions and support limited data types, Bit offers more flexibility. It's fully recursive, supports a wide array of common data types (including custom classes, structs, lists, dictionaries, etc.), and handles data maps without cumbersome limitations.&#x20;

It even handles Interfaced types without adding additional code. Just make sure the interfaced type has a no-parameters constructor and all will be fine!

### Maps and Resilience to Change

Bit's mapping system ensures data resilience over time. For instance, objects serialized with an initial map version (R0) can be seamlessly reserialized to a newer version (R1) as your data schema evolves. This built-in functionality simplifies the process of keeping serialized data up-to-date without the complexity often associated with such transformations.

### Compression Ratios

Bit demonstrates exceptional efficiency in data storage, achieving compression ratios of over 90% in many cases, and even up to 98% when optimizing data types and attribute usage, far surpassing the compression achieved with minimized JSON.

## An Example

Here's a simple example where we are serializing a single class that has a `string`, `ushort`, `enum`, and recursive list of related "`bit people`".&#x20;

It's extremely easy to use and Bit handles all of the data types and mapping.

```csharp
var bitPerson = new BitPerson() { 
Name = "Bandit", 
Age = 42, 
PersonType = BitPersonType.adult, 
RelatedPeople = new List<BitPerson>()
{
    new BitPerson() { Name = "Bingo", Age = 7, PersonType = BitPersonType.child }
} };

//Simple example without storing a map
byte[] ser = Bit2.Serialize(bitPerson);
BitPerson? des = Bit2.Deserialize<BitPerson>(ser);
```

#### Compression Comparison

If you take this example and compare the byte lengths of JSON to Bit, it's pretty crazy. The compression ratios get even bigger when a larger document is at play, as bit automatically tests for additional compression on larger objects.

{% code overflow="wrap" %}

```csharp
decimal compSize = Bit2.SerializeHeadless(BitPerson).Length / (decimal)JsonConvert.SerializeObject(BitPerson).Length;

// 0.108 (or a ~ tenth of the size!)
```

{% endcode %}

## Documentation

## Attributes

### Ignore

The first attribute is <mark style="color:purple;">**`Bit2Ignore`**</mark>. This tells the serializer to ignore this property and not serialize it. It is important to put this attribute on properties that are not necessary to store, or should be re-calculated after deserialization.

```csharp
public class BitPerson
{
    public string Name { get; set; }

    [Bit2Ignore]
    public string ignoreExample { get; set; } = "";
}
```

### Serialization Callbacks

There are two serialization attributes as well, they are: <mark style="color:purple;">**`Bit2PreSerialize`**</mark> and <mark style="color:purple;">**`Bit2PostDeserialize.`**</mark> These attribute allow you to specify a singular method to be called before serialization and after deserialization. &#x20;

{% hint style="success" %}
These methods must be instanced (not static) methods and the name does not matter.
{% endhint %}

```csharp
public class BitPerson
{
    public string Name { get; set; }

    [Bit2PreSerialize]
    public void PreInvoke()
    {
        //Called before serialization.
        //Null out values, or store additional information needed after deserialization
    }

    [Bit2PostDeserialize]
    public void PostDes()
    {
        //Called after deserialization. Do whatever you need here!
    }
}
```

#### PostDeserialize Example

In almsot all cases, reference types likely don't matter. In those rare cases they do, like traversing and comparing a directed graph, those reference types are very important. In this example, we fix that by:

1. &#x20;Implementing the post deserialize callback.
2. Checking if our deserialized class held it's comparer.
3. If #2 is true, calling [ReplaceReferenceTypes](#replacereferencetypes) - Which is a Bit2 utility method.

All of the adjacency lists instances are now re-referenced. If you were to call `object.ReferenceEquals(a,b)` for two nodes in this graph, it would return true!

```csharp
/// <summary>
/// This allows a deserialized graph to "patch" reference types. 
/// </summary>
[Bit2PostDeserialize]
public void PatchReferenceTypes()
{
    if (Comparer == null) return;
    
    Bit2.ReplaceReferenceTypes<T>(Comparer,
    adjacencyList.Keys.ToList(),
    adjacencyList.Select(f => f.Value).ToArray());

}
```

## Serialization Cache

For scenarios where you need extreme performance, you can achieve <mark style="color:green;">**70-250X**</mark> faster compression times using the <mark style="color:purple;">**`DeSerCache`**</mark> (Many of our sample test cases were only 2-10 microseconds).

Creating a cache is easy. Simply supply a instantiated object and let the system pre-cache the object and create a bitMap to match. Then supply these objects to any serialization / clone / deserialization calls you want.&#x20;

```csharp
var bitPerson = new BitPerson();

//Generate a cache and a mpa
var cd2 = Bit2.DeSerCacheFromObject(bitPerson);

//Serialize with the map and cache
var sk2 = Bit2.Serialize(bitPerson, cd2.map, 0, cd2.cache);
```

This is incredibly helpful if you're serializing many of the same types over and over again (like a realtime communication application or lots of data store requests).

## Serialization / Deserialization

### Deserialize

Deserializes a byte array into an instance of a class.

#### Example:

```csharp
YourClass obj = Bit2.Deserialize<YourClass>(data, map);
```

### DeserializeHeadless

Deserializes a byte array without a header into an instance of a class. Useful for data serialized without initial header bytes.

#### Example:

```csharp
YourClass obj = Bit2.DeserializeHeadless<YourClass>(data);
```

### SerializeHeadless

Serializes an object into a byte array without adding a header.

#### Example:

```csharp
byte[] data = Bit2.SerializeHeadless(obj, version);
```

### Serialize

Serializes an object into a byte array, including a header with a version.

#### Example:

```csharp
byte[] data = Bit2.Serialize(obj, version);
```

### Serialize with Map Bytes Output

Serializes an object into a byte array and outputs the bytes of the map used for serialization.

#### Example:

```csharp
byte[] mapBytes;
byte[] data = Bit2.Serialize(obj, out mapBytes, version);
```

### Reserialize

Reserializes data from one map version to another. It enables transferring data between different revisions of a map, handling changes like new fields, removed fields, or updated data types.

#### Example:

```csharp
byte[] newData = Bit2.Reserialize<YourClass>(data, oldMap, newMap);
```

### Reserialize with Modification Callback

Similar to `Reserialize`, but includes a `BeforeReserialization` callback allowing modification of the object just before reserialization.

#### Example:

```csharp
byte[] newData = Bit2.Reserialize<YourClass>(data, oldMap, newMap, obj => {
    // Modify obj here
    return obj;
});
```

### Patch

Deserializes an object, patches it using a provided callback function, and then reserializes it.

#### Example:

```csharp
byte[] patchedData = Bit2.Patch<YourClass>(data, obj => {
    // Patch obj here
}, map);
```

## Utilities

### DeepClone

Deep clone an object by serializing and deserializing with the same mapping information.

{% hint style="success" %}
Please note, this only works with properties that Bit2 is able to serialize.\
Please verify your data can be serialized properly before relying on DeepClone.
{% endhint %}

```csharp
var bitPerson = new BitPerson() 
{ 
    Name = "Bandit", 
    Age = 42, 
    PersonType = BitPersonType.adult, 
    RelatedPeople = new List() { new BitPerson() { 
        Name = "Bingo", 
        Age = 7, 
        PersonType = BitPersonType.child 
        } 
    } 
};

var anotherBandit = Bit2.DeepClone(bitPerson);
```

### ReplaceReferenceTypes

This allows you to supply an IEqualityComparer\<T>, and either one list, an array of lists, or an initial list + additional lists to replace all reference types. It uses the comparer to identify identical classes and then replaces those unique instances with references to itself.&#x20;

This is likely not necessary on most deserialized data. However, if it is necessary, you have a helper here :thumbsup:

#### Example:

```csharp
Bit2.ReplaceReferenceTypes<T>(Comparer,
    adjacencyList.Keys.ToList(),
    adjacencyList.Select(f => f.Value).ToArray());
```

### MapToCSharpByteString

Converts a map to a C# byte array string. Useful for storing maps internally for later deserialization.

#### Example:

```csharp
string mapString = Bit2.MapToCSharpByteString(typeof(YourClass), version);
```

### Map

Maps a type to a `BitMap` and optionally serializes and returns the bytes of that map.

#### Example:

```csharp
BitMap mapped;
byte[] mapBytes = Bit2.Map(typeof(YourClass), version, out mapped, true);
```

### ReadHeader

Reads the `BitHeader` from a byte array, using a maximum of 6 bytes. It also outputs the version used during serialization if available.

#### Example:

```csharp
ushort version;
BitHeader header = Bit2.ReadHeader(bytes, out version);
```

### GetMap

Converts a byte array to a `BitMap`.

#### Example:

```csharp
BitMap map = Bit2.GetMap(mapBytes);
```

### GenerateSchema

Generates a schema from a map, producing full C# classes that can be used to deserialize the data.

#### Example:

```csharp
string schema = Bit2.GenerateSchema(mapBytes);
```


# API + Perigee

Grab the code from the blueprint section for API hosting with Perigee

{% content-ref url="/pages/lNGf3TZSO5B97YPpPNWn" %}
[Perigee With .NET Hosting](/blueprints/perigee-with-.net-hosting)
{% endcontent-ref %}

## Admin controller example

In this example we create a controller that allows us to turn threads on and off.&#x20;

1. Simply add a new empty "API Controller" to the **`Controllers`** folder.&#x20;
2. Call it <mark style="color:blue;">**`AdminController.cs`**</mark>
3. Paste the code below in to replace the content&#x20;

```csharp
using Microsoft.AspNetCore.Mvc;
using Perigee;
using Perigee.Helpers;

// Visit https://docs.perigee.software to learn more
// Visit https://perigee.software to purchase a license!

namespace PerigeeIntroAPI.Controllers
{
    [Route("api/[controller]")]
    [ApiController]
    public class AdminController : ControllerBase
    {
        public ThreadRegistry reg { get; }

        public AdminController(ThreadRegistry tr)
        {
            this.reg = tr;
        }


        [HttpGet]
        public IActionResult Taskcontrol([FromQuery] string task, [FromQuery] bool start)
        {
            //Does this thread exist?
            if (reg.ContainsThreadByName(task))
            {
                if (start)
                {
                    reg.StartIfNotRunning(task); //Start if not started
                    return Ok();
                }
                else
                {
                    reg.QueueStop(task, true); //Stop and do not auto restart
                    return Ok();
                }
            }

            return BadRequest();
        }

        [Route("cron")]
        [HttpGet]
        public IActionResult cron([FromQuery] string name, [FromQuery] string cron, [FromQuery] string result)
        {
            if (reg.ContainsThreadByName(name) || string.IsNullOrEmpty(cron) || string.IsNullOrEmpty(result)) return BadRequest();

            reg.AddManagedThread(new ManagedThread(name, (ct, l) =>
            {
                l.LogInformation("result: {result}", result);
            }, cron, reg.CTS, reg.GetLogger<AdminController>()));

            return new JsonResult(new { Message = $"Will run a CRON thread named {name} {Cron.Parse(cron).ToString()}" });
        }

        [Route("delete")]
        [HttpDelete]
        public IActionResult remove([FromQuery] string name)
        {
            reg.RemoveThreadByName(name);
            return Ok();
        }

        [Route("list")]
        [HttpGet]
        public IActionResult list()
        {
            return new JsonResult(new { Threads = reg.GetThreads().Select(f => new { Name = f.Name, Runtime = f.RunTime }).ToArray() });
        }

        [Route("reboot")]
        [HttpGet]
        public IActionResult reboot()
        {
            reg.RestartAllThreads();
            return Ok();
        }

        [Route("exec")]
        [HttpGet]
        public IActionResult exec([FromQuery] string name)
        {
            reg.ExecuteCRONNow(name);
            return Ok();
        }


    }
}

```

In this example we've created a simple endpoint we can call to turn anything on or off by simply checking the thread registry for the requested thread, then turning it on or off.&#x20;

The port may be different - but you can see how easy it would be to turn something on or off!

`[GET] https://localhost:5001/api/admin?task=ProcessAgent&start=true`

{% hint style="warning" %}
Typically speaking this would be secured or unavailable outside the firewall. Don't forget to secure your endpoints!
{% endhint %}


# Name Split

In this simple example, We show how to load in a source file, split the name column into it's first and surnames, then re-save the file.&#x20;

{% hint style="success" %}
This uses the [Transformer](/transform-sdk/quick-start-guide) to load data which means it goes through the data identification, cleaning, and import process it uses. To read more about it, check out the [Transforms ](/transforms/what-is-transforms)section!

[F(x) Expressions](/core-modules/utility-classes/f-x-expressions) are powerful "formulas" you can apply to your data. Check them out to see what else you can use!
{% endhint %}

```csharp
//Read file, add first and last name
var tblname = Transformer.TableFromFile(@"InputFile.csv");
tblname.Columns.Add("FirstName", typeof(string));
tblname.Columns.Add("LastName", typeof(string));

//Run an Fx expression over both new columns, splitting up the FullName into it's first and surnames
tblname.FxTable(new Dictionary<string, string>() {
    {"FirstName", "name([FullName], 'first')" },
    { "LastName", "name([FullName], 'surname')" }});

//Resave the CSV!
File.WriteAllText(@"Outfile.csv", tblname.ToCSV());
```


# OpenAIClient (Chat GPT)

In this super simple example, we'll create and submit a request to `gpt-5.1`, in only a few lines of code.&#x20;

{% hint style="success" %}
The [OpenAIClient](/core-modules/utility-classes/openai-client-responses) is designed to be easy to use, read, and implement in your own codebase.
{% endhint %}

{% code overflow="wrap" %}

```csharp
//Declare a client
var aic = new OpenAIClient(apiKey);

//Get a response
var response = await aic.GetResponseAsync(
   OpenAIClient.GPT51("It's this easy to message AI??")
   .WithInstructions("You're a helpful assistant, respond kindly and to the point"));

//Use the built in MessageContent Property to retrieve the latest message
if (response.IsSuccessful)
    Console.WriteLine(response.Data.MessageContent);
```

{% endcode %}


# Excel Quick Load

From Data To Analyst In a Few Clicks

## Data Load

Need to take your Excel data and load it into your database to get the analysts started?  &#x20;

Instead of taking weeks to develop a new data pipeline, create structure, and work with the business to load your new client data in, just drop the file in Perigee. We will take care of everything from finding and getting the data loaded, to creating a table in only a few seconds. You’ll be a hero!  &#x20;

#### The Data

Here's a typical messed up Excel file where data is shifted and there are unwanted headers.&#x20;

<div data-full-width="true"><figure><img src="/files/vfoBsYX8YuRFvsIeXJWu" alt="Excel window showing misaligned data"><figcaption></figcaption></figure></div>

#### The Code

```csharp
using Microsoft.Extensions.Logging;
using Perigee;
using Perigee.Database.MSSQL;
using Perigee.FileFormats.Excel;
using System.Data;

// Visit https://docs.perigee.software to learn more
// Visit https://perigee.software to purchase a license!
PerigeeApplication.App("Excel Load", (c) =>
{
    //Register the "main" connection string to a credential called MSSQL.
    c.RegisterConnectionString("MSSQL", "main");
    
    c.Add("ReadFile", (ct, l) =>
    {
        //Get data from file, sheet 1.
        var tbl = Transformer.TableFromFile("SampleExcel.xlsx", sheetIndex: 1);
        tbl.TableName = "ClientData";
        
        //Load into SQL
        tbl.ProcessToSQL("MSSQL");

        //run once. 
        while (PerigeeApplication.delayOrCancel(10000, ct)) {}
    });
});
```

Taking a peak at our database, we see the data loaded into our new table **`dbo.clientData`**:

<div data-full-width="true"><figure><img src="/files/nJDTKORPGmzk4NFNaxp8" alt=""><figcaption></figcaption></figure></div>

Which came directly from the Excel file linked below

### The associated files:

The <mark style="color:orange;">**`appsettings.json`**</mark> file:

```json
{
  "ConnectionStrings": {
    "main": "data source=host; initial catalog=test; User Id=sa; Password=abc"
  },
  "AppSettings": {
  
  },
  "Perigee": { "HideConsole": false },
  "Serilog": {
    "MinimumLevel": "Debug",
    "WriteTo": [
      { "Name": "Console" }
    ]
  }
}
```

The <mark style="color:orange;">**`SampleExcel`**</mark> file we loaded:

{% file src="/files/nNseCS4IvJLN1gYFhar7" %}


# SalesForce Watcher

## SalesForce Demo

To see the full demonstration of connecting to SalesForce, see the page dedicated to the SalesForce Connector

{% content-ref url="/pages/swMbXNPWQPzrCSDLJhus" %}
[SalesForce](/core-modules/event-sources/watchers/salesforce)
{% endcontent-ref %}

```csharp
PerigeeApplication.ApplicationNoInit("SalesForce Demo", (c) => {

    //Replace the details here
    var x509 = new X509Certificate2();
    
    c.AddSalesForceWatch<SFAccount>("WatchAccounts", "Account", "ConsumerKey", "ConsumerSecret, "User", x509, "login", 
    (ct, log, updated, deleted) => {

        //updated records, bound back to an SFAccount class
        foreach (var item in updated)
        {
            Console.WriteLine($"[{item.id}] {item.AccountName}({item.Type})");
        }

        //Deleted ID's, along with the deleted date
        foreach (var item in deleted)
        {
            Console.WriteLine($"{item.id} - {item.deletedDate:G}");
        }

    });

});
```


# Report Scheduler

Let's say your web app allows users to schedule reports to email off. These items are configurable and the user can add or remove them at any time.

* The front-end web app saves a database record back with all the information needed to run the specific report and it's parameters.
* Then the [Scheduler](/core-modules/event-sources/scheduled-logic/scheduler) reads the table for those database records every few minutes and updates, removes, reschedules any changed items.
* You get a simple callback when it's time to execute the event task

### Demo Scheduler

The demo below hooks up everything but actually generating reports, and [emailing](/core-modules/alert-managers/email) them off.&#x20;

* The `RunType` argument could easily contain what reports to generate.
* The `RunArgs` could easily contain additional user information like who it's being sent to, a database ID of the job to lookup, etc. &#x20;

{% code lineNumbers="true" %}

```csharp
PerigeeApplication.ApplicationNoInit("Demo Scheduler", (c) =>
{
   
    //Declare a new memory source, remember to use a single instance of memory/file based sources or locking can occur
    using var MemSource = new MemoryScheduledSource("memSource.json", c.CTS.Token);

    //Add scheduled items.
    //If this was something like a DatabaseScheduledSource, we obviously would control these records from the database, not here.
    MemSource.AddIfNotExists(GenericScheduledItem<ushort>.MemoryItem(0, "A scheduler, 15sec", "A", "a;b;c", "*/15 * * * * *", TimeZoneInfo.Local));
    MemSource.AddIfNotExists(GenericScheduledItem<ushort>.MemoryItem(1, "B scheduler, 45sec", "B", "b;c;d", "45 * * * * *", TimeZoneInfo.Local));

    //Add a scheduler with the MemorySource, a single callback is given for anything required to run (multi-threaded)
    c.AddScheduler("Main", MemSource, (ct, l, item) => { 
        if (item.GetRunType() == "A")
        {
            l.LogInformation("Running A with {args}", item.GetRunArgs());
        }
        else if (item.GetRunType() == "B")
        {
            l.LogInformation("Running B with {args}", item.GetRunArgs());
        }

    });

});
```

{% endcode %}

{% hint style="info" %}
The demo code uses the [**`Memory Scheduler`**](#memory-source) as it does not require a remote source. Typically speaking you would tie the event task descriptions back to a database record (like the MSSQL Scheduler Source).
{% endhint %}

* <mark style="color:blue;">**Line 5**</mark> - Declare a new event source. This demo uses the memory scheduler.
* <mark style="color:blue;">**Line 9-10**</mark> - Add the two scheduled items, A, and B, to schedule and execute
* <mark style="color:blue;">**Line 13**</mark> - Add a scheduler using the source we defined, and declare the callback.
  * You're given a <mark style="color:orange;">**CancellationToken**</mark> for respecting graceful shutdown event.
  * An <mark style="color:orange;">**ILogger**</mark> for logging to the system and defined sink sources.
  * And the <mark style="color:orange;">**GenericScheduledItem\<ushort>**</mark> Which is the interfaced item that allows you to access it's definition values.
* <mark style="color:blue;">**Line 14**</mark> - You can execute or perform any tasks you need. Like generating a report with parameters.
  * You can see the call to `GetRunType()`. There's also `GetRunArgs()`, `GetLastRunDate()`, `GetName()`, etc.

##


# Agent Data Synchronization

## Resources

{% embed url="<https://youtu.be/D39yYVudaNk>" %}

## Sync Agents

Sync agents are a more powerful and configurable ways of defining tasks that must perform under a given sequence, dependency tree, or schedule. They can be configured in a number of ways that allow for very complex and fine grain control over how and when they execute.

A few of examples of why we would use a sync agent:

* A task or job needs to be fired at a given time
* We need the ability to schedule something in a different time zone
* We want to request that an agent performs it's refresh from a remote source (like a database)
* The task is dependant on other tasks completing
* We have data that may expire if not kept current
* We need to supply multiple CRON strings to specify which times the task runs
* We need to supply a blackout range where the task should not be executed

### Agent callbacks

Agents have several main blocks to them, they are as follows:

1. The first callback is the configuration section. We can set all kinds of settings including:
   * Maximum executions per day.
   * A timespan of how often to execute
   * An array of CRON strings to specifiy when to execute
   * Blackout periods in the form of Timespan and CRON strings.
     * Setting <mark style="color:red;">**"\* 5 \* \* \*"**</mark> as a blackout CRON would disallow the agent to run during the entire fifth hour of the day (from 5:00AM to 5:59AM inclusive)
2. The execution callback
   * This callback is only ever called when the agent is in an active refresh/sync state.&#x20;
   * You can perform whatever logic you need here, and simply return exec.Complete or exec.Failure depending on the results of your process
3. Tree check callback
   * This callback is only for late binding trees, in the below example you can see how it's used to setup a behavior tree for checking previous agent runs

### Example - Three agents configuration

In the below example we configure 3 agents.&#x20;

1. The first is run every 5 seconds, once a day.
2. The second is run on the minute 0 mark, once a day.
3. The level 2 agent has a late binding dependency tree to check to determine whether the first two succeeded and the data is not expired. If this is true, then it runs

```csharp
using Microsoft.Extensions.Logging;
using Perigee;
using Perigee.AI;
using Perigee.Scheduler;

// Visit https://docs.perigee.software to learn more
// Visit https://perigee.software to purchase a license!


PerigeeApplication.ApplicationNoInit("Unparalleled Task Coordination", (c) => {

    //Clear on start, for demo purposes only
    if (File.Exists("MemAgent.json")) File.Delete("MemAgent.json");

    //Source
    var AgentSource = new SyncAgentSourceMemory("MemAgent.json", c.GetCancellationToken());
    
    /* PullData agent */
    c.AddAgent("PullData", "PullData", "Main", AgentSource, AgentRunCondition.RunIfPastDue,
        (configAgent) => configAgent.SetSyncLimitPerDay(1).SetSync(TimeSpan.FromSeconds(5)),
        (ct, l, exec) => {

            l.LogInformation("Pulling and loading data from remote source...");
            Task.Delay(2000).Wait();
            l.LogInformation("Done! Data is valid until {date}", DateTimeOffset.Now.AddDays(1));
            return exec.Complete(DateTimeOffset.Now.AddDays(1));
        },
        (ct, l, tree) => { });

    /* LoadExcel agent */
    c.AddAgent("LoadExcel", "LoadExcel", "Main", AgentSource, AgentRunCondition.RunIfPastDue,
        (configAgent) => configAgent.SetSyncLimitPerDay(1).SetSync(null, "0 */1 * * * *"),
        (ct, l, exec) => {

            l.LogInformation("Loading data from Excel...");
            Task.Delay(2000).Wait();
            l.LogInformation("Done! Data is valid until {date}", DateTimeOffset.Now.AddDays(1));
            return exec.Complete(DateTimeOffset.Now.AddDays(1));
        },
        (ct, l, tree) => { });


    /* Add an agent "ExecuteRefresh" that ONLY runs after the first two have produced valid data */
    c.AddAgent("ExecuteRefresh", "ExecuteRefresh", "Main", AgentSource, AgentRunCondition.RunIfPastDue,
        (configAgent) =>
            configAgent.SetSyncLimitPerDay(1).SetSync(TimeSpan.FromSeconds(5))
            .SetLateBindingBehaviorTrees(true, false),
        (ct, l, exec) => {

            l.LogInformation("Starting refresh of data now that all my sources have non expired data");
            Task.Delay(3000).Wait();
            l.LogInformation("Done! Data is valid until {date}", DateTimeOffset.Now.AddDays(1));

            return exec.Complete(DateTimeOffset.Now.AddDays(1));
        },
        (ct, l, tree) => {

            //Late binding tree update checker
            if (tree.TreeType == AgentTreeType.SyncTree)
            {
                var BT = new BehaviorTree("Check previous level completion").AddSequence("Check expiration",

                    //Returns success if the data is not expired, allowing the sequence check to proceed
                    LeafNodes.AgentDataExpired("PullData", tree.AgentData, l),
                    LeafNodes.AgentDataExpired("LoadExcel", tree.AgentData, l));

                //Set tree for late binding execution
                tree.UpdateTree(BT);

            }
        }, failedTreeReshcedule: TimeSpan.FromSeconds(15));

});
```


# IMAP Echo bot

The IMAP bot will scan an email box and respond with the text you sent it, as well as info about attachments.&#x20;

For more information about the imap client, see it's page linked below!

{% content-ref url="/pages/qdPoXhtlCvt7gD3f6kFE" %}
[IMAP](/core-modules/event-sources/watchers/imap)
{% endcontent-ref %}

## Demo Code

To run the demo, you would need to authenticate it properly with your email server. \
&#x20;  This demo is using SASL-OAUTH for Google GMail. If you want to supply direct username/password authentication you can do that as well.

```csharp
PerigeeApplication.ApplicationNoInit("SASL Google", (c) => {

    var SASLGoogle = MailWatcher.SASL_GoogleAPIS("fakeemailaddress@gmail.com", "mailbot_google_auth.json");
    c.AddIMAPWatcher("EmailBot", "fakeemailaddress@gmail.com", "FromMe", "smtp.gmail.com", 587, "smtp.gmail.com", 993, () => SASLGoogle, (ct, l, mail) => {

        try
        {
            if (!mail.IsAnswered)
            {
                var From = mail.FromAddresses().FirstOrDefault()?.Name ?? "";
                var SaidWhat = mail.GetOnlyInputTextBody();
                var attachments = mail.Message.Attachments.Count();

                mail.Reply(false, (b) => {

                    b.HtmlBody = $"Hello <b>{From}</b><br />  You said: {SaidWhat}<br />Attachments: {attachments}";
                    b.TextBody = $"Hello {From}\r\n  You said: {SaidWhat}\r\nAttachments: {attachments}";

                });

                mail.AddFlags(MailKit.MessageFlags.Answered | MailKit.MessageFlags.Seen);
                mail.AddLabels("bot");
            }
        }
        catch (Exception ex)
        {
            l.LogError(ex, "Uncaught exception in mail processor");
            try
            {
                mail.AddFlags(MessageFlags.Answered | MailKit.MessageFlags.Seen);
                mail.AddLabels("error");
            } catch (Exception) { }
        }

    });
});
```


# Watch and load CSVs

This example uses a file watcher to scan for CSV's and parse them into a **`DataTable`**. It prints the info about it.

```csharp
PerigeeApplication.ApplicationNoInit("Watcher Demo", (c) =>
{

    c.AddDirectoryWatch("CSV", "C:\\temp\\Watch", "*.csv", SearchOption.AllDirectories, (ct, l, path) => {

        //Read the CSV
        var CSVData = CSVReader.ToDataTable(path, out var rRes);

        //Reprt on it
        l.LogInformation("Read CSV {file}[{encoding}]. Columns/Rows: {col}/{row}; Delimiter: {delChar}; Jagged? {jagged}", 
            Path.GetFileName(path), rRes.FileEncoding.EncodingName, rRes.ColumnCount, 
            CSVData.Rows.Count, rRes.FinalDelimiter, rRes.RowShifts.Count > 0 ? "YES" : "NO");

        //You'll notice the file gets moved to the _Failed Folder (Due to DirectoryWatchFailurePolicy supplied below)
        //  Watcher expects the file to be removed after it's processed to prevent infinite loops


    }, policy: ThreadRegistry.DirectoryWatchFailurePolicy.MoveToFailedFolder);

});
```


# Graph Delegated Authorization + DataVerse

This demo shows how you would authorize a token call to Microsoft Graph for delegated permissions where a token response is required.

This setup involves an app registration in [Azure Portal](https://portal.azure.com/), as well as registered redirects and the appropriately selected API Permissions.

To run the below demo, grab the [Web Host Utilities](/blueprints/web-host-utilities) and drop it into your project.

Our redirect is `https://localhost:7201/api/token` - which is why our call to map the incoming HTTP request is `/api/token`.

```csharp
PerigeeApplication.ApplicationNoInit("GraphDemo", (c) =>
{
    //Graph and token endpoint
    var dvGraph = new GraphClient(
        c.GetValue<string>("graph:tenant"), 
        c.GetValue<string>("graph:client"), 
        c.GetValue<string>("graph:secret"), 
        c.GetValue<string>("graph:scope"), 
        c.GetValue<string>("graph:redirect"), 
        "", 
        c.GetLogger<Program>());
    
    //Add token receive endpoint
    c.AddMinimalAPI("TokenReceiver", 7201, (w) => { 
            w.MapGet("/api/token", ([FromQuery] string code, GraphClient graph) => { CredentialStore.RefreshAuthorizationCode(graph.credentialName, code); return Results.Ok("Got the new code! Thanks!"); }); }, 
            (b,s) => s.AddSingleton<GraphClient>(dvGraph));

    //Await a valid credential on load
    var cred = CredentialStore.AwaitValidCredential(dvGraph.credentialName, c.GetCancellationToken()).GetAwaiter().GetResult();
    c.GetLogger<_PerigeeStartup>().LogInformation("Authorized Account: {acc}", cred.JWTGetValue(cred.DecodeJWT(cred.Authorization), "unique_name"));

});
```

The <mark style="color:red;">`appsettings.json`</mark>:

```json
"graph": {
  "tenant": "tenantguid",
  "client": "clientguid",
  "secret": "secretkey",
  "scope": "user.read Channel.ReadBasic.All Team.ReadBasic.All offline_access",
  "redirect": "https://localhost:7201/api/token"
}
```

It's very important to include **`offline_access`** if you want to be able to refresh the token automatically.

## For DataVerse

If you're trying to communicate with DataVerse, simply change the domain and scope parameters:

```csharp
PerigeeApplication.ApplicationNoInit("GraphDemo", (c) =>
{
    //Graph and token endpoint
    var dvGraph = new GraphAPI(
        c.GetValue<string>("graph:tenant"), 
        c.GetValue<string>("graph:client"), 
        c.GetValue<string>("graph:secret"), 
        c.GetValue<string>("graph:scope"), 
        c.GetValue<string>("graph:redirect"), 
        c.GetValue<string>("graph:domain"), 
        c.GetLogger<Program>());
    
    //Add token receive endpoint
    c.AddMinimalAPI("TokenReceiver", 7201, (w) => { 
            w.MapGet("/api/token", ([FromQuery] string code, GraphClient graph) => { CredentialStore.RefreshAuthorizationCode(graph.credentialName, code); return Results.Ok("Got the new code! Thanks!"); }); }, 
            (b,s) => s.AddSingleton<GraphClient>(dvGraph));

    //Await a valid credential on load
    var cred = CredentialStore.AwaitValidCredential(dvGraph.credentialName, c.GetCancellationToken()).GetAwaiter().GetResult();
    c.GetLogger<_PerigeeStartup>().LogInformation("Authorized Account: {acc}", cred.JWTGetValue(cred.DecodeJWT(cred.Authorization), "unique_name"));
    
    //Pull DV
    var Employees = dvGraph.GetDataVerseTable<Employees>("cr521_employees");

});
```

The <mark style="color:red;">`appsettings.json`</mark>:

```json
"graph": {
  "tenant": "tenantguid",
  "client": "clientguid",
  "secret": "secretkey",
  "domain": "https://org1234567.api.crm.dynamics.com"
  "scope": "https://org1234567.api.crm.dynamics.com/.default offline_access",
  "redirect": "https://localhost:7201/api/token"
}
```


# Coordinator Demo

## Resources

{% embed url="<https://youtu.be/sJ4P4HNIO_k>" %}

## Demo Requirements

To run the below demos:

1. Create a new web api project (.NET 6+)
2. [Install Perigee](/)
3. Download the [Web Host Utilities](/blueprints/web-host-utilities) and include it as part of your project.
4. Copy, paste, and run!&#x20;

## Two-step demo:

In this demo, we have a coordinator set up to run two steps.&#x20;

The first step calls an API to submit order data. If it is a success, it will move onto the next step and log the data.

```csharp
// Visit https://docs.perigee.software to learn more
// Visit https://perigee.software to purchase a license!

//To call order, use postman or curl:
//curl https://localhost:7216/queue?number=66

PerigeeApplication.ApplicationNoInit("Coordinator", (c) =>
{
    #region Handlers
    //Declare a coordinator source - MSSQL
    //var handler = new ITransactionSource_MSSQL(c.GetConnectionString("integration"), "Order_Header", "Order_Item");

    //... Or a memory handler if you prefer local testing
    var handler = new ITransactionSource_Memory("ITSourceMemory.json", c.GetCancellationToken());

    //To clear local directory on load (for ease of testing)
    //      if (Directory.Exists($"TC{Path.DirectorySeparatorChar}OrderProcess")) Directory.Delete($"TC{Path.DirectorySeparatorChar}OrderProcess", true);
    //      if (File.Exists("ITSourceMemory.json")) File.Delete("ITSourceMemory.json");
    #endregion

    //Add a coordinator named "OrderProcess" to the system
    c.AddTransactionCoordinator("OrderProcess", handler, (ct, l, process) =>
    {
        using var client = new RestClient("https://localhost:7216");

        //MultiStep
        process.MultiStep(new string[] { "order", "report", "csv" }, MultiStepOptions.RequireInternet,
            (order) =>
            {
                //Get the initial data object, a string
                var orderString = $"O-{order.GetInitialDataObjectAs<string>()}";
                l.LogInformation("Executing order {order}", orderString);

                var rsp = order.Execute<OrderResponse>(client, new RestRequest("/order", Method.Get).AddParameter("order", orderString));
            },
            (report) =>
            {
                //Get the data object from the last step, an OrderResponse
                var order = report.GetDataObjectFromLastStepAs<OrderResponse>();
                l.LogInformation("Reporting order {@order} to record service", order);

                var rsp = report.Execute(client, new RestRequest("/report", Method.Get).AddParameter("order", order.Order).AddParameter("created", order.CreatedAt.ToString("O")));
            },
            (csv) =>
            {
                //Get the response body, since we're logging it.
                var previousResponseBody = csv.GetPreviousItem()!.ResponseBody;

                //Get the original item, "order".
                var orderItem = csv.GetItemWithName("order")!;
                l.LogInformation("Order has been completed! Response was: {body}", previousResponseBody);

                //Generate a CSV and save it to our filesystem
                var DT = new List<OrderResponse>() { JsonConvert.DeserializeObject<OrderResponse>(previousResponseBody)! }.ToDataTable();
                new CSVWriter(DT).WriteFile($"OrderCSV{Path.DirectorySeparatorChar}Order_{orderItem.TransactionID}.{orderItem.ReplayID}.csv");
                l.LogInformation("Complete! Wrote CSV to path");

                //As this isn't using .Execute, we need to set the status to complete the item, and header. 
                csv.SetStatus(TransactionStatus.Completed);
            }
        );
    }, LocalPullTimespan: TimeSpan.FromSeconds(15), RemotePullTimespan: TimeSpan.FromSeconds(60));


    //Add an API to trigger the processes
    c.AddMinimalAPI("DemoAPI", 7216, (r) =>
    {

        //To queue a new order with number
        r.MapGet("/queue", ([FromQuery] string number, TransactionCoordinator tc) =>
        {
            tc.QueueTransaction(TransactionHeader.Transaction(number, number));
            return Results.Ok("Enqueued");
        });

        //Replay an order
        r.MapGet("/replay", ([FromQuery] string number, TransactionCoordinator tc) =>
        {
            try
            {
                tc.ReplayTransaction(number);
                return Results.Ok("Replay started");
            }
            catch (Exception)
            {
                return Results.BadRequest("Couldn't replay that ID");
            }
        });

        //An API method to get an order and respond with it
        r.MapGet("/order", ([FromQuery] string order) => Results.Json(new { Order = order, CreatedAt = DateTimeOffset.Now }, statusCode: 201));
        r.MapGet("/report", ([FromQuery] string order, [FromQuery] DateTimeOffset created) => Results.Json(new { Order = order, CreatedAt = created, Status = "order successfully reported to record system" }, statusCode: 200));

    }, (b, s) => { s.AddSingleton(c.GetTransactionCoordinator("OrderProcess")!); });
    
});

public class OrderResponse { public string Order { get; set; } public DateTimeOffset CreatedAt { get; set; } }

```

### Logs

After calling the above demo with curl: `curl https://localhost:7216/queue?number=90`

{% code overflow="wrap" %}

```c
[16:42:18 INF](OrderProcess) Executing order O-90
[16:42:27 INF](OrderProcess) Reporting order {"Order": "O-90", "CreatedAt": "2023-05-10T16:42:18.4905622-04:00", "$type": "OrderResponse"} to record service
[16:42:27 INF](OrderProcess) Order has been completed! Response was: {"order":"O-90","createdAt":"2023-05-10T16:42:18.4905622-04:00","status":"order successfully reported to record system"}
[16:42:27 INF](OrderProcess) Complete! Wrote CSV to path
```

{% endcode %}

After turning off Wi-Fi access, and turning it back on:

```c
//Off
[11:43:11 INF](OrderProcess) Coordinator OrderProcess cancellation requested
[11:43:11 INF](OrderProcess) Coordinator OrderProcess cancellation complete

//Back on
[11:43:16 INF](OrderProcess) Coordinator OrderProcess starting
```


# Azure Service Bus

## Azure Service Bus Demo

This demo will allow you to connect to service bus and retrieve messages. It's configured only for 1 concurrent message at a time, but is easily configurable.

Setup and configuration for your service bus can be done on the [Azure Portal](https://portal.azure.com).

## Azure Service Bus Setup

1. Install the package: `Azure.Messaging.ServiceBus`
2. Then [install perigee](/)
3. Copy the code over and configure the settings
4. Run and modify!

```csharp
PerigeeApplication.ApplicationNoInit("SPA", (c) =>
{
    //Service processor
    c.AddAsync("Service Processor", async (ct, l) => {

        await using var clientSB = new ServiceBusClient(c.GetValue<string>("SPA:queueConnection"));
        await using ServiceBusProcessor processor = clientSB.CreateProcessor(c.GetValue<string>("SPA:queueName"), 
            new ServiceBusProcessorOptions { AutoCompleteMessages = false, MaxConcurrentCalls = 1 }
            );

        //When a message is received:
        processor.ProcessMessageAsync += async (args) =>
        {
            //TODO: Write process code here!!
            
            //Then complete
            await args.CompleteMessageAsync(args.Message);
            
            //Or abandon
            //await args.AbandonMessageAsync(args.Message); 
        };
        
        //When an uncaught error is thrown, (write good code and don't let this happen!)
        processor.ProcessErrorAsync += (args) =>
        {
            var l = c.GetLogger<ServiceBusProcessor>();
            l.LogError("Error: {Source}", args.ErrorSource);
            l.LogError("Error: {FQN}", args.FullyQualifiedNamespace);
            l.LogError("Error: {Entity}", args.EntityPath);
            l.LogError("Error: {Exception}", args.Exception.ToString());
            return Task.CompletedTask;
        };

        //Start the process and delay until cancelled
        await processor.StartProcessingAsync(ct);
        while (PerigeeApplication.delayOrCancel(5000, ct)) { }

        //Cancel request: DO NOT send token here, it will cancel the cancel operation.
        await processor.StopProcessingAsync();
        l.LogInformation("Processor stop completed");
        
    }).LinkToConfig("SPA:enabled");
});
```

And the <mark style="color:red;">**appsettings.json**</mark>:

```json
{
  "ConnectionStrings": {    
  },
  "SPA": {
    "queueConnection": "Endpoint=sb://abcdefg.servicebus.windows.net/;SharedAccessKeyName=RootManageSharedAccessKey;SharedAccessKey=ReplaceMe",
    "queueName": "myqueuedemo1",
    "enabled": true,
  },
  "Perigee": { "HideConsole": false },
  "Serilog": {
    "MinimumLevel": "Information",
    "WriteTo": [
      {
        "Name": "Console",
        "Args": {
          "outputTemplate": "[{Timestamp:HH:mm:ss} {Level:u3}]({ThreadName}) {Message:lj}{NewLine}{Exception}"
        }
      }
    ]
  }
}
```


# QuickBooks Online

## QuickBooks Online x Perigee

Working with OAuth Flow can be a double-edged sword. While it's crucial for securely accessing APIs, managing tokens, authorization state, and timeouts can be challenging. Get it wrong, and you may find yourself locked out of a resource or stuck with an expired token during an important operation.

QuickBooks Online (QBO) offers a comprehensive guide and an even better playground for developers, especially those just starting with OAuth. But, here comes the tricky part: you have to manage independent sets of authorization and refresh tokens for each authorized company (<mark style="color:purple;">**known as a realm**</mark>) within your application.

This article breaks down how to use Perigee to effortlessly manage these tokens across multiple realms.

### The Core of the Process&#x20;

The following C# code snippet is executed immediately after receiving the `RealmID` and `Code` parameters from the API callback:

```csharp
//Reach out to: https://developer.api.intuit.com/.well-known/openid_configuration
// Get the token endpoint
ThreadRegistry reg = ThreadRegistry.Instance;
string TokenEndpoint = "";

//Create a client pointing to the QBO Token Endpoint
using var authClient = new RestClient(new RestClientOptions(TokenEndpoint)
{
    Authenticator = new RestSharp.Authenticators.HttpBasicAuthenticator(
    reg.GetValue<string>("AppSettings:client_id")!,
    reg.GetValue<string>("AppSettings:client_secret")!)
});
var authReq = new RestRequest("", Method.Post);


//Add parameters
authReq.AddParameter("redirect_uri", reg.GetValue<string>("AppSettings:redirect"));
authReq.AddParameter("grant_type", "authorization_code");
authReq.AddParameter("code", code);

//Execute - Getting back an initial authorization code and refresh code. 
var rsp = authClient.ExecuteRetry<QBAuth.Tokens>(authReq, 2);

if (rsp.IsSuccessful)
{
    //Each credential is assigned a name: QBA- + realmID
    string qbaName = $"QBA-{realmId}";

    //Step 1) Persist an initial credential we received from the token callback
    CredentialStore.PersistCredential(
    new RestSharpCredentialStoreItem(new RestSharp.Authenticators.JwtAuthenticator(rsp.Data?.AccessToken ?? ""), DateTimeOffset.UtcNow.AddSeconds(rsp.Data?.ExpiresIn ?? 3000))
    {
        RefreshToken = rsp.Data?.RefreshToken,
        StoreA = rsp.Data?.IdToken,
        Environment = realmId,
        Name = qbaName
    });

    //Step 2) Register realm refresh for future usage on expiration
    CredentialStore.RegisterRefresh(qbaName, (o) =>
    {
        using var authClient = new RestClient(new RestClientOptions(TokenEndpoint)
        {
            Authenticator = new RestSharp.Authenticators.HttpBasicAuthenticator(
            reg.GetValue<string>("AppSettings:client_id")!,
            reg.GetValue<string>("AppSettings:client_secret")!)
        });
        var authReq = new RestRequest("", Method.Post);

        authReq.AddParameter("redirect_uri", reg.GetValue<string>("AppSettings:redirect")!);
        authReq.AddParameter("grant_type", "refresh_token");
        authReq.AddParameter("refresh_token", CredentialStore.GetRefreshToken(qbaName));
        var rsp = authClient.ExecuteRetry<QBAuth.Tokens>(authReq, retries: 1);

        if (rsp.IsSuccessful)
        {
            //Get previous expired credential using peek to pull environment from last run...
            var expCred = CredentialStore.PeekCredential(qbaName);

            return new RestSharpCredentialStoreItem(new RestSharp.Authenticators.JwtAuthenticator(rsp.Data?.AccessToken ?? ""), DateTimeOffset.UtcNow.AddSeconds(rsp.Data?.ExpiresIn ?? 3000))
            {
                RefreshToken = rsp.Data?.RefreshToken,
                StoreA = rsp.Data?.IdToken,
                Environment = expCred?.Environment ?? "",
            };
        }
        else
        {
            return new FaultedCredentialStoreItem($"Couldn't refresh token for realm {qbaName}, {rsp.Content}");
        }
    });
}
```

### Re-Register the Callback on Application Startup 🔄

Since each realm has its own set of authorization details, it's important to re-register the callback functions for each realm when the application restarts:

```csharp
foreach (var cred in CredentialStore.GetCredentialsByPredicate(f => f.Name.StartsWith("QBA-")))
{
    var QBAName = cred.Name;
    
    //TODO: Call the register function again listed above. It would be wise to encapsulate that mathod to use in multiple places!
}
```

### Making Authorized Realm Calls Is Simpler Than Ever&#x20;

Thanks to our prior setup with Perigee, making authorized realm calls is now a walk in the park. The system ensures that you get a freshly refreshed authorization code each time you hit an endpoint. Plus, it authorizes the call pre-emptively, reducing the risk of a failure midway through a process.

```csharp
var realmID = 123456789;

//New client (this is using sandbox, you *should* be querying the discovery endpoint for this)
using var client = new RestClient(new RestClientOptions("https://sandbox-quickbooks.api.intuit.com") {
    
    //Use the credential authenticator here, with the QBA-Realm key! Voila!!!
    Authenticator = new CredentialAuthenticator($"QBA-{realmID}")
});

var rsp = client.ExecuteRetry<CompanyInfo.QueryResponse>($"/v3/company/{realmID}/query?query=select * from CompanyInfo", retries: 3);
```

In conclusion, while OAuth can often feel like a labyrinth of tokens and authorizations, Perigee simplifies the process, making it far easier and more reliable.

Happy coding from the Perigee Team!&#x20;


# Perigee With .NET Hosting

Here's the full setup guide for a Perigee Application with included API hosting, CORS, and swagger.  You can download the completed result here:

{% file src="/files/FDcfEJHqhwVPN22ffoVr" %}

### 1- Create an ASP.NET Core Web API project

Using Visual Studio we are going to create a new project. We want to select <mark style="color:red;">**"ASP.NET Core Web API".**</mark>

<figure><img src="/files/ixloZE4VpHglRrWj5ewr" alt=""><figcaption></figcaption></figure>

### 2- Configure the application as needed

When you get to configuration, feel free to override these settings as desired. An example configuration of this is shown below.

<figure><img src="/files/J6N6j3ybHoMpymGtVxUp" alt=""><figcaption></figcaption></figure>

### 3 - Setup Program.cs

After opening <mark style="color:red;">**Program.cs**</mark> - the template created a project for us which looks like this:&#x20;

<figure><img src="/files/vaTF3qzyd68aHOCTe4ja" alt=""><figcaption></figcaption></figure>

We're going to add a few things to this basic setup to get it fully configured for Perigee.&#x20;

* We're going to add the <mark style="color:blue;">`ThreadRegistry`</mark> instance to the builder host services.
* We need to use <mark style="color:blue;">`Serilog`</mark>.
* Let's add CORS for cross origin.
* Instead of running the application in synchronous mode we capture the asynchronous task handle.&#x20;
* Pass it to Perigee.

#### The "new" Program.cs

```csharp
using Perigee;
using Serilog;

var builder = WebApplication.CreateBuilder(args);

// Add services to the container.
builder.Services.AddSingleton(ThreadRegistry.Instance);
builder.Host.UseSerilog();

//Controllers
builder.Services.AddControllers();

//SwaggerGen - https://aka.ms/aspnetcore/swashbuckle
builder.Services.AddEndpointsApiExplorer().AddSwaggerGen();

//Build / configure
var app = builder.Build();
if (app.Environment.IsDevelopment()) app.UseSwagger().UseSwaggerUI();

// HTTPS/Auth/Controllers/Cors
app.UseHttpsRedirection().UseAuthorization();
app.MapControllers();
app.UseCors(o => o.AllowAnyOrigin().AllowAnyMethod().AllowAnyHeader());
app.UseSerilogRequestLogging();

//Run async!
var taskRunner = app.RunAsync();

//Pass the taskRunner to Perigee initialization
PerigeeApplication.ApplicationNoInit("Hosted Perigee App", (c) => {

    //Add and configure away

    //Sample running config
    c.AddRecurring("Running", (c, l) => { l.LogInformation("I'm running"); });

}, HostTask: taskRunner);

/*********************************************************************/
// TODO:
// Using the package manager console, or the Nuget GUI: install-package Perigee
// Add AppSettings.json and set the "Copy To Output Directory" in the Properties inspector to "Copy Always"
/*********************************************************************/
```

### 4 - Installation

We need to install Perigee as a dependency.&#x20;

Either use the Nuget GUI or the Package Manager Console and type **`install-package Perigee`**

<figure><img src="/files/cLpOkek8IVLx3XyhDiMI" alt=""><figcaption></figcaption></figure>

### 5- AppSettings.json

{% file src="/files/gAKbErIqHwZTyg2F3Izf" %}

The <mark style="color:red;">**`AppSettings.json`**</mark> file is slightly different when using .NET hosting, as we want to turn off the debug level logging for <mark style="color:blue;">`Serilog`</mark> and <mark style="color:blue;">`AspNetcore`</mark>.&#x20;

```json
{
  "ConnectionStrings": {

  },
  "AppSettings": {

  },
  "Perigee": { "HideConsole": false },
  "Serilog": {
    "MinimumLevel": {
      "Default": "Information",
      "Override": {
        "Microsoft": "Warning",
        "System": "Warning",
        "Microsoft.AspNetCore": "Warning"
      }
    },
    "WriteTo": [
      { "Name": "Console" }
    ]
  },
  "AllowedHosts": "*"
}
```

#### File / Copy Settings

Depending on the template and .NET version you selected the appsettings.json file may or may not exist. Feel free to download and drop in the one provided if it is not automatically included. \
&#x20;  As always, make sure this is set to **"Copy Always" in the Property Inspector**.

<figure><img src="/files/khW0AK4zTkmcZqufBrba" alt=""><figcaption></figcaption></figure>

### 6- License file

Please copy your license file into the project root and set to "Copy Always"

<figure><img src="/files/v3lQ32sxVcj6dD03a3F3" alt=""><figcaption></figcaption></figure>

### Running the application

After clicking "Run" - You should see Swagger in the default browser, and the Perigee application console window with .NET hosting running.&#x20;

<figure><img src="/files/9TNGjJ7WS3E4ceZzOjIl" alt=""><figcaption></figcaption></figure>


# Web Host Utilities

Below is the file linked for web hosting utilities. They are used commonly throughout demo applications and can easily be dropped into a sample app.

{% file src="/files/jklN3cXtIusZjRQgYZtO" %}


# Plugin Load Context

Below is the plugin load context file that enables .NET core applications to hot-reload plugins from the system.

{% file src="/files/ukATxWAvJF61lzmf2rMH" %}


---

[Next Page](/llms-full.txt/1)